Welcome to the Astronomy Post! You can find resources here that complement an Waldorf astronomy main lesson block or materials you may use to create your own Astronomy unit study. Is there a difference? Yes! When astronomy is taught in the Waldorf way in grade 6, it’s taught from the perspective of the child, his senses and what’s observed from earth. The constellations and their stories are central, then the movement of the planets from the observable surface of the planet. There is awe and wonder every step of the way. When teaching from a unit study approach, often the planets are looked at in detail; their composition, revolution and number of moons are explored. Often models of the solar system are detailed from the position of being outside the realm of the solar system. While these facts are fascinating, they are not as relatable, engaging or meaningful as the study of what can be seen, perceived and experienced by the student.
The difference between the Waldorf and a Unit Study Approach to Astronomy
The Waldorf approach to Astronomy comes after the main lesson block on Mineralogy and before the physical sciences of physics and chemistry. Prior to Mineralogy and Astronomy, the young student will be exposed to the natural world through stories and experience. After interacting with the natural world through play or nature walks, the child is introduced to more formal learning in Zoology in grade 4, and Botany in grade 5.
The life sciences are introduced first to the student. Just like animal materials were introduced first in the younger grades with wool for knitting, followed by plant based materials later on and finally the mineral kingdom with metal work in high school, so too is the Waldorf child introduced to the Animal Kingdom in Zoology in grade 4, followed by The Plant World with Botany in grade 5. Also in grade 5, the Waldorf student has their first formal introduction to geometry. In grade 6, the Waldorf student continues with geometry while being introduced to the Mineral kingdom with the formal lessons in Mineralogy. From our home on Earth, we look up to the the heavens and the sky above.
The grade 6 the student now gazes up at the heavens and ponders the beauty of the sky and stars above. In all the lessons, Waldorf students are taught what can be seen or experienced through their senses while they are young. The unseen world is held until near or post puberty. With the introduction of Astronomy, once again the student receives lessons based on what is observable to the student. The first lessons are on the constellations, the seasons, the rise and setting of the sun and differences experienced in understanding time and season for various locations on the planet. Introducing Astronomy through the constellation allows a gentle, story driven, imagery rich experience before moving into the the history of astronomy, biographies of astronomers, discoveries that were made, data collected and finally the three laws of motion discovered by Johannes Kepler.
In the Waldorf approach to introducing astronomy to the grade 6 or grade 7 student, students are taught the stories behind the Constellations. Some of these stories will be familiar to the student having previously taken Greek and Roman histories and mythologies. Likewise, this is a great opportunity to introduce diversity into the curriculum by sharing stories from other cultures and peoples regarding the Constellations.
Following the introduction of the astronomy block and the stories of the constellations, we may move into observing the sun in relation to the student’s position on the planet. The sunrise and sunset is different depending on the time of year. The sunrise and sunset also differ, depending on where you are in the world. At the equator, you can easily tell the time of day as sunrise and sunset are near nearly the same every day. But you can’t tell the season as well, because at the equator there’s a little distinction between the seasons.
Conversely, closer to the poles, you might have several months of darkness in the winter when the sun does not even rise above the horizon. And, in the summer, you might have several months of sunlight as the sun does not set below the horizon. Instead in the summer, the sun circles the sky, but stays low in the horizon. Near the poles, you may not be able to tell the time of day, but you can definitely tell the season. And then, everywhere in between the equator or the polar region, we have a balance.
Following the lessons of the observable sky, the sun, the moon, latitude and longitude, we move into the study of the planets. But the study of the planets will be different than a conventional approach to astronomy. Instead of learning about the terrain and atmosphere of the planets, we are learning about their orbits. With a simple quadrant and telescope we can learn so much about the night sky. With stronger telescopes and space technology, we have come closer to the stars and planets than we ever were before. While, this is very exciting to learn about and to teach to the middle school student, the Waldorf approach would keep us focused on what is observable to the student.
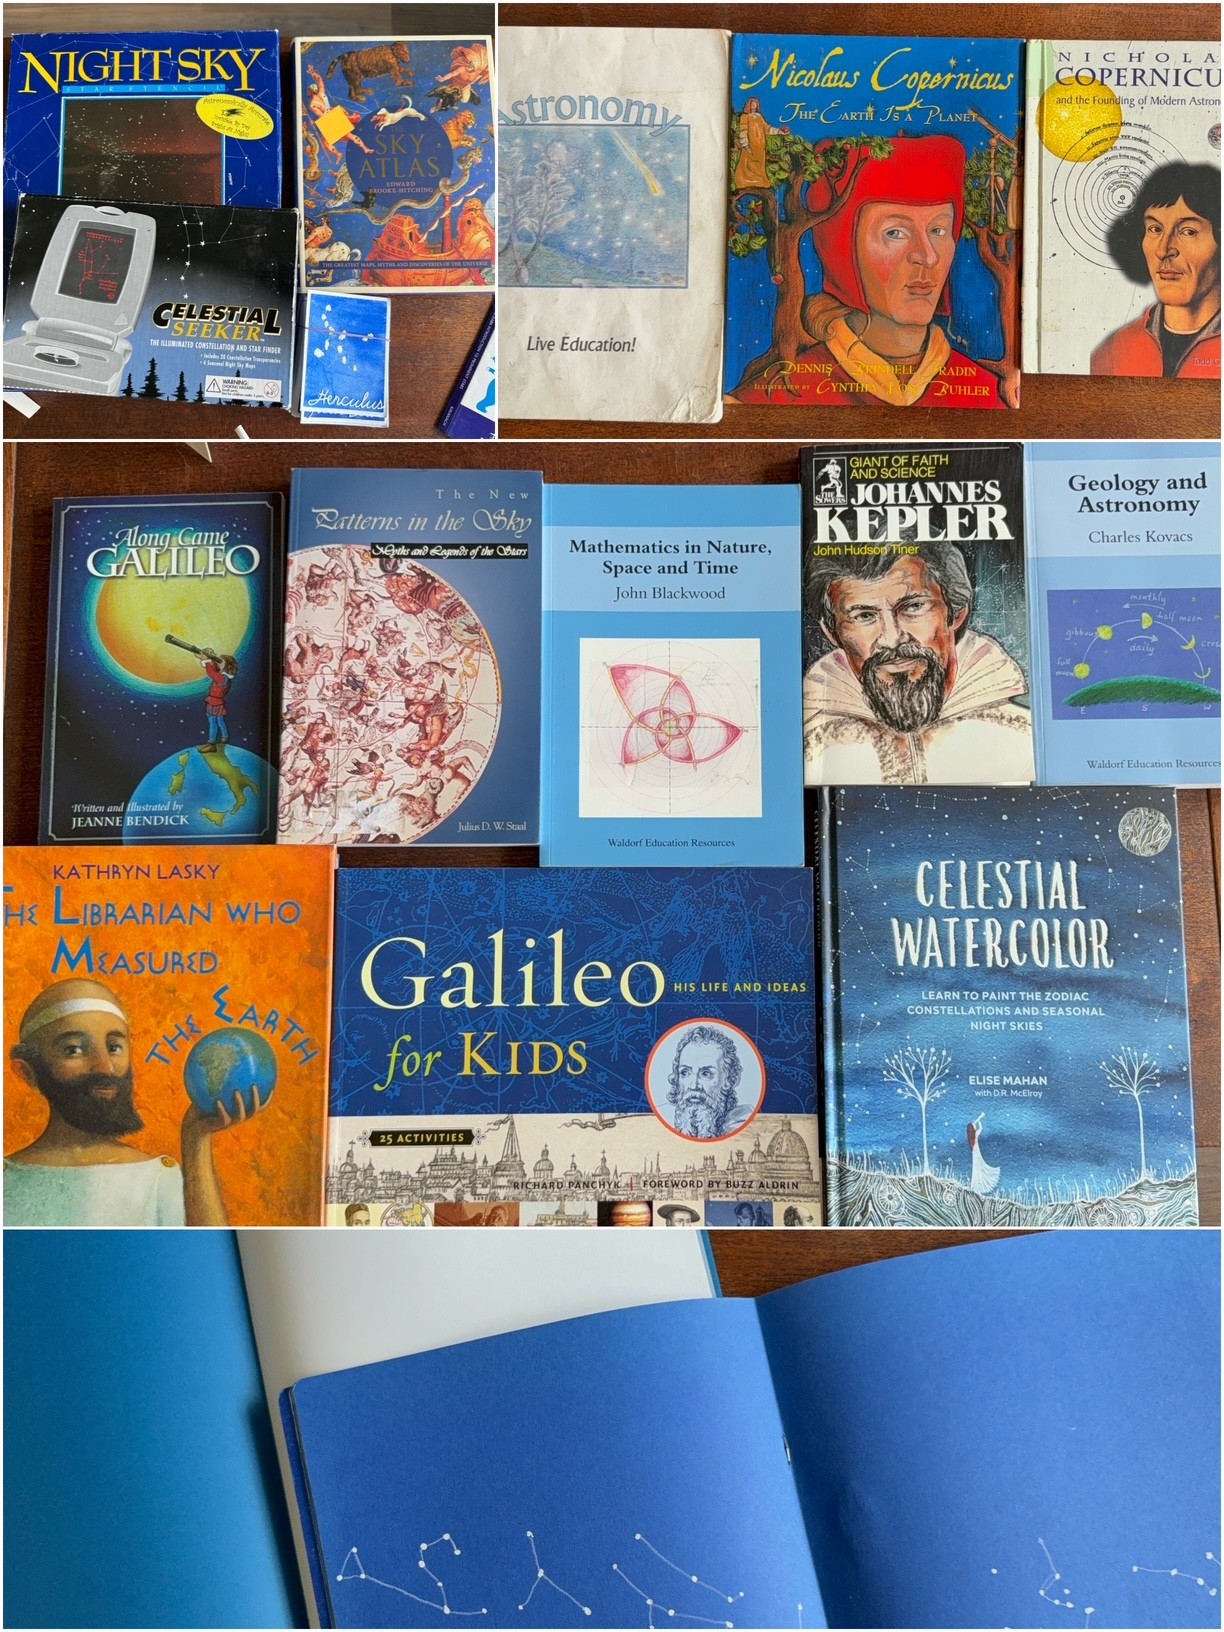
Waldorf Resources
- Waldorf main Lesson Book for Astronomy by Live Education
- Geology and Astronomy (Waldorf Education Resources) by Charles Kovacs
- Astronomy Main Lesson Book
- Celestial Watercolor: Learn to Paint the Zodiac Constellations and Seasonal Night Skies
- Galileo for Kids: His Life and Ideas, 25 Activities (Volume 17) (For Kids series)
- The Librarian Who Measured the Earth
- Along Came Galileo
- New Patterns in the Sky: Myths and Legends of the Stars
- Johannes Kepler: Giant of Faith and Science
- Ursa Major – Night Sky – DIY Stars Stencil for Ceiling – Summer Constellations
- The Sky Atlas: The Greatest Maps, Myths, and Discoveries of the Universe
- Nicolaus Copernicus: And the Founding of Modern Astronomy (Great Scientists)
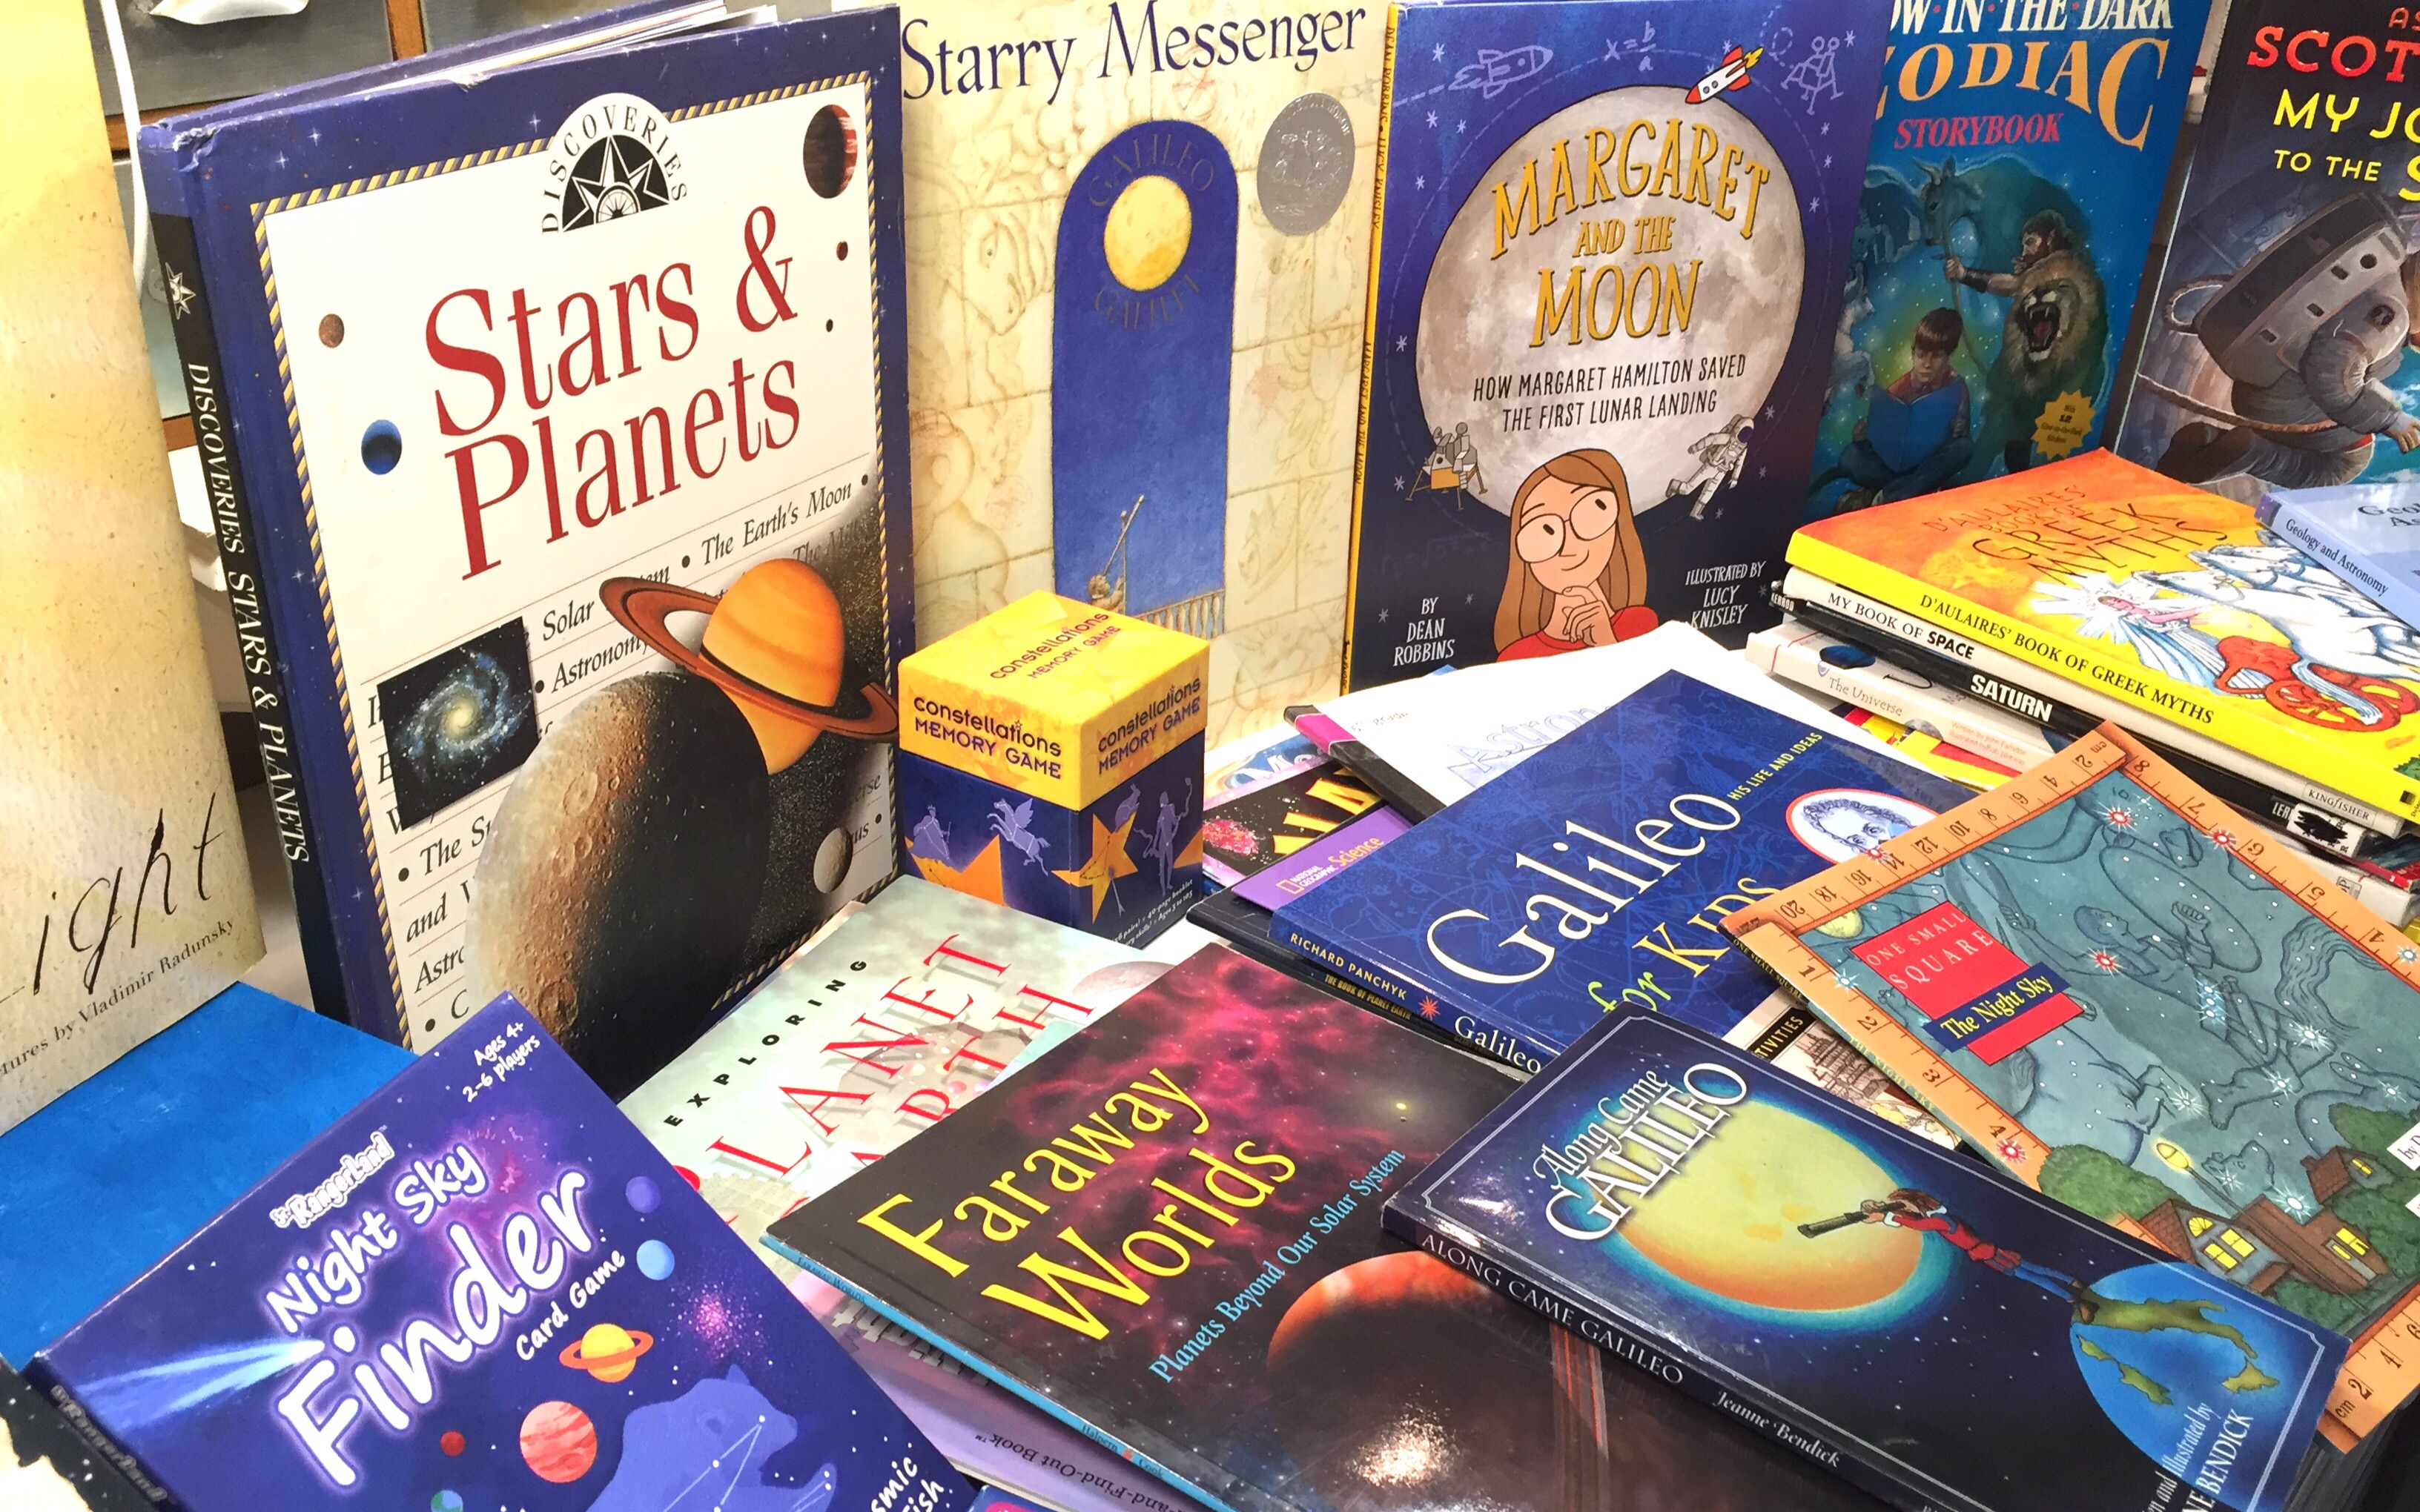
Astronomy Unit Study for Middle School
If a Waldorf approach to Astronomy isn’t what you’re looking for, maybe a unit study is just right. You may choose any duration for a unit study. You may choose to include other resources or subject areas to make your unit study holistic, or you may choose to keep it focused. However you choose to do your unit study, a lot of homeschoolers find it beneficial to have a spine text to keep their unit on track. While I have both used such a text in the past, I also have done so without one. If you choose to have a spine, I have included a number of books that would suit that option. Then, I include several, often too many, additional books to support the main text. I often homeschool multiple ages (with the exception of the last couple years of homeschooling), so including younger options like pictures books along with grade level options for middle school as been a practice of mine for many years, even decades.


Resources
- The Mysteries of the Universe: Discover the best-kept secrets of space
- Cosmos: Explore the Wonders of the Universe (DK Secret World Encyclopedias)
- Planetarium: Welcome to the Museum
- The Usborne Complete Book of Astronomy and Space
- The Mystery of Mars
- Faraway Worlds
- Space: The Definitive Visual Catalog
- Neptune by Gregory L. Vogt
- The Universe: More than 100 Questions and Answers to Things You Want to Know
- The History of Space Travel Puzzle
- Robot Explorers
- Space Exploration (DK Eyewitness Books)
- The Book of Planet Earth
- Destination Mars A Strategy Game by Discovery
- Constellation Cards by Hatching Curiosity
- Solar System to Scale Ribbon by Hatching Curiosity
- Our Star: The Sun
- Saturn (Planet Library)
- Discovering Jupiter: The Amazing Collision in Space
- A Book About Planets and Stars
- Professor Noggin’s Outer Space Trivia Card Game
How to put Together an Astronomy Unit Study
Putting together a new unit is always fun, but I have to admit that as the years go by and we circle back to familiar units, a new problem seems to emerge. Choice. What items from my own collection do I choose this time around? Our units are filled with various resources from games, to books, to projects and kits, to fiction and non-fiction books. Do we stick to old favorites or try new resources? This time around we did a short 3-week main lesson block inspired almost entirely by our Live-Education Waldorf curriculum. I will show you the materials we used for that main lesson block as well as materials we have used or plan to use for our unit study on Astronomy. We will return to our Astronomy main lesson block after we do our history units for the year. Currently, I’ve decided to split up large main lesson blocks into two smaller ones as recommended in the curriculum. The reason why we don’t do this often is that once we get engrossed into a topic area, we like to see it through before moving. Three weeks is such a short duration for our units that it seems right when we are getting into the meat of the material, it’s time to move on. However, one of the downsides to stretching a unit until all the material is covered is that there is a saturation of information and soon we just can’t squeeze anything else in. Giving a few weeks to rest between main lesson blocks means that the information learning in one main lesson block as an opportunity to be digested and processed while new different material is being learning. So, this time around, this unit will be short and only feature the material shown at the beginning of the video as well as the games and some projects. When we revisit this main lesson block, I’ll post the new updated lesson plans on my website (link below to the current 3-week lesson plan), and they will also be available on Homeschool Panda.
We’ve been homeschooling since 2003, and in that time, we’ve collected a lot of resources for our unit studies. You certainly don’t need this much. One good non-fiction book as well as some picture books, a book on mythology, some books on astronomers or scientists and some games and projects would round out a unit study very well. You can see all the projects we did for this unit for the years by checking out this playlist.
Check out the lesson plans on Homeschool Panda. Steps to import lesson plan:
- Step 1: Log into Homeschool Panda
- Step 2: Click on “Lesson Planner” from left hand pane
- Step 3: Click on “Import Lesson Plan” located on the top right
- Step 4: Paste this link and Click on “Import Lesson”
Check out the lesson plans here if you don’t use Homeschool Panda:
- Week 1 Astronomy Main Lesson Block
- Week 2 Astronomy Main Lesson Block
- Week 3 Astronomy Main Lesson Block
Find me one X, Instagram, Facebook, YouTube, and TikTok
Astronomy Chalk Drawing
We just started our Waldorf Main Lesson Block for Astronomy. And while we are primarily following the Waldorf pedagogy, we do take liberties often. For this block, we are adding in books on the planets during our opening activities. We are currently fascinated with Mars, Neptune and the moons of Jupiter. For that reason, we have included some additional astronomy books for this block.
This chalk drawing reflects those additions. The Mars landscape, atmosphere and chemical composition is not a lesson typically found in the Waldorf astronomy main lesson block. However, since this is our first chalk drawing, we decided to focus the drawing on Mars as we have been learning about the planets before we dive into the Main lessons for this block.
This chalk drawing has Olympus Mons in the background, rocky mountains the terrain the mid-ground and the Mars Rover in the foreground. Initially the sky was blue with warm tones, but it didn’t look right, so I erased it and added a pink atmosphere and cinnamon colored clouds. This chalk drawing is not as detailed as some chalk drawings and therefore only took 40 minutes.
For this chalk drawing, I made a like pencil sketch that I colored in. I used both Sargent Art square chalk pastels and Mercurius 12-set and 16-set chalks. The Mercurius sets did not include black or white so I took those from my Sargent Art set.
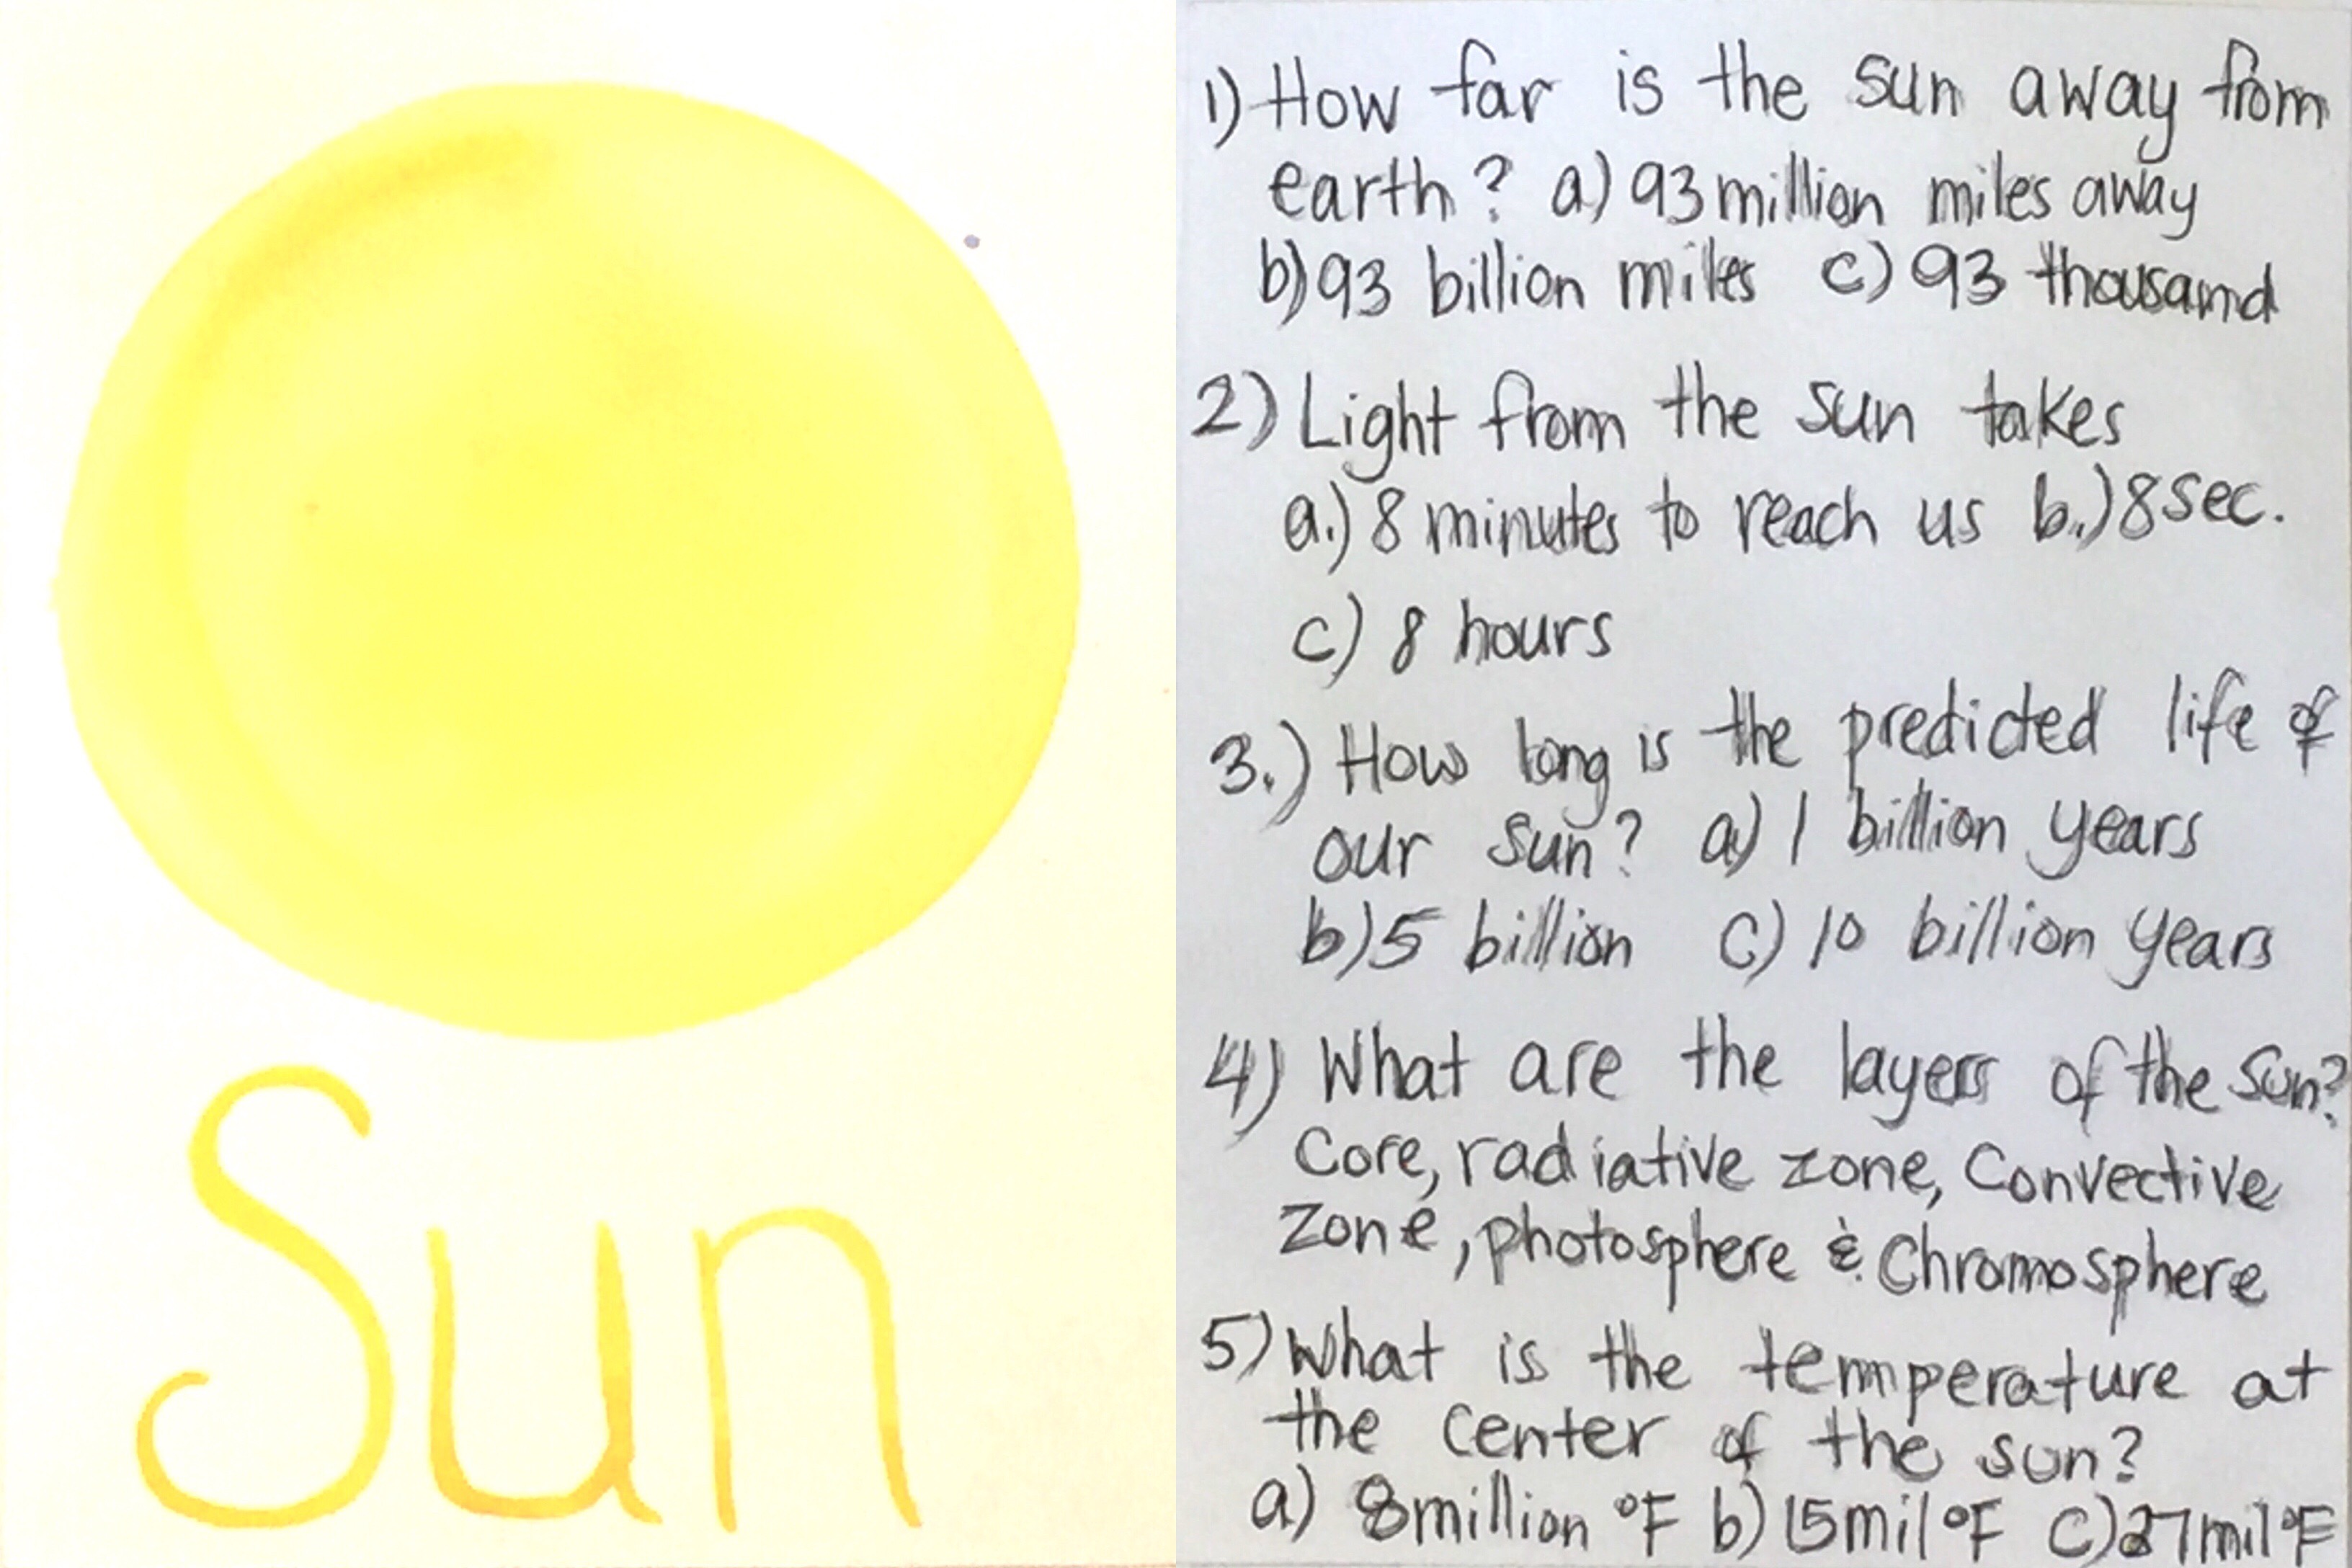
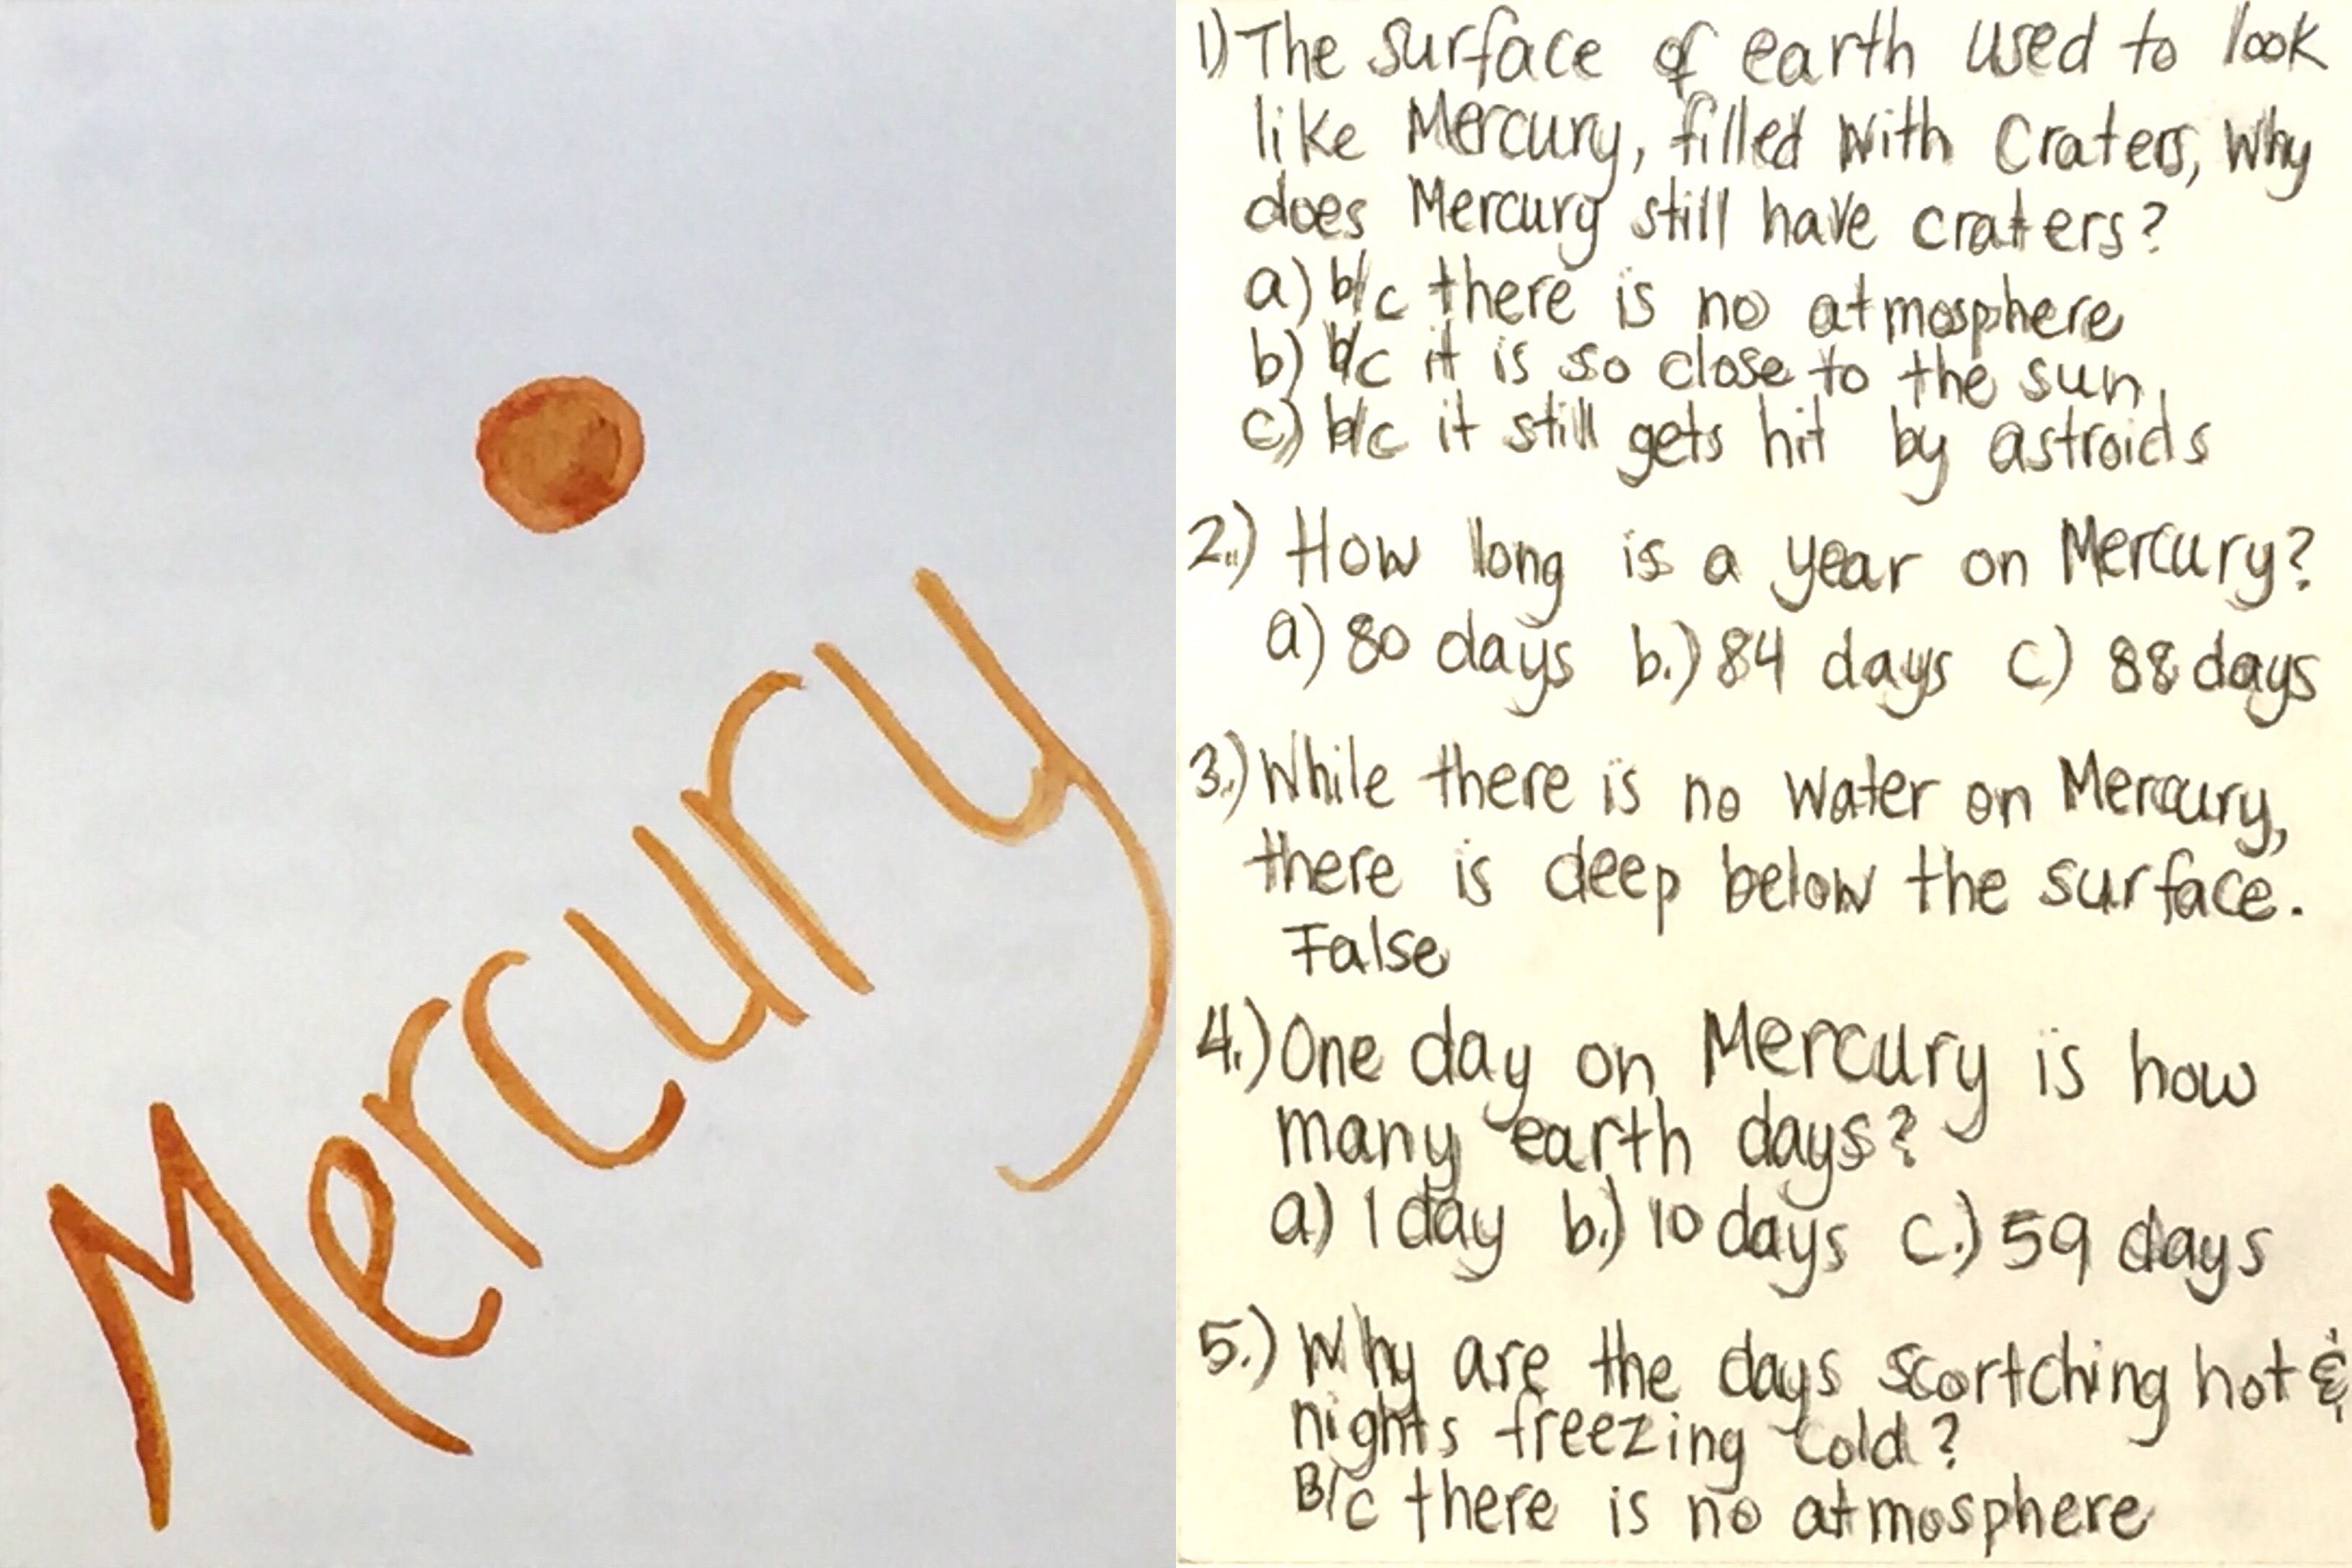
Astronomy Trivia Card
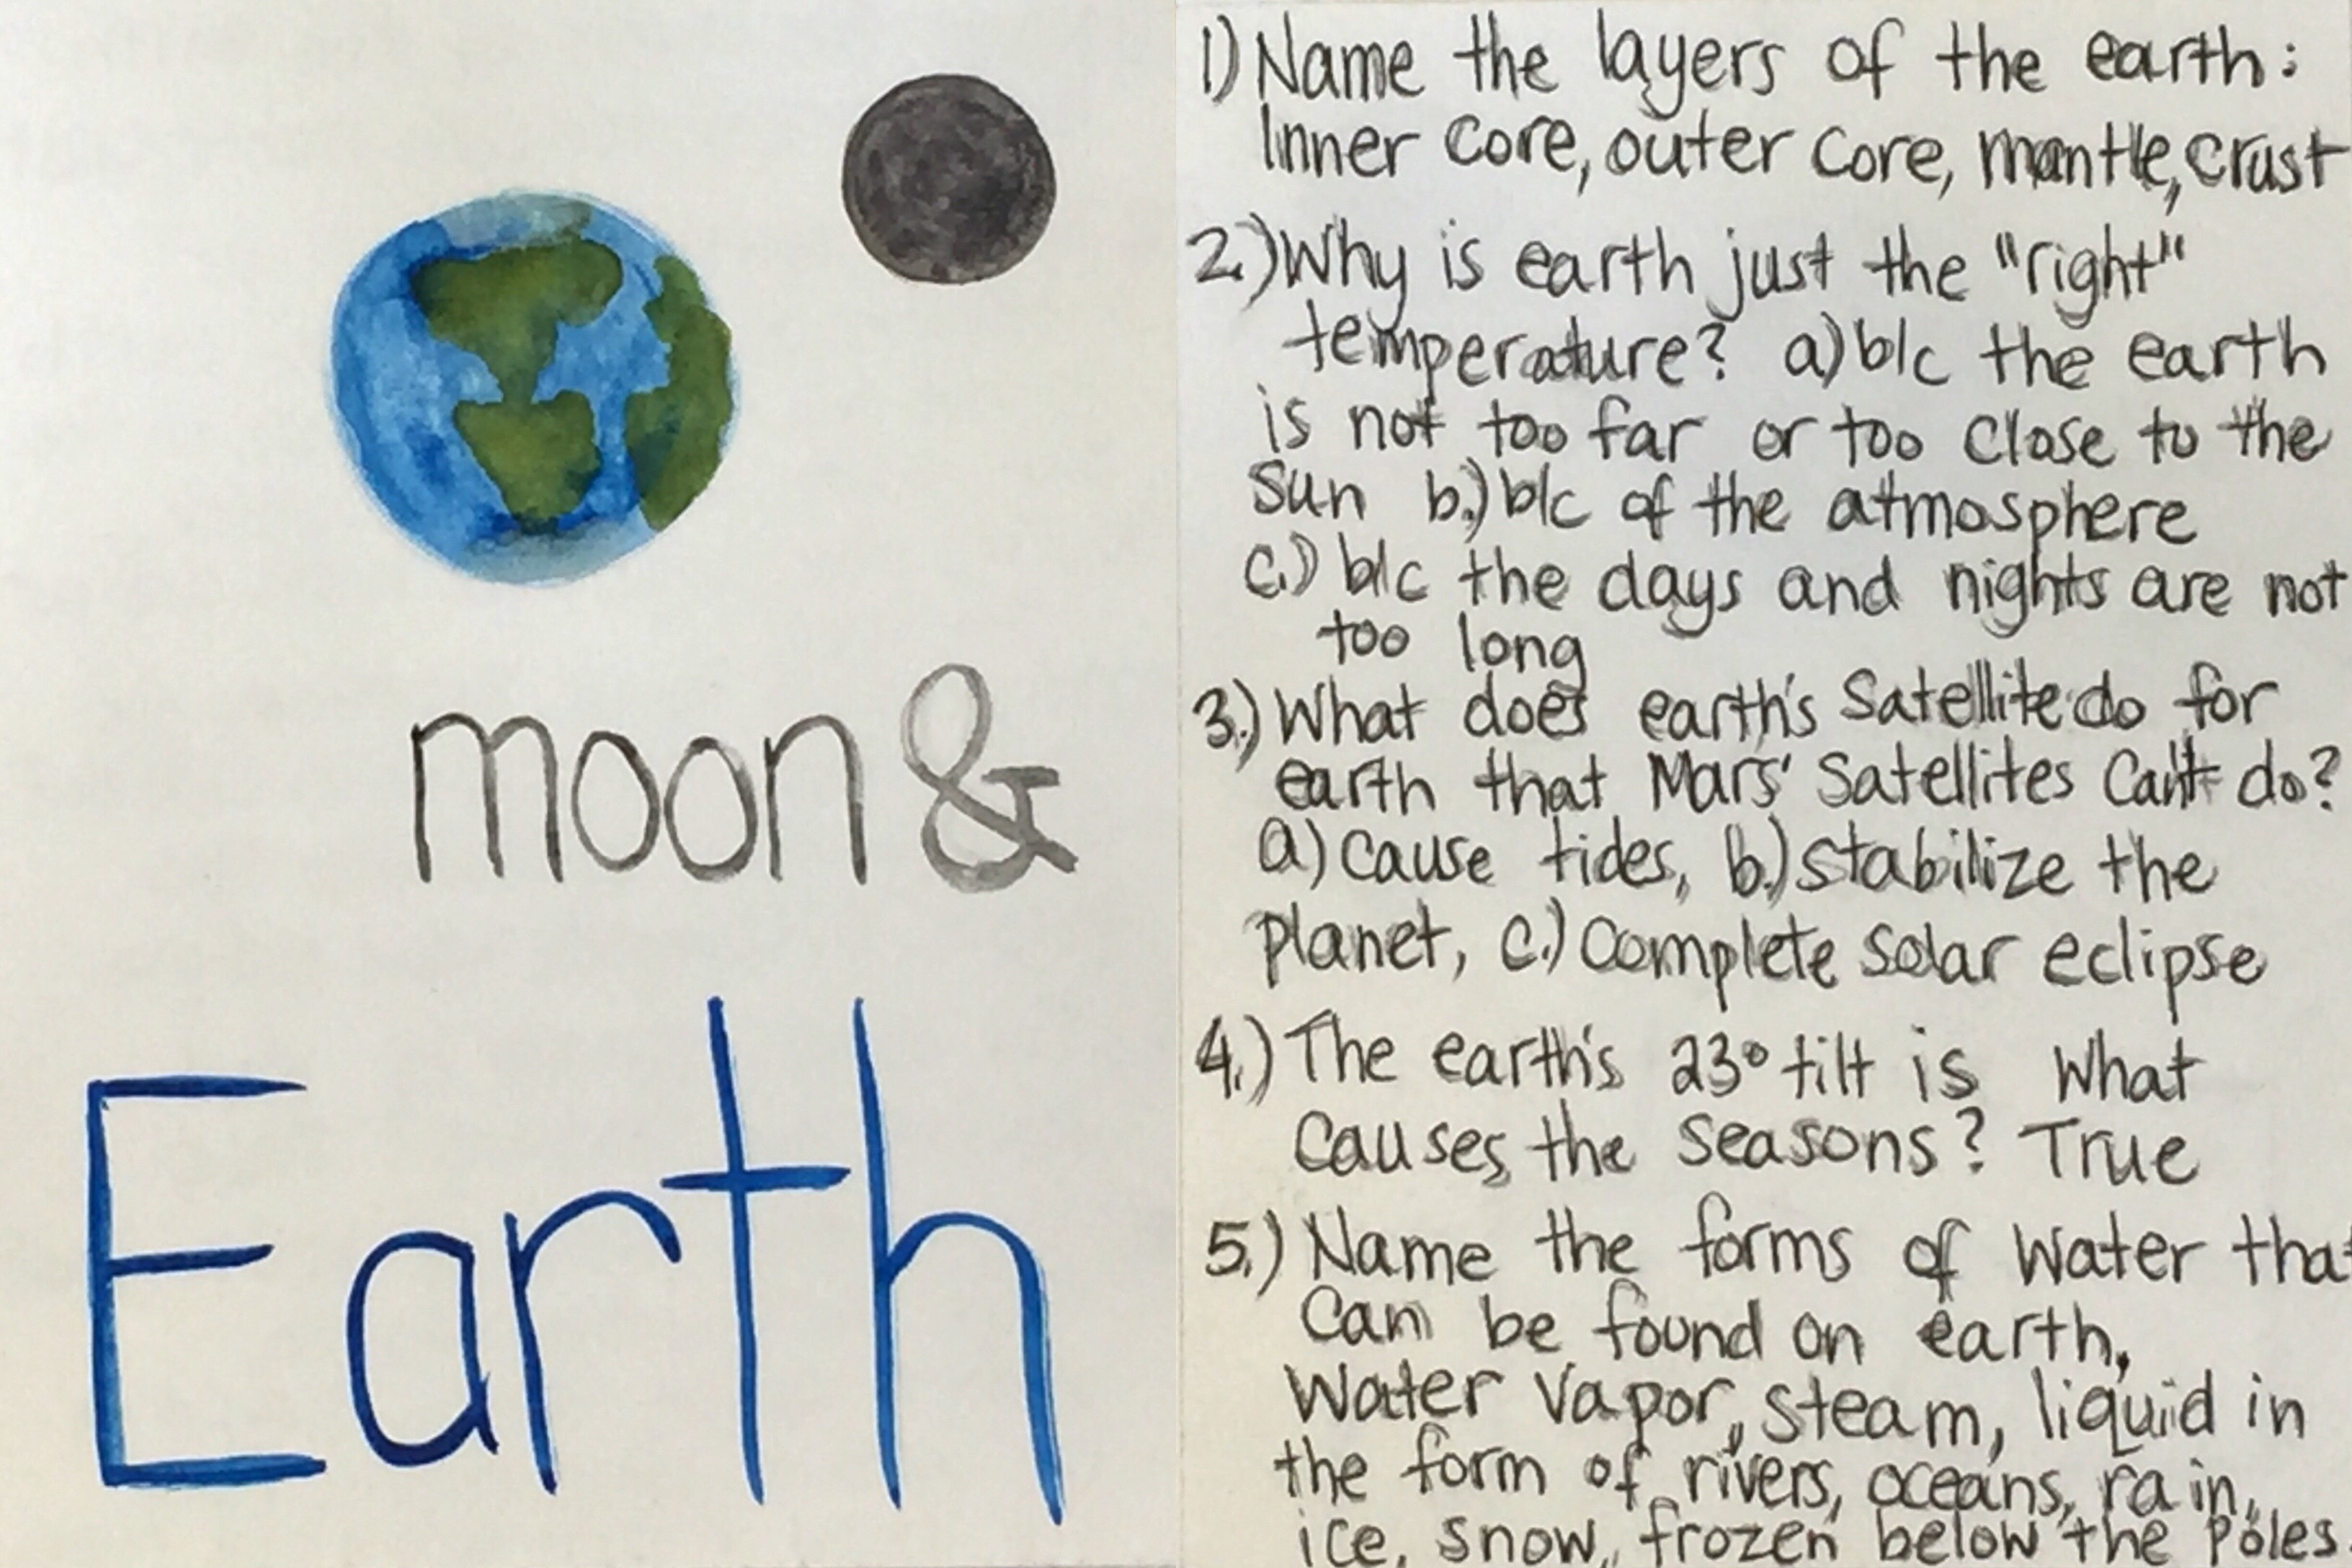
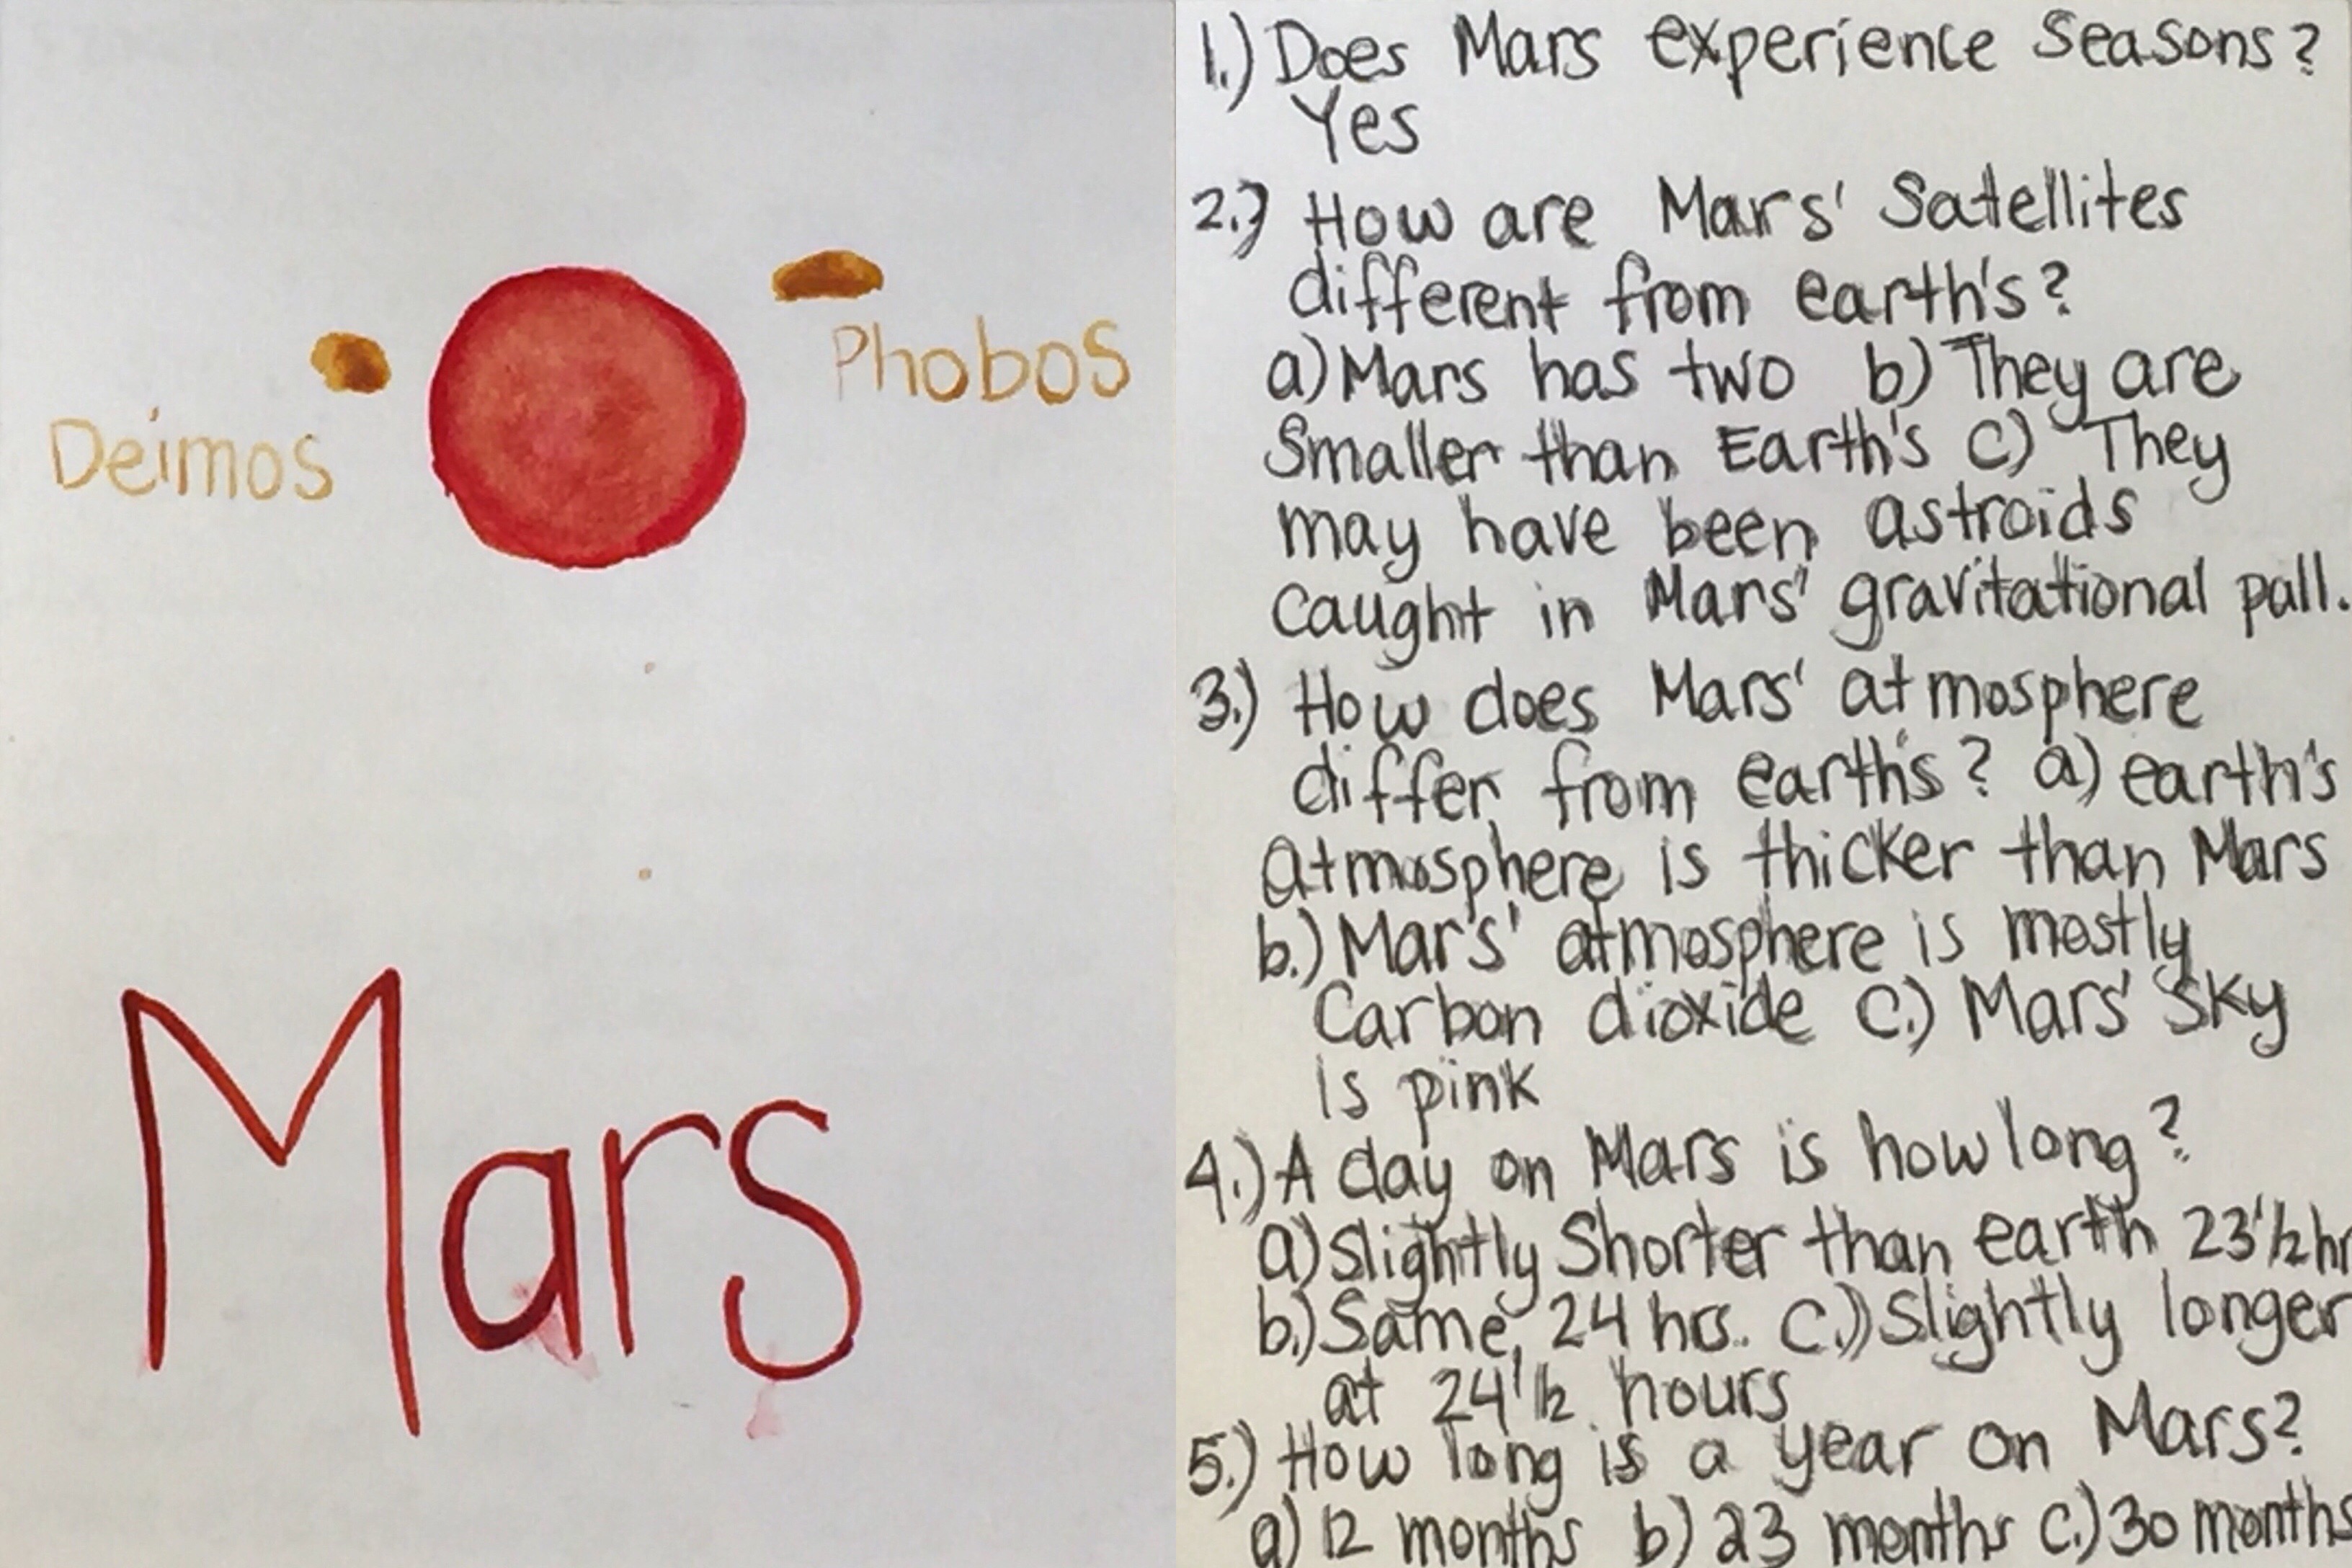
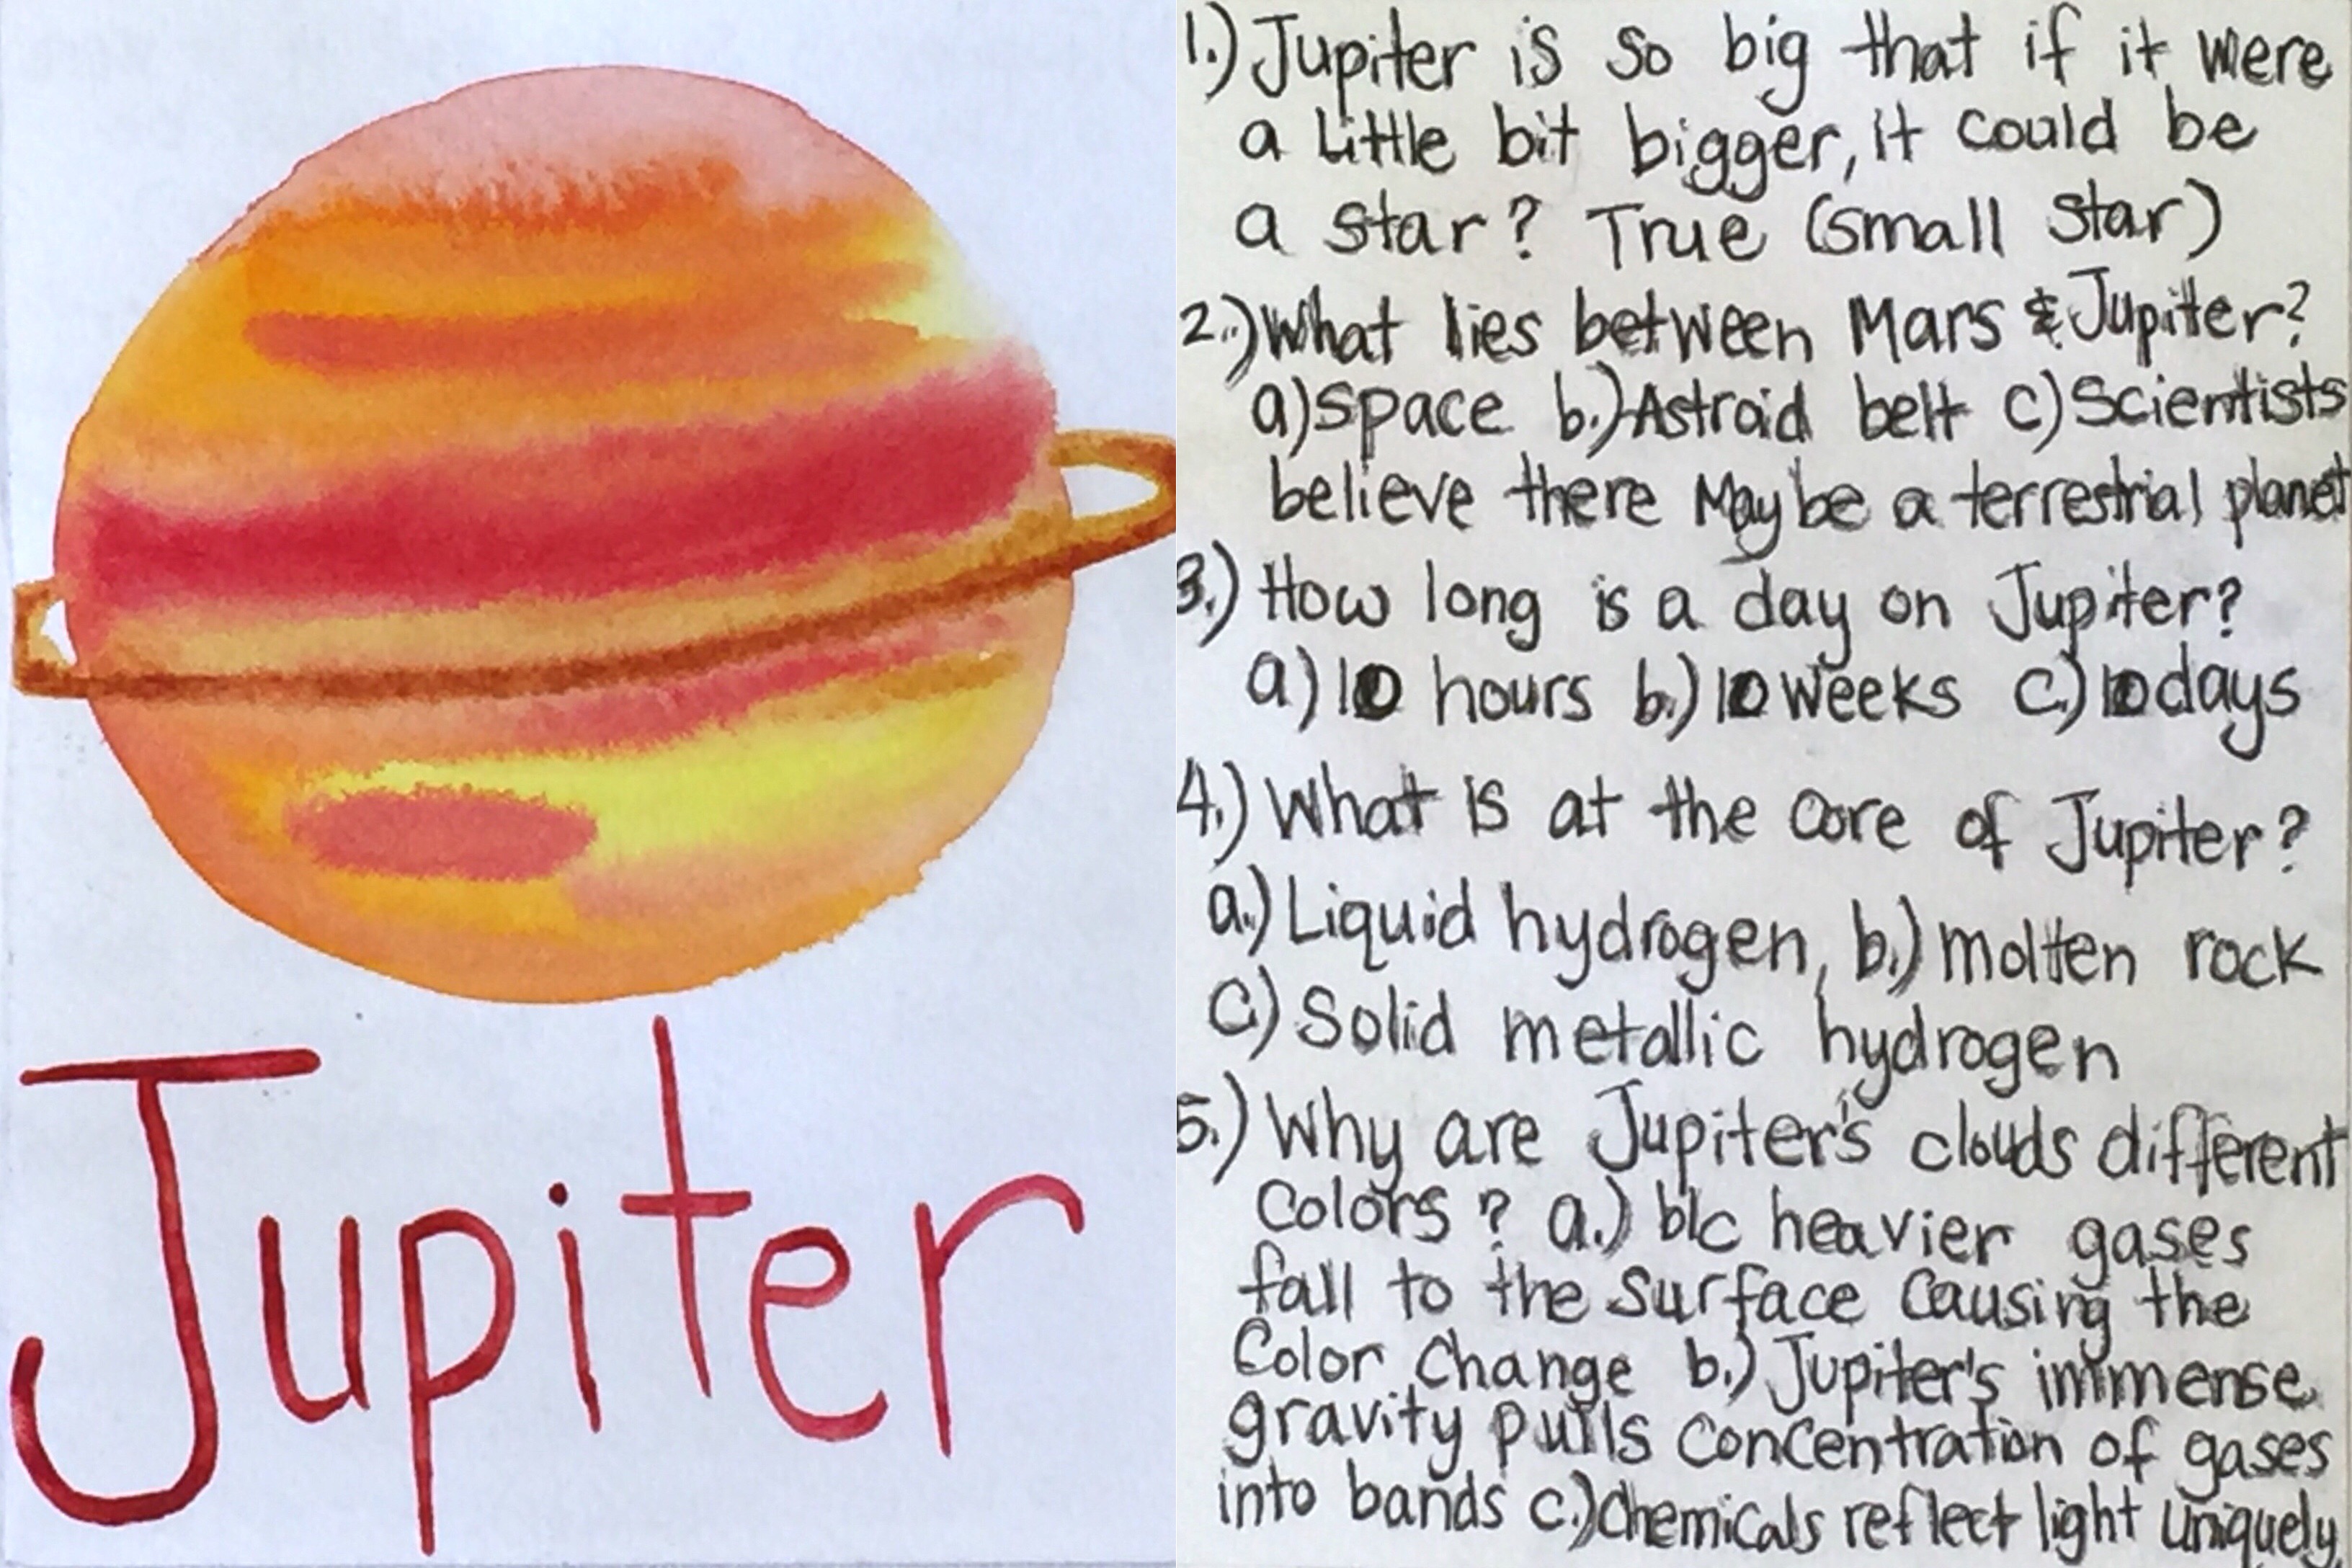
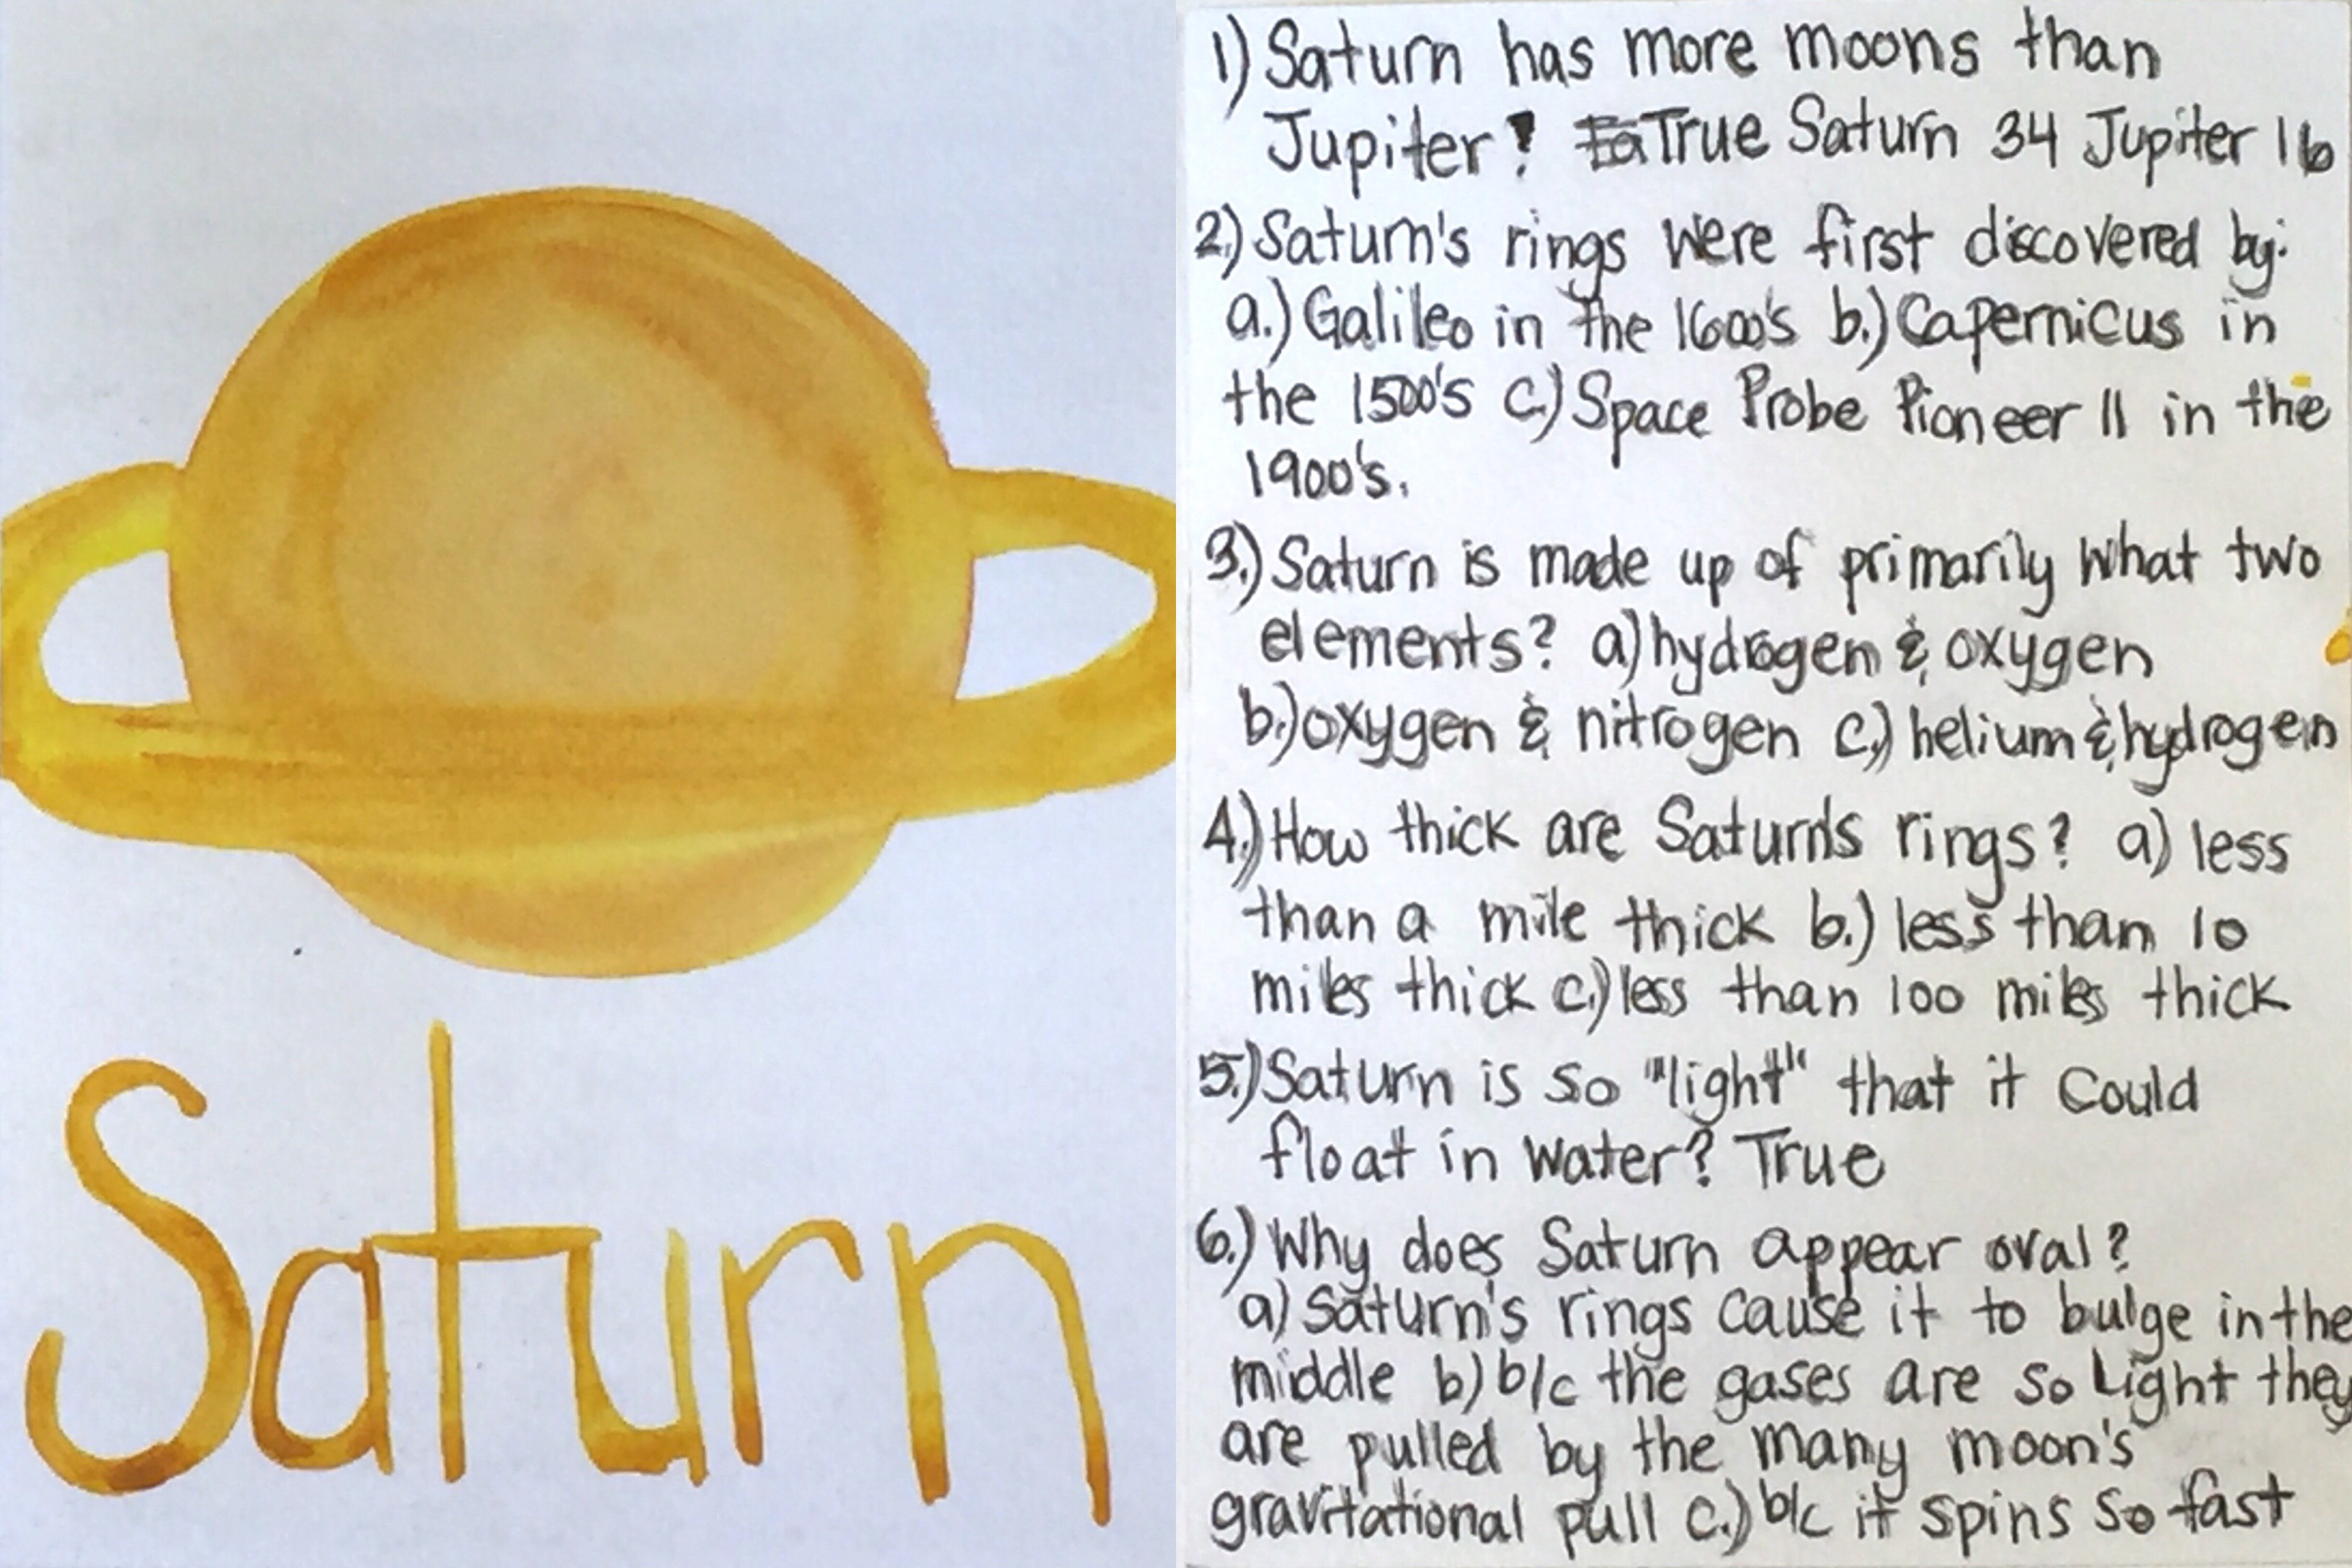
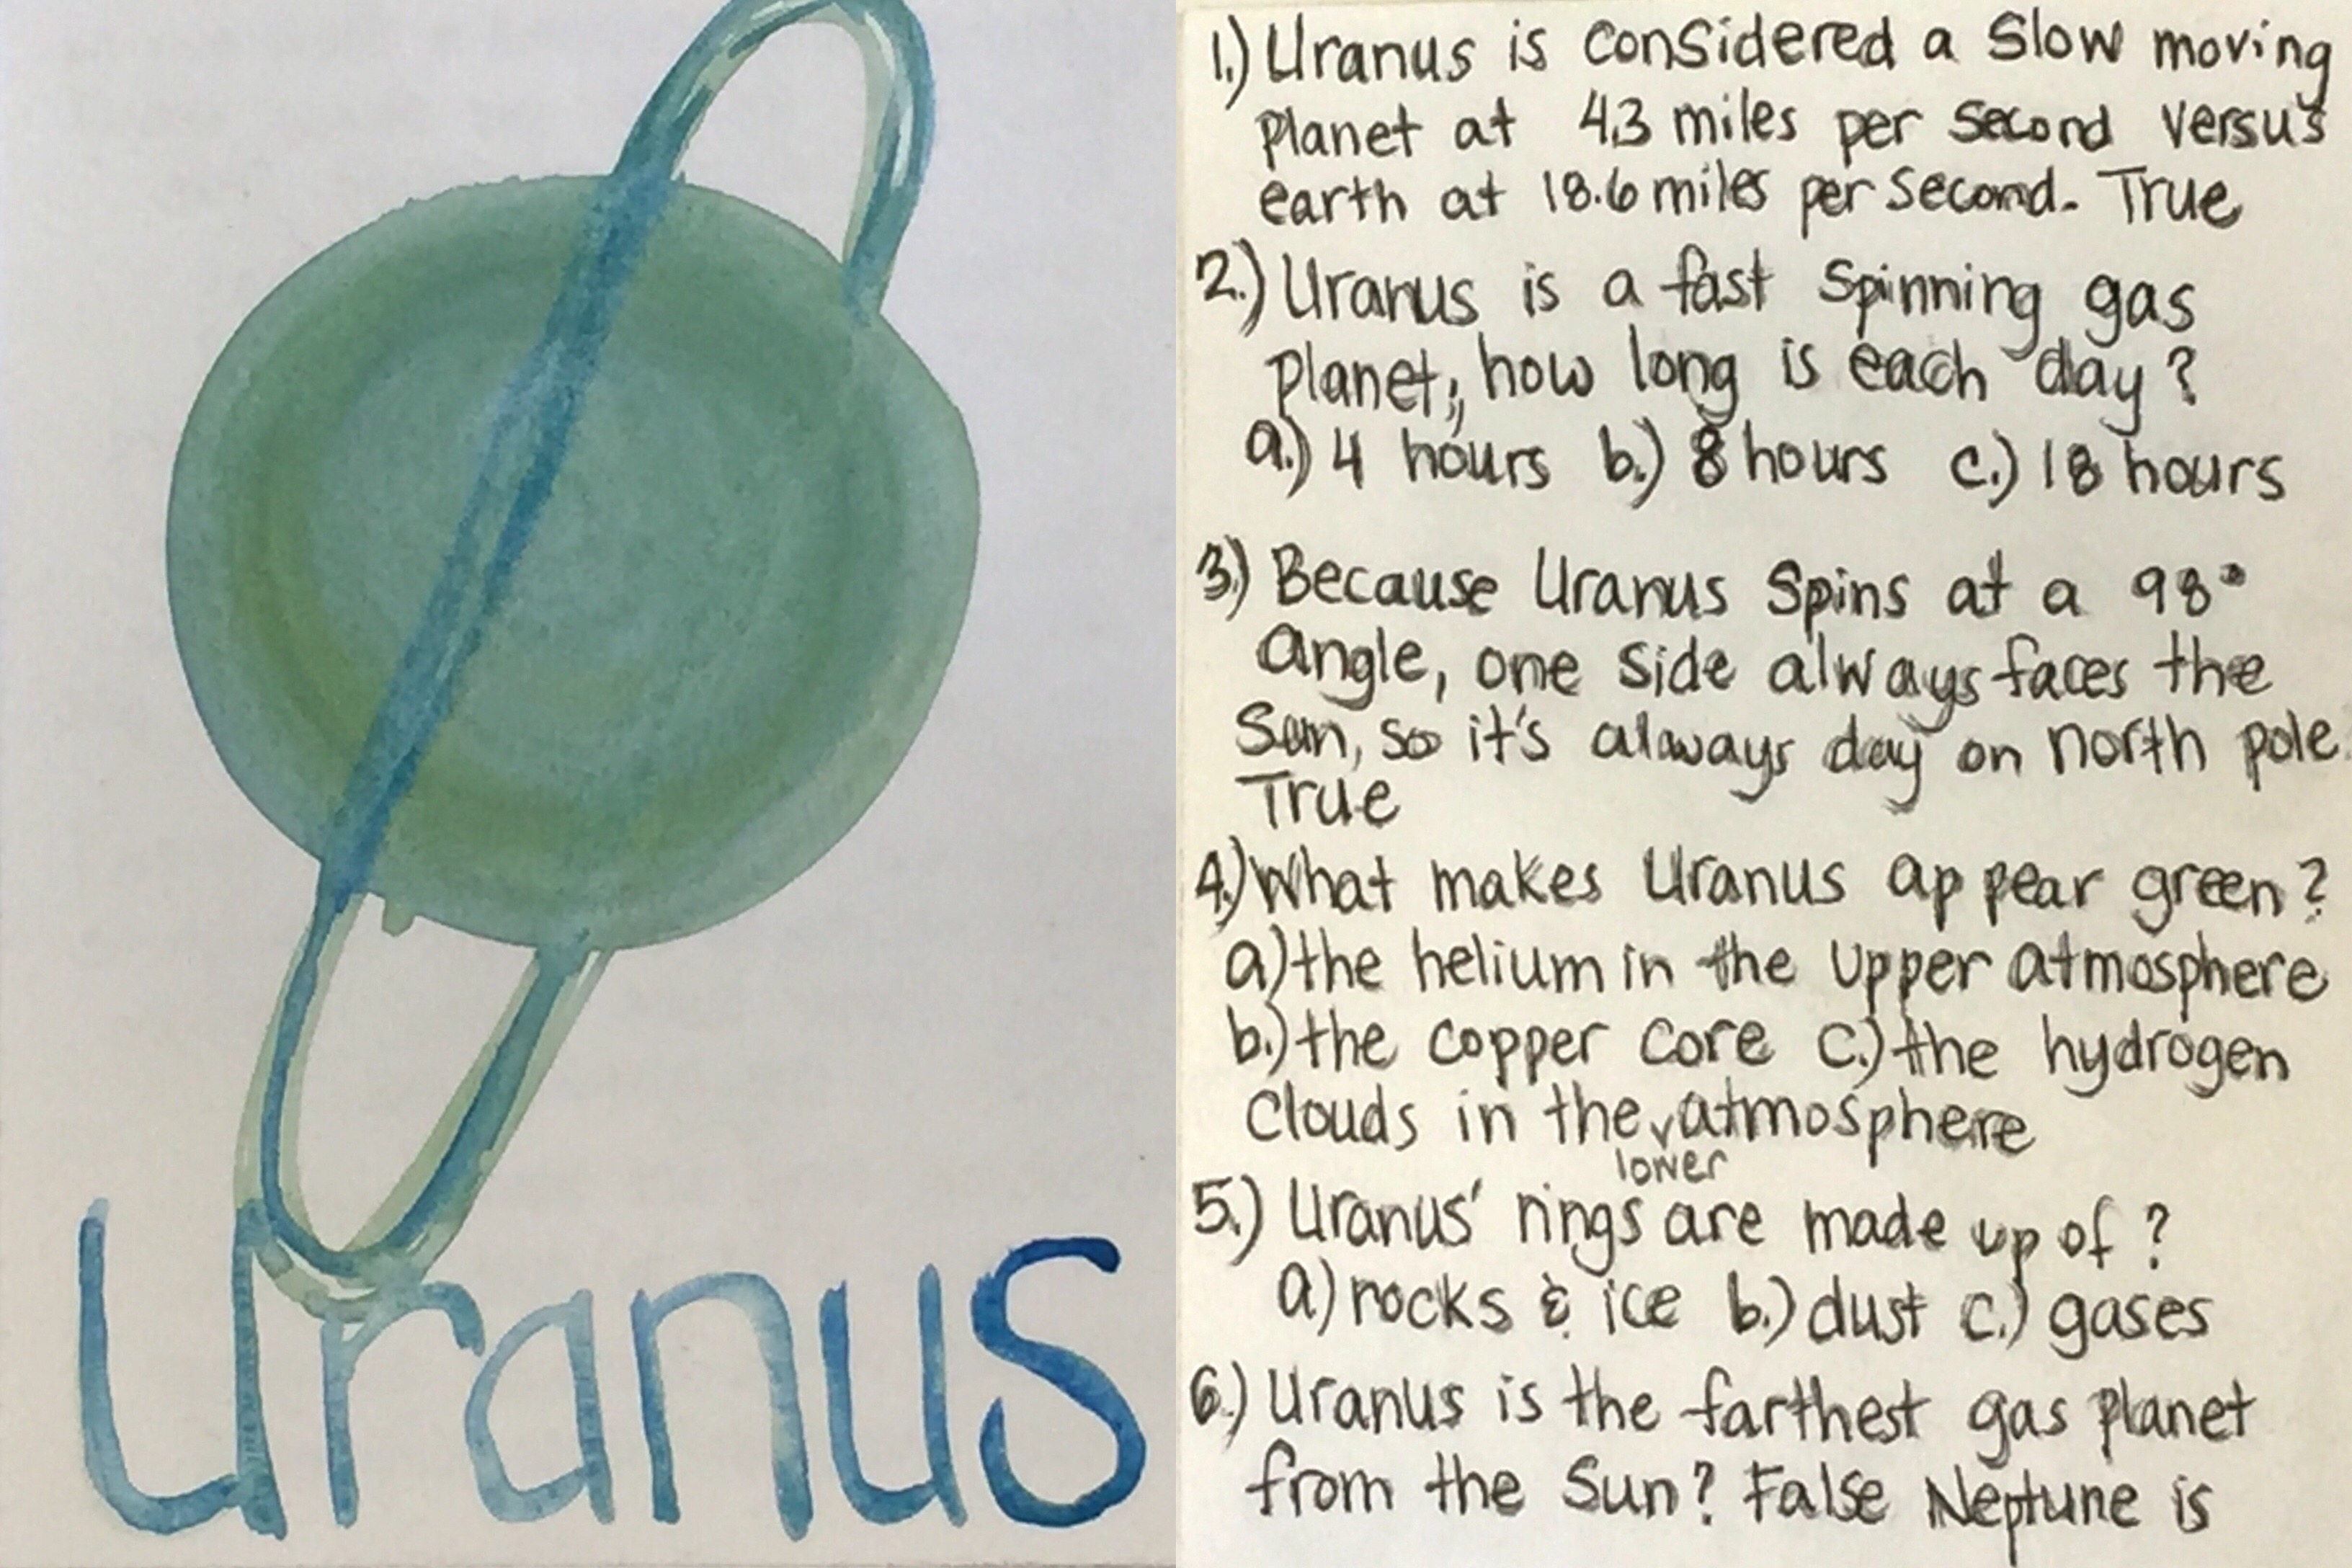
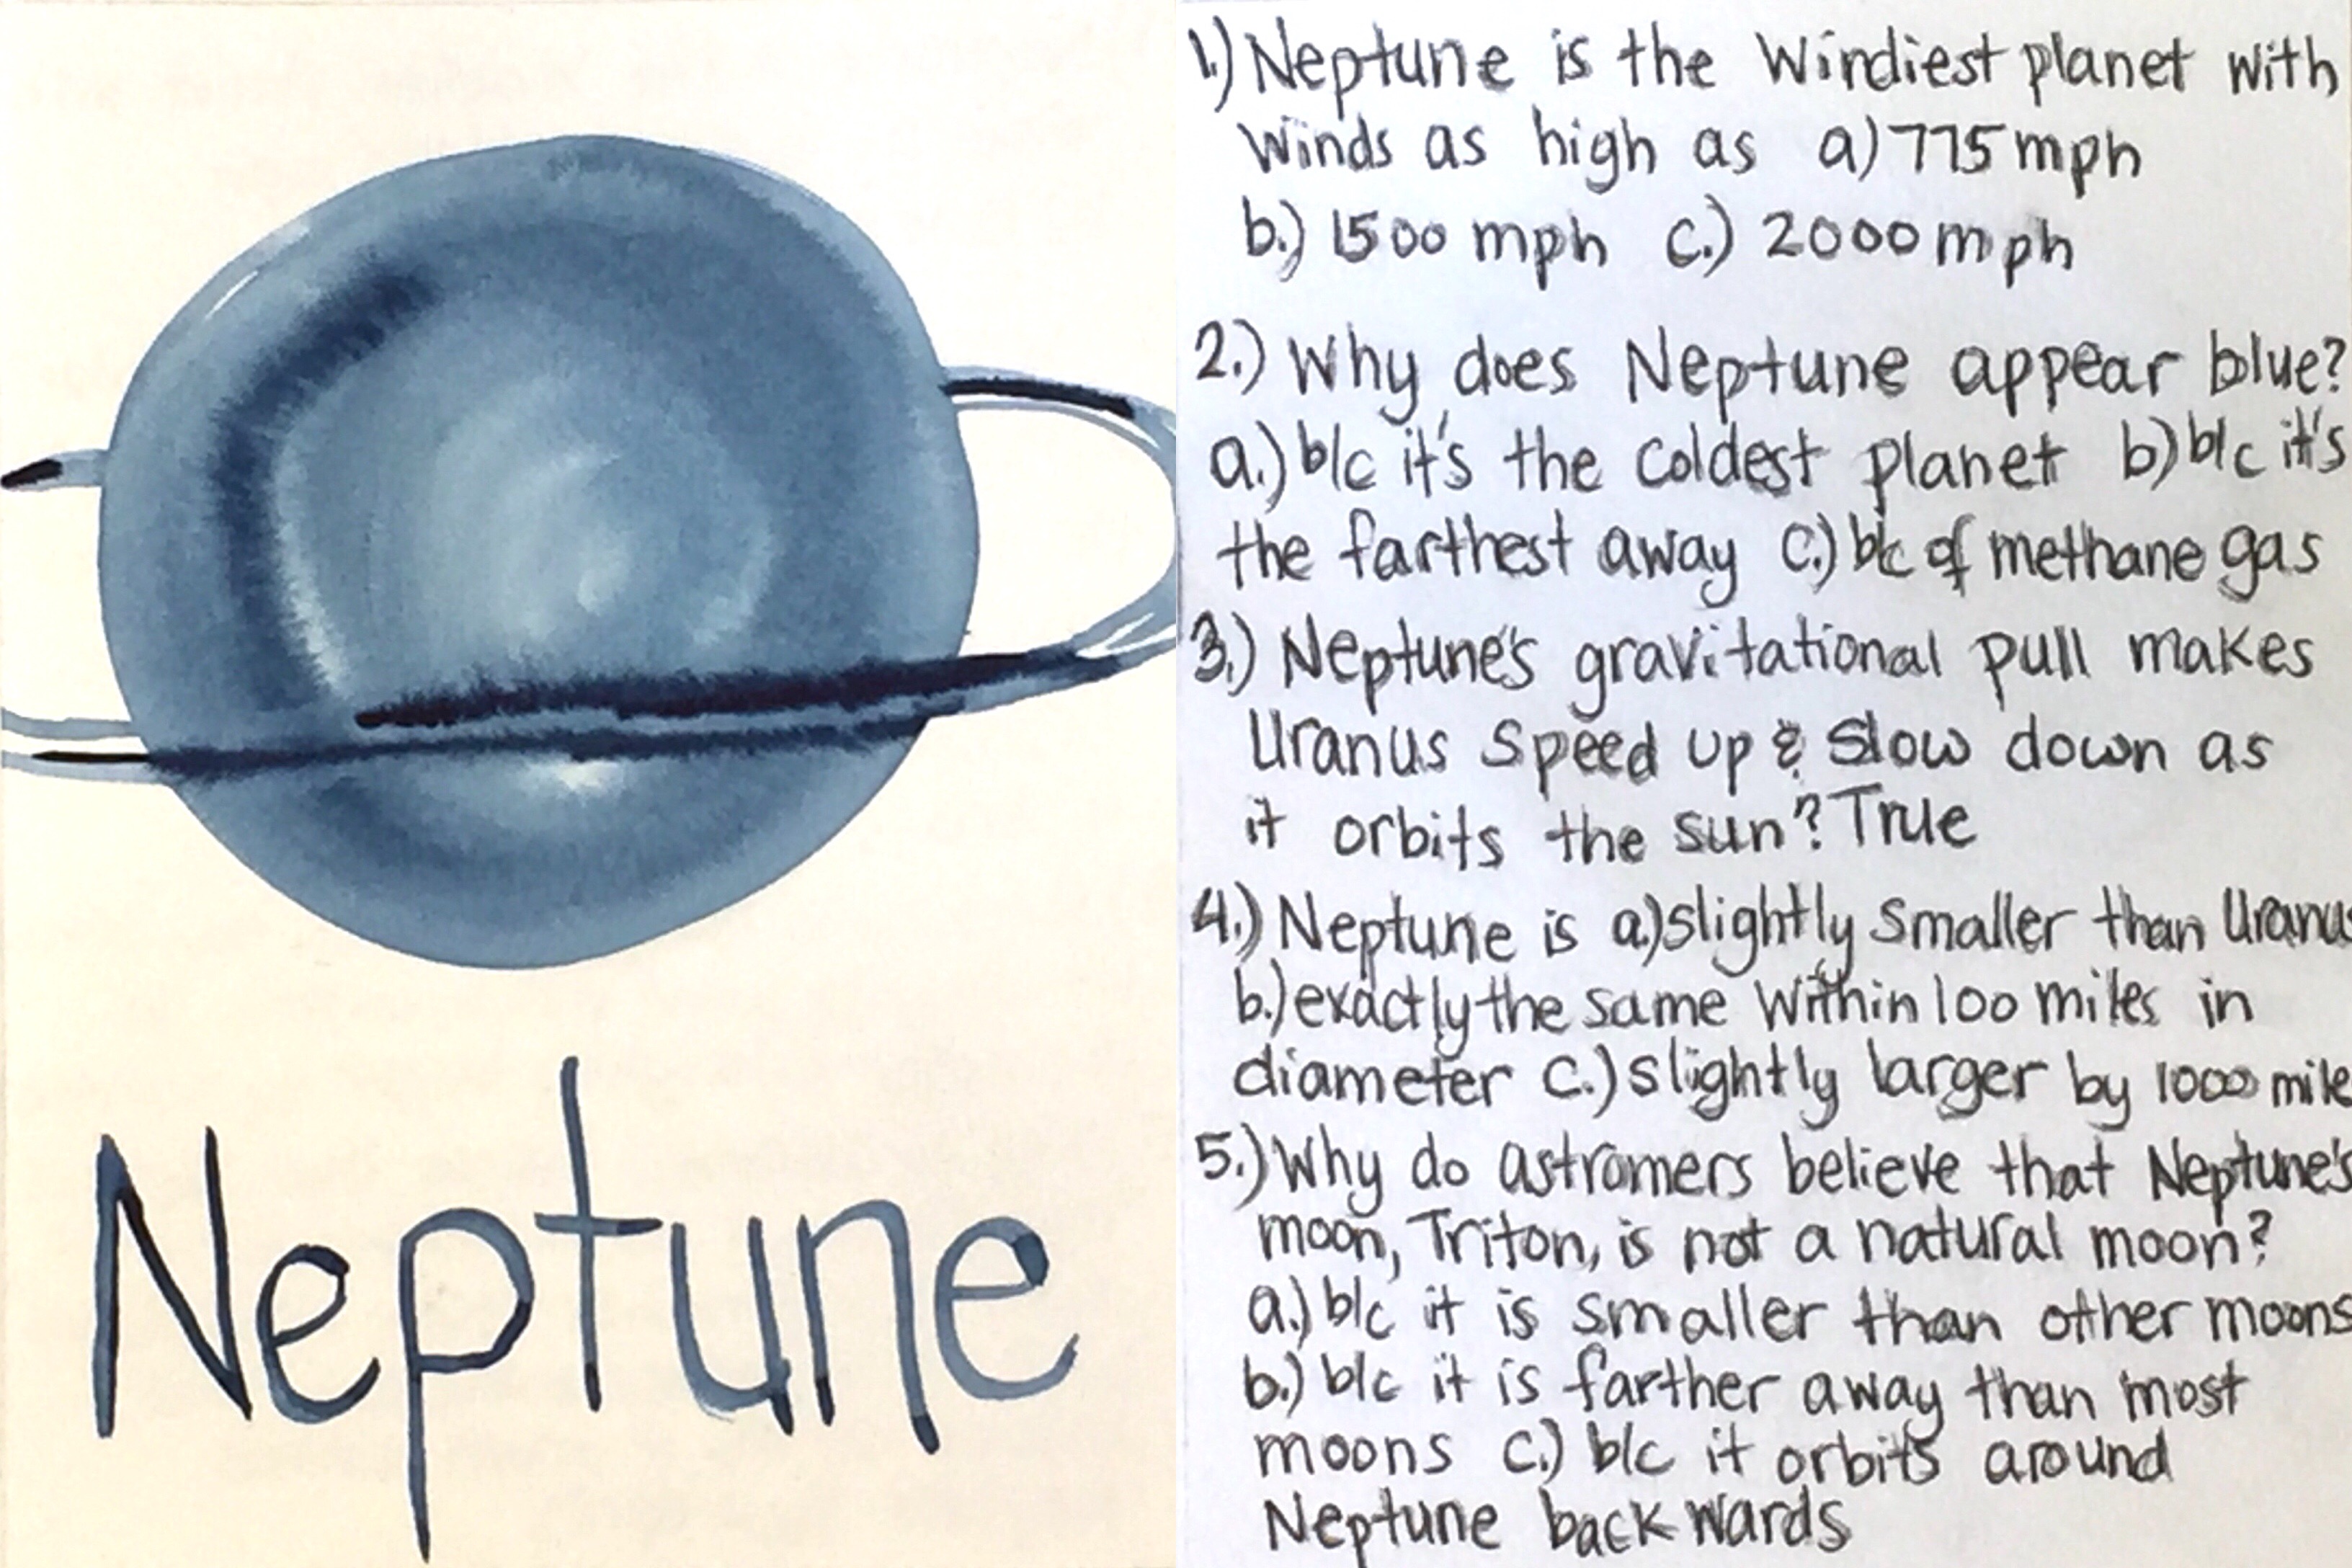
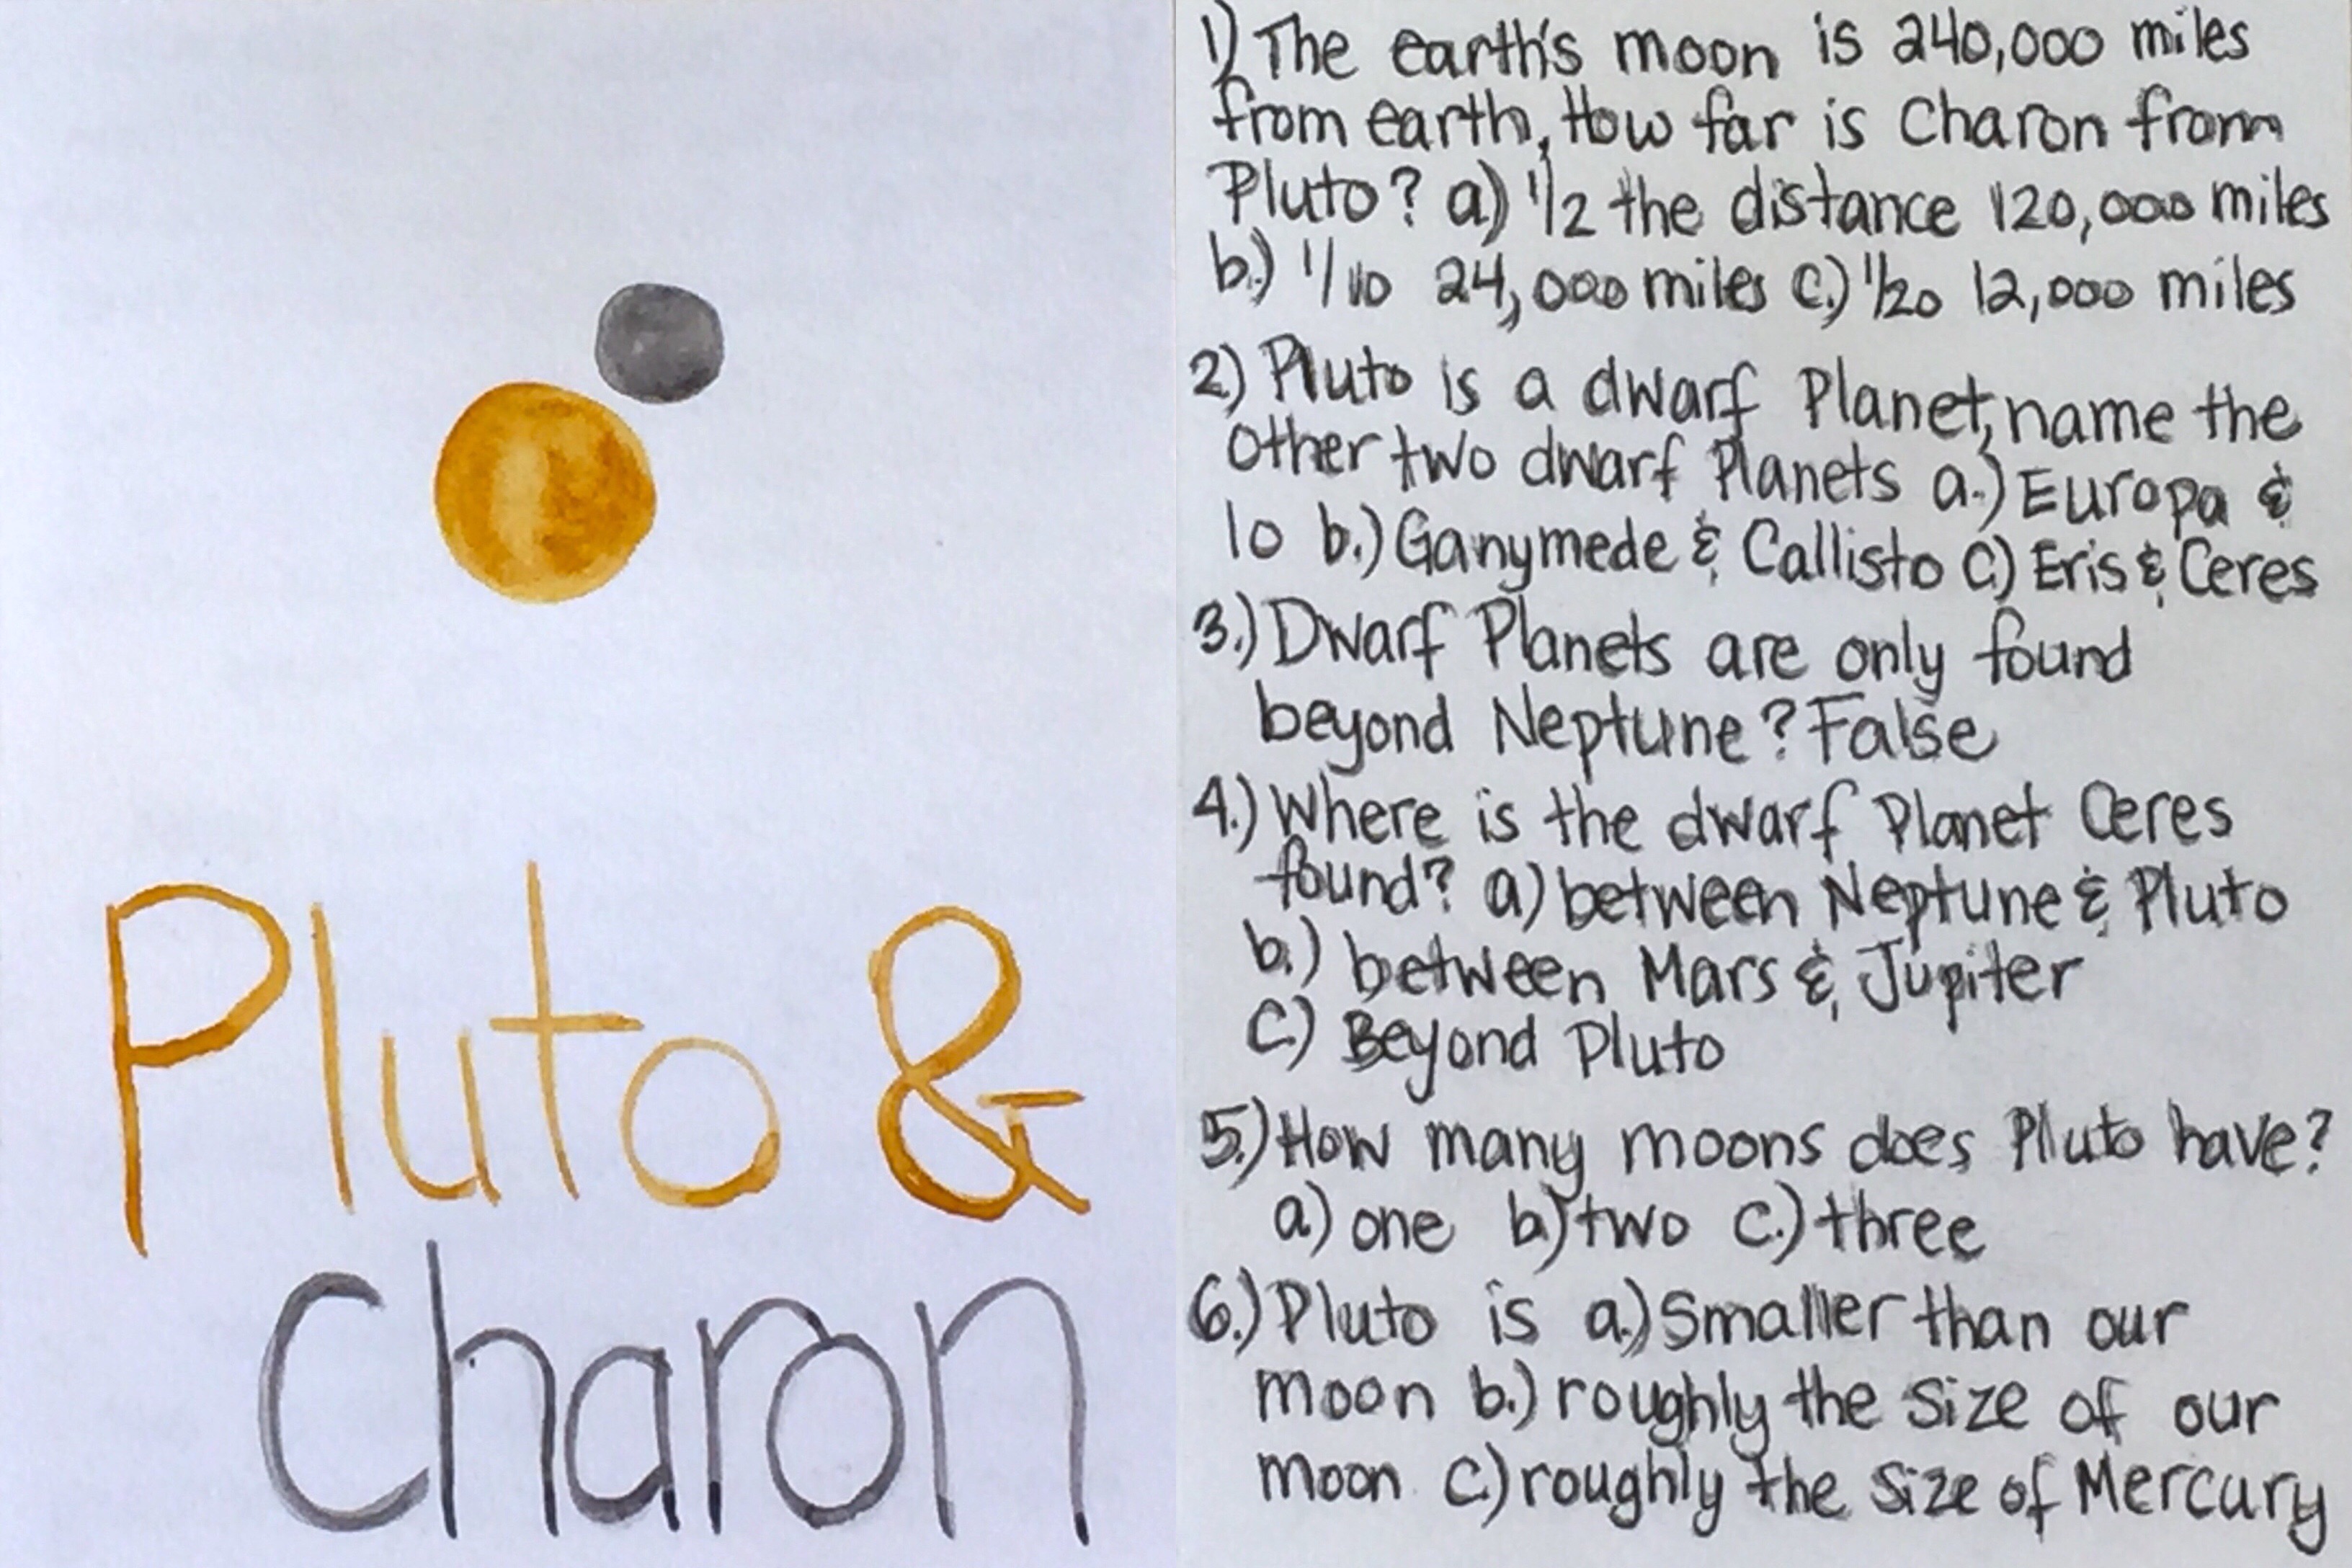
Making flash cards is probably one of the easiest homeschool DIYs. But I’ll admit, if there’s a way to add art to the project (and complicate it), you can be sure I’ll find that way. Watercoloring the planets for this project is easy and enjoyable. Even if you don’t feel you can watercolor or draw, this is one project that is fail safe. We got creative with our colors as seen in the resources we used. Those books are listed below.
For this project you can use any watercolor paper or drawing paper if you decide to color rather than watercolor. I’m using Fabriano 90lb. watercolor paper measuring 9″x12″. I’m also using Winsor Newton watercolors and some simple paint brushes I got from a local craft store. I buy most of my art supplies from Dick Blick, A Child’s Dream or Waldorf Supplies, but you can source these or similar products are most craft stores. I’m also using my Cutterpillar Pro paper trimmer and my Minc machine as a laminator. Laminator sheets can be found at most office supply retailers.
For more Astronomy projects, check out this playlist. We love our astronomy units and main lesson blocks and find it thrilling to learn about the planets, constellations and beyond!
Here are a few of the resources we used:
Stars and Planets by David H. Levy, Book of Planets by Catherine D. Hughes, Neptune by Gregory L. Vogt, The Usborne Internet Linked Book of Astronomy and Space, Saturn by Robin Kerrod, The Book of Planet Earth by Clint Twist, Our Star: The Sun, by Barrons Educational Series, and A Book about the Planets and the Stars by Betty Polisar Reigot.

Find me on YouTube, Twitter, Instagram and Facebook
Tycho Brahe Quadrant
Ever wonder how the astronomers of the past observed the stars and planets? The basic components of the instruments are rather simple, and with a few items you probably already have around the house, you can construct a rudimentary quadrant to record the ascension of the stars and planets and track their path across the sky. Today’s project is from the Astronomy main lesson book from the Live Education! Waldorf homeschool curriculum for grade 6. For this project, you need a dowel, straw, nail, washer, string and a protractor. You also need scissors, a hammer and glue. For more information on the curriculum we are using, you can check out the Live Education! website. This project accompanies our Astronomy unit and you can see the rest of the videos on YouTube. Find me one X, Instagram, Facebook, YouTube, and TikTok
Total Solar Eclipse
Having just experienced a partial solar eclipse, we used it to work on an Astronomy lesson prior to the formal start of this main lesson block. In the video I share a bit about the Muslim prayer during an eclipse. It is a special prayer that is offered in congregation at the masjid, and read aloud. The 2-ruka prayer is elongated during ruku and sujood, allowing extra time for dua. A significant difference is that there are two ruku for each sujood, so this two-ruka prayer has 4 ruku and 4 qiam rather than 2 and 2. For a complete description and explanation, please refer to this video.
For this lesson, we referred to online resources for the specificities of solar eclipses, then referred to specific hadith for the Islamic portion of this lesson. Art inspiration for this lesson came from a content creator on Instagram. We are using our Main Lesson Books from A Child’s Dream. These measure 9 inches by 12 inches and are the astronomy books which contain a blue page for astronomy constellations and a white page for written narration. While this size main lesson book is often used in grade 5 or younger, I find them to be a suitable size through middle school. This lesson accompanies our Astronomy unit and you can see the rest of the videos on YouTube. Find me one X, Instagram, Facebook, YouTube, and TikTok
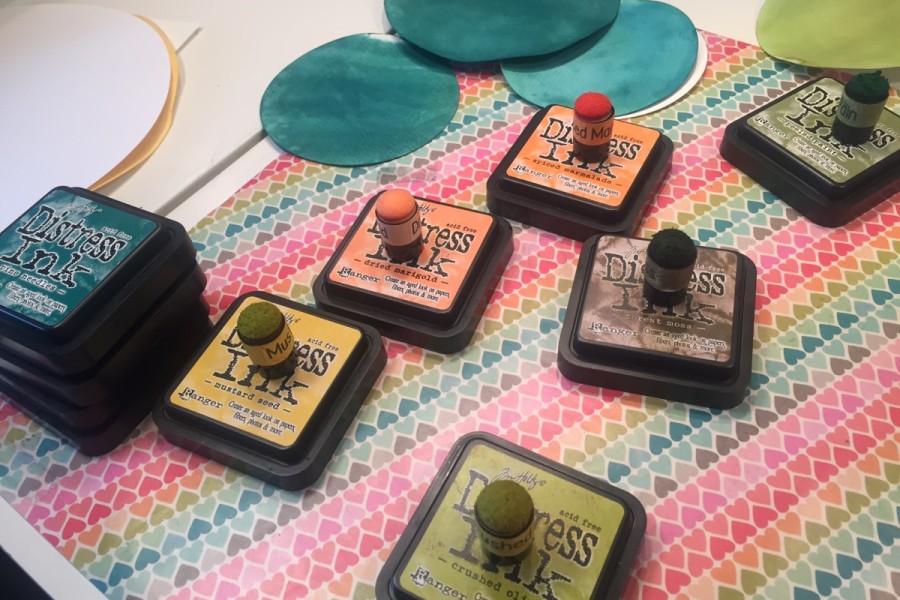
Hanging Solar System Mobile
We got this hanging solar system mobile project from the book “Classical Kids: An Activity Guide to Life in Ancient Greece and Rome” by Laurie Carlson. This activity works well for an astronomy unit or for an Ancient Rome unit. We used watercolor paper, Tim Holtz Distress Inks, DMC metallic thread, paint brushes, spray adhesive, glue and scissors or a circle cutter (we used the Silhouette Cameo). Supplies can be found at Dick Blick and A Child’s Dream. Complete playlist for Ancient Rome and Astronomy.
Level: Easy
Duration 1-2 hours
Cost: $5 (unless you don’t have any products, then you’ll have to invest in a pad of paper and watercolors)
Diameter sizes:
- Mercury- .4″
- Venus- 1″
- Earth- 1″
- Mars- .6
- Jupiter- 12″
- Saturn- 10″
- Uranus- 4″
- Neptune- 4″

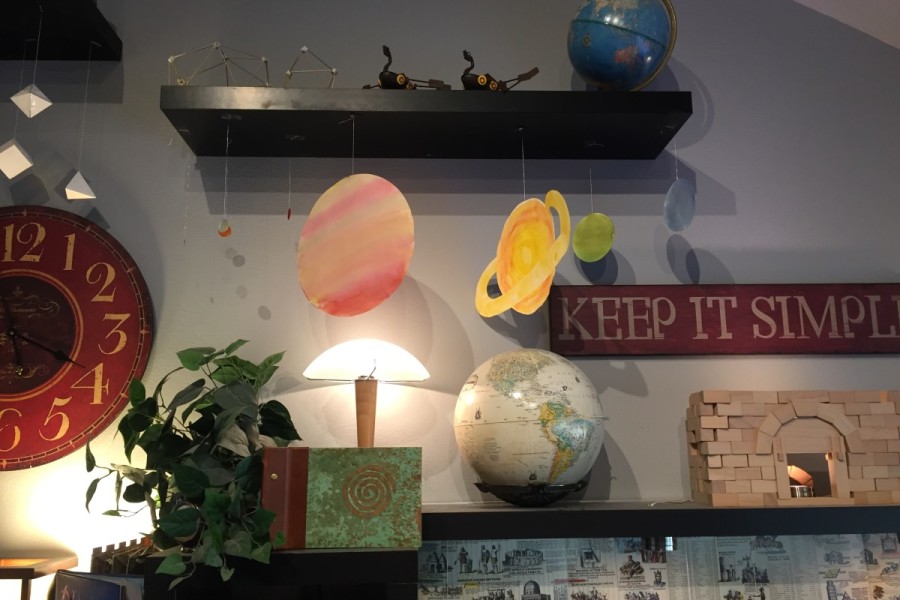
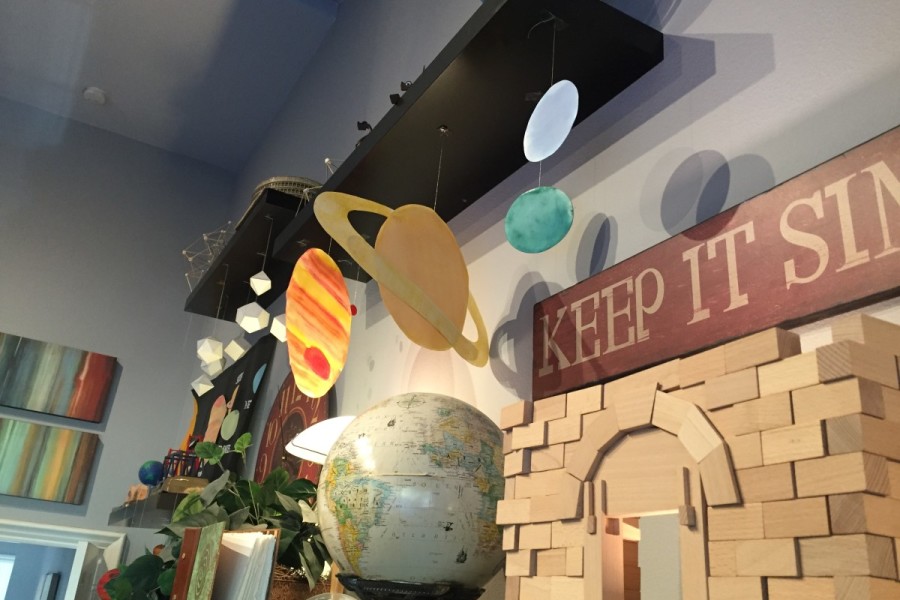
Find me one X, Instagram, Facebook, YouTube, and TikTok
Galileo
For our astronomy unit we made these interactive books. We read the book “Along came Galileo” by Jeanne Bendick. We recreated the demonstrations Galileo made in the 1600’s: dropping two objects of different weights and timing the swings of a pendulum. We made the books interactive with movable models. The kids love these books!
The project took about two weeks from start to finish. We used products available from Blick Art Supplies. Supplies include: Lokta paper, distress ink, watercolor paper, spray adhesive, long reach stapler, scissors, and silhouette cameo.
Find me one X, Instagram, Facebook, YouTube, and TikTok
Solar System Fold-Out Book
For our astronomy unit, we made these fold-out solar system books using two 10″x30″ strips of light-weight watercolor paper cut from a large sheet. We adhered them together to make a fold-out book. We placed the four outer planets on the outside panels and the inner planets on the inside panels with the sun being in the center of the folded book. We used our Silhouette Cameo to size and cut the planets and labels. We used “A Book About Planets and Stars” by Betty Polisar Reigot and The Usborne Internet-Linked Book of Astronomy and Space as reference books. Other supplies were Fabriano watercolor paper, Derwent watercolor pencils and Tim Holtz Distress Inks and Pads. All available from Blick Art Supplies. Tools used: Scissors, double-stick tape, stylus for folding paper, Silhouette Cameo and paint brushes. This project took about a week. We read information on two planets a day, plus the sun and moon. We watercolored the planets, adhered them in the fold-out book and then wrote final drafts about each planet, the sun and the moon.
Diameter sizes:
- Mercury- .4″
- Venus- 1″
- Earth- 1″
- Mars- .6
- Jupiter- 12″
- Saturn- 10″
- Uranus- 4″
- Neptune- 4″
We made one sun at 10″ to fit snugly in the fold out book; we also made one that was 22″ that folded out. If you want it to scale, the sun would have to be about 120″.
Find me one X, Instagram, Facebook, YouTube, and TikTok
Homeschool Lesson
What do you mean every lesson isn’t ‘perfect’? Why would you show such a failure, I mean, what’s the point? I had high hopes for this lesson, I mean after all, I successfully did it the last time we did the main lesson block. So what changed? I can’t say for sure, but I couldn’t live up to my previous self from years ago. How does that even happen?! Well, all the components were in place. All the materials were selected. Everything was ‘perfectly’ arranged and ready to go. Learning and art were to be married in this lesson on the Great Bear constellation. Well, see for yourself. I think I might have been the problem. Maybe my expectations were too high for myself. Maybe I wasn’t in the right mental space to do this lesson, either way, we threw in the towel and didn’t bother looking back. Check out the complete Astronomy main lesson block playlist.
Astronomy Curriculum Review
For the first time in a loooong time we actually finished a unit is the time I scheduled for it with minimal trailing into the next main lesson block. This review covers the materials we used for the first of a two part Astronomy Main Lesson block in which we covered material from our Live Education grade 6 Astronomy book. We’ll do the second part at the start of the new school year, and it will be a longer unit with more math and science. For this part of the unit, we focused on the constellations and used a main lesson book especially designed for astronomy to draw our constellations and write narrations. We scheduled three weeks for this unit. There are minimal projects that coordinated with this unit, but there will be more during our second unit.
We used a few picture books, a book on Greek Mythology, our Live-Education Waldorf curriculum on Astronomy and my favorite: Geology and Astronomy by Charles Kovacs.
This is the review I left on Amazon for the Charles Kovacs book Geology and Astronomy:
“This book was compiled using notes Kovacs wrote in preparation for teaching his students in Edinburgh, Scotland. It’s been edited for book format, but still read like a lively lecture. You can either read the lessons straight out of the book or retell them in your own words if you wish to be more authentic with the Waldorf teaching principles. The Geology section (14 lessons) can serve as inspiration for how to teach Geology and Mineralogy as the examples in the book are relevant for students in that part of the world. We chose to read it as is and gleaned much from the content. The chapters are short, don’t contain too much new content and are written in spoken language (as if you were listening to the teacher present it in class).The Astronomy section (27 chapters) begins by relating the sun to our heartbeat as a means to connect the child to the cosmos. The analogies continue throughout the chapters. Great connections are made between the seasons and day in relation to positions on the planet that I haven’t seen made elsewhere. Lessons are enhanced by drawing your own diagrams to complement the lesson, though the book comes with many simple drawings to explain the content. Unlike our Waldorf curriculum which begins the Astronomy block with the constellations and the stories of Ancient Greek and Roman mythology, this book jumps right into the science content, with the Zodiac being presented in chapter 26. The Astronomy section, like the one on Geology, contains short chapters that would easily complement any curriculum or be the basis for your own main lesson block on the subject.
We used the Geology section for our Mineralogy block and the Astronomy for the first of two Astronomy blocks. We homeschool using the Live-Education Waldorf curriculum and used this book to supplement the curriculum. We really enjoyed this book and have since purchased the rest in the series to accompany our other main lesson blocks.”
This is the review I left on Amazon for the Charles Kovacs book Geology and Astronomy
This review accompanies our Astronomy unit and you can see the rest of the videos on YouTube. Find me one X, Instagram, Facebook, YouTube, and TikTok
The Moon
The moon is the closest astronomical body to the earth and it has profound effects on us and our planet. This area of the post is dedicated to the projects and lessons we’ve completed regarding the moon. While some projects worked with our astronomy unit, other projects coincided with our Ramadan activities.
Phases of the Moon | Painted Project
The study of the moon and its phases is not restricted to the month of Ramadan, but it seems that every year, that’s when we focus our attention on this subject area. Each year we seem to add one more project or activity to help in our understanding of this subject. In the past we’ve done phases of the moon with cookies, cut out a paper mobile of the phases of the moon, assembled a kit of the moon by Nature-Watch, painted peg dolls in the phases of the moon, and probably more that slip my mind. Today’s project was a joy to do, but did take a long time because I not only made mistakes, I complicated the project by painting both sides of the moon tile, added craters on one side and the names of the phases on the other. These additions turned a less-than-an-hour project into a two-day project. I show the whole process so you can see what I did and so that you can skip what doesn’t suit you. While the craters took forever to paint, they are my favorite feature. They really bring this project to life and make it look more authentic.
This kit comes with everything you need to make the phases of the moon, including paint, brush and directions. I happened to have missed the directions, and did them without, which ended up being a blessing because I brought personal touches and authenticity to this project, and I especially like the way it looked in the end. With directions, I’m sure you could do this project easily and quickly. I dipped into a Nature-Watch kit on the Phases of the Moon to help with the phases and how to paint them. I’m sure you’re familiar with the cookie phases of the moon. It’s a delicious project!
I love the new item we have this year which is the Ramadan Moon phases of the moon DIY wooden kit. It looks great hanging just above our Ramadan Table. Our Ramadan Calendar has been a staple in our home for many years, but originally we had a store bought calendar. While it’s common to put a little treat in each pocket, I have 20 non-candy alternatives you can put into each pocket. One year, I painted 30 peg dolls that depicted the phases of the moon. It was a labor intensive project, but I’m super pleased with the results. And, this is one project that can be used year round.
While I don’t have a print out of our sahaba stories, you can click here to see pictures of all of them.
I purchased The Ramadan Moon DIY Kit at the QuadM shops in March of 2019. While at the time, I purchased the last one available, I’m hoping they have been restocked. In the meantime, you can check out the other products by The Rustik Home.
Find me on YouTube, Twitter, Instagram and Facebook
Edible Phases of the Moon
Edible learning is probably the most memorable of all educational experiences. It’s not just hands-on, it takes all your senses into account when food’s involved. You touch the cookie, smell the cream, hear it crunch in your mouth and then taste the yummy goodness. I’m sure you’ve seen this phases of the moon project from cookies and today we add a little twist to the activity.
Instead of just doing this project and eating the cookies, we added a memory game to the mix. Using the Phases of the Moon Memory Game kit from Nature-Watch, we designed cookies to look like the eight phases of the moon on the game pieces. Next we laid out the memory game tiles and my two children played the game. Whoever got a pair, got to eat the cookie matching that pair! It meant that some wins were better than others! And also, one child might get more cookies than the other. Indeed that happened. My six-year-old got 5 pairs while my 11-year-old got 3 pairs. They didn’t eat the losses. Turns out the Jo-Jos from Trader Joe’s aren’t that tasty.
This project accompanies our Astronomy unit. Find other Nature-Watch kit videos. This project accompanies our Astronomy unit and you can see the rest of the videos on YouTube.
Find me one X, Instagram, Facebook, YouTube, and TikTok
Phases of the Moon | Memory Game
I’m sure you could DIY this Phases of the Moon memory game, but as much as I’m a crafting homeschool guru, I take full advantage of pre-assembled kits to make doing these kinds of projects easy and fast. There are certainly benefits to making things on your own. I’m sure the children would be far more attached and proud of a project they did completely on their own from scratch, but when the point of a project is to do a hands-on activity, and you’re not much of a DIYer, then the kits from Nature-Watch are a win! They come with all the materials you need to do the project as well as additional educational material for the teacher to use with the classroom. I prefer getting the classroom kit rather than the individual kits as the price is better and it gives us the opportunity to do the project again. But, in this case, it would have been better to just buy the individual kits. We have a lot left over to share with other homeschooling families. The classroom kits come with supplies for 25 students plus additional supplies for the teacher (like books, samples and booklet with info). The classroom kits range in price but end up costing about $1.50 per student. The Individual kits are about $6 a person. They do offer a homeschool kit with multiple projects in one kit. This project accompanies our Astronomy unit. Find other Nature-Watch kit videos. This project accompanies our Astronomy unit and you can see the rest of the videos on YouTube.
Find me one X, Instagram, Facebook, YouTube, and TikTok
Phases of the Moon Peg Dolls
These are probably the cutest peg dolls I’ve ever made! Don’t be deceived by the thumbnail, I actually made a complete lunar phase set to last an entire month! Granted it did get a little tedious and some crescents and moons look awfully similar to one another, but we got a complete set! Now we can track the lunar cycle with these adorable moon phase peg dolls. Of course my 7-year-old will be playing with them, too.
I plan to put each peg doll into our Ramadan calendar for this year and each day we can remove the peg doll and display it on a wooden plaque.
Project details:
Duration: 5+ hours
Level: advanced (young children could do the base color, but details were challenging)
Cost: $20+
Direction: First I painted all the small peg dolls with a coat of blue from our Lyra Watercolor set. Once they were dry, I gave them all a coat of Mr. Huey’s Shine for a bit of shimmer. Before painting the phases of the moon, I polished each one with Beeswax Polish. Finally, I used the white opaque paint that comes with the Lyra watercolors set to paint the phases of the moon. I watered it down until it was smooth and easy to paint and I used a stiff, yet soft bristled pointed brush for best results. While the peg dolls dried, I worked on the wooden plaque. I watercolored it with various shades of blue and white opaque paint. I added Mr. Huey’s shine and let it dry thoroughly before added beeswax polish. Then I painted the faces and hair for each doll varying the hair color, but making all them with sleepy faces. To make the sleepy eyes, just draw two half circles. The circles should be stretched like ovals and should be midway down the face. I used a felt tip marker for most, but you can also use the black paint. For the mouth, I used a magenta colored Sharpie, but red paint for be just fine. I just dotted a little mouth. For the little caps, I cut an elongated semi-circle out of 100% wool felt in various shades of blue. It was a little trial and error till I got the size I wanted with no extra felt hanging over the sides or back. I used hot glue to adhere it to the completely dry peg dolls.


Astronomy Unit for Elementary
Astronomy can be a compelling and imaginative study in which even young children can delight. Putting together a unit study for elementary aged student may include a variety of picture books and simple hands-on projects, but you may also want to include some biographies and games as well. The resources shared are suitable for all ages, but may be especially enjoyed by students grade 1-4. While some of the resources I have collected over the years are outdated and hard to find, the resources for elementary are newer and hopefully easier to source. If not, I recommend getting books that are similar rather than exact, especially because often outdated books contain material that’s been revised. Some of the books I have for our astronomy unit date back to the 1980s and 1990s! While we navigate the outdated material with ease and humor, I advise purchasing newer resources when possible, and especially in subject areas where modern technology provides new and fascinating discoveries.


Resources:
- Who Was Neil Armstrong?
- Who Was Galileo?
- Who Was Albert Einstein?
- Professor Noggin’s Outer Space Trivia Card Game
- Who Were the Wright Brothers?
- Lindbergh: The Tale of a Flying Mouse (Mouse Adventures)
- Armstrong: The Adventurous Journey of a Mouse to the Moon (Mouse Adventures)
- Smartivity Rocket Launcher Kit
- Caroline’s Comets: A True Story
- A Computer Called Katherine: How Katherine Johnson Helped Put America on the Moon
- Mae Among the Stars
- Hidden Figures: The True Story of Four Black Women and the Space Race
- My Journey to the Stars
- On Earth
- Eclipse
- My First Book of Relativity
- My First Book of the Cosmos
- If You Were Me and Lived on… Mars
- On a Beam of Light: A Story of Albert Einstein
- Find the Constellations by H. A. Rey
- Black Holes and Other Space Phenomena
- One Small Square, The Night Sky
- The Girl Who Named Pluto: The Story of Venetia Burney
- Look Up!: Henrietta Leavitt, Pioneering Woman Astronomer
- The Glow-in-the-Dark Zodiac ST
Find me on Twitter, Instagram and Facebook
Thanks for this detailed post and the lesson plans.
The downloaded files dont open. What file format is it?
Hello Hana.
Would I be able to have a link to the lesson plans sent to my email? I do not have the software to open the file nor is the Homeschool Panda import working for me.
Thank you.