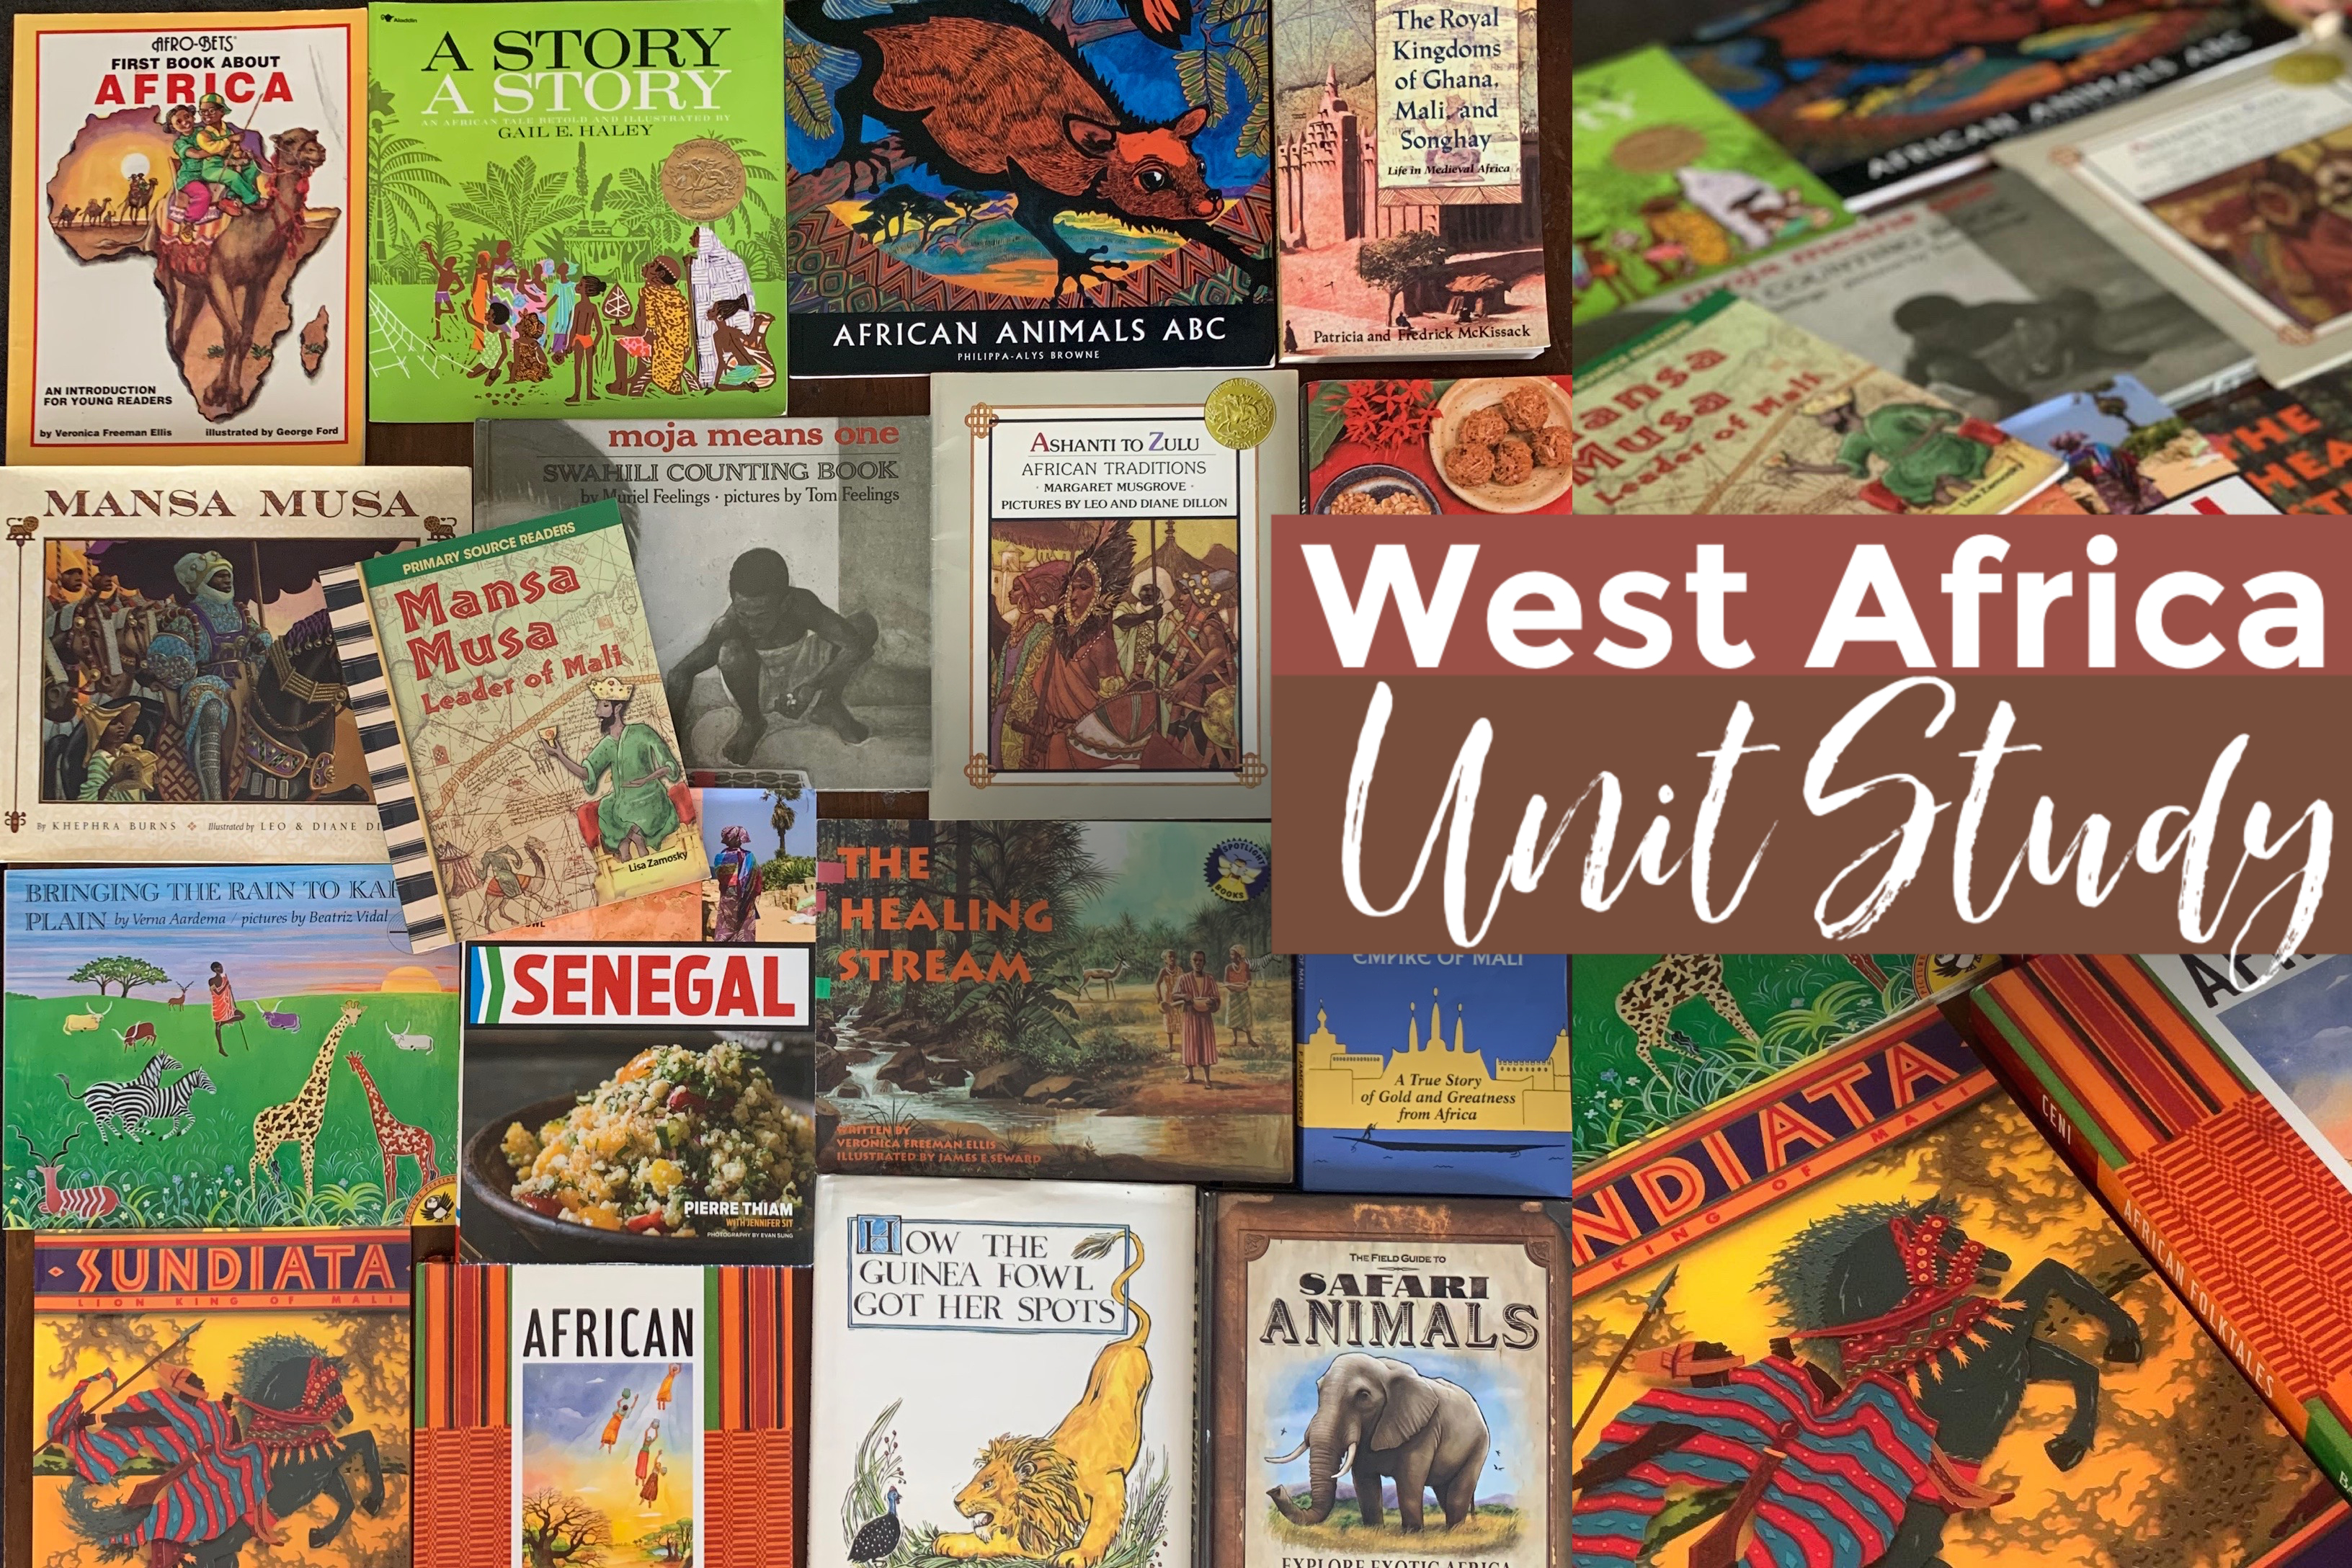
The Empires of Mali, Ghana and Songhai (900s-1400s)
Is it really Medieval if Africa was experiencing its Golden Age? It was an age of exploration, wealth, power and civilization. This unit study on Africa covers the time period of about the 900s to the 1400s, and focuses on the empires of Mali, Ghana and Songhai. While putting together our history unit studies and main lesson blocks, I like to look for books and resources for a rich experience. I add picture books, historical fiction, project books, cookbooks, folktales, biographies, and history books as well as projects and outings if possible. For this unit, I ran into a problem I couldn’t find a single premade activity or project kit. Not one. Granted, I only looked at Amazon and Rainbow Resource. So if you know of pre-made kits for an African unit, please let me know. Instead, we made our own projects using raw materials as well as repurposing other kits. We loved heading to the kitchen to enjoy some Ghanaian and Senegalese recipes. We purchased two books to help us on our culinary journey and some recipes are ones we still enjoy a year later, long after our unit was over. Many of the books we purchased for this unit were from Amazon. I also dipped into my own resources and pulled a number of picture books that are African in nature, but not exactly relevant to our location or time period. I included them as well because this unit was a little sparsely populated with picture books and folktales. The additional resources were for the Sahara or east Africa or for other time periods. While I do believe there would have been enough resources for the time period we were exploring, I chose to add these pictures books. In the end, our Sahara interactive animal book was a huge hit as it was one that provided hours of imaginative play for my 9-year-old daughter. Our game 10 Days Across Africa was the perfect addition to this unit as it was a fun, interactive geography game that helped orient ourselves on this continent and identify the countries. While this is a modern political map, it was helpful nonetheless. We did look at an atlas for a physical map, and our chalk drawing was as close to a historical map we were going to get.


Setting the Educational Scene


Masjid Chalk Drawing
When I do a chalk drawing for a new main lesson block or unit study, I usually use our large 4’x6′ chalkboard which hangs in our homeschool room. However, this time around, I made our chalk drawing on a smallish chalkboard from Paper Scissor Stone from Waldorf Supplies which measures about 2’x3′. I love these chalkboards!! They have just the right surface for beautiful chalk blending. Our large chalkboard is a slate chalkboard which is superior; however, over time, it loses its roughness and doesn’t hold up well to these magnificent rich chalk drawings. For this chalk drawing, and honestly, for nearly all the chalk drawings I’ve ever done, I use Sargent Art Square Chalk Pastel from Blick Art Materials. I’m using the book Mansa Musa by Khephra Burns and illustrated by Leo and Diane Dillon as inspiration for today’s chalk drawing. At first I contemplated doing a historical map of Africa with physical markers and coloring, but then I thought it was not inspiring and too hard. Map drawing takes skill and perseverance, and this day, I had neither. So I settled on what I thought would be the easiest drawing for this unit: Sandstone structure, likely a masjid, with a brilliant oversized sun and warm lavender sky. Boy was I wrong about how easy this would be. It wasn’t. While I love the way it turned out and honestly can’t stop gazing at it, it was not easy or quick by any means. This drawing took nearly 30 minutes to complete and for such a small chalkboard, I feel like that’s a lot of time, but then again, maybe it isn’t. The challenge was entirely in getting the shading right and the shapes correct. The shapes were okay, though for simple soft edged triangular pillars, I did struggle to get the curves just right. What I loved was the layering. I was so pleased that this drawing only utilized about 6 colors: two for the sky, two for the sun, and two for the structures with the addition of the two sun colors for the highlights on the structures. I worked for the edges in and from the background to the foreground. I started with the border which I often don’t do on the large chalkboard since it is framed. I love the look of a border as long as there is room, otherwise it looks cramped. Next I did the sky. I didn’t have lavender or purple because I recently used up all the pinks and purples from all my old sets of chalk to make some super large six-fold symmetry art on our driveway and I figured those colors rarely get used as my earth tones for quickly. So for the sky, I layered pink then blue, oh and one more dark pink/rose hue, so I suppose that means three colors for the sky. Then I drew the sun in a peachy pale neutral before layering yellow towards the end. I took that peachy neutral and covered the bottom of the chalkboard before drawing in the structure in a warm medium brown. Lastly came the shading. I took a dark neutral brown and shaded as best as I could finishing with a light pale neutral for the highlights. Then I decided to give the edges of the structure a bit of yellow to really make it look as if the sandstone masjid was basking in the sun. I love the warmth this drawing exudes and feel as if it really captures the essence of what I imagine this time period and location were like.


How I Teach a Homeschool Lesson | West Africa Unit
Join me as we travel back in time to the grand empire of Mali in West Africa. For this lesson, we are making a map of Africa that is both physical and historical. This lesson accompanies our West Africa or Medieval Africa unit study which spans from the 900’s to the 1300’s. We studied the empires of Mali, Ghana and Songhai using various resources.
For this project, we used Fabriano cold press 90 lb. watercolor paper measuring 11″x15″. We used our Children’s World Atlas and 10 Days In Africa as resource guides and used our Winsor Newton watercolors to paint our map. We also used a fountain pen to label locations and geographical areas on the map. While the project turned out beautiful in the end, my 13-year-old son was hasty when labeling the map, so I had him to the project again. He wasn’t happy about it, but I insisted that my his age, I expected that correct spelling and grammar were necessary for this project especially since I had clearly reminded him of my expectations. In a situation like this, you have to balance the emotions of the student and the goal of the project. I could have easily let it go, but for this project, we weren’t just experiencing the spirit of the project, we were striving for precision and excellence.


West Africa Masjid
I’m really happy with the projects we did for our West Africa unit. With few resources to choose from, I came up with my own ideas. I got to flex my creative muscle and it was so satisfying creating the projects from scratch. We made a sand/mud masjid in west African style. This was initially a daunting projects, and I procrastinated for weeks, maybe even months before finally doing it. It turned out to be really simple! I’m really pleased with the outcome. It didn’t take as long as I expected and nearly a year later, it’s standing sturdy in our homeschool room. We used red/brown clay from Aardvark Clay mixed with sand to make the sand/mud mixture which would be the walls and roof of the masjid. We used 1/16″ dowels cut to about 3″ and stained using walnut stain. We also stained popsicle sticks for the door, but that didn’t hold up too well in part because the clay dried and cracked around the door. We assembled the whole thing on a 6”x8” gesso board we smothered with clay to make it appear like it was sand. Together my 13-year-old son and I made four thick rectangular walls for the base of the masjid. We used clay to seal the edges together. Once the majid and courtyard were complete, we inserted the dowels into the walls. You need to work quickly because the clay dries hard, and you won’t be able to mold the clay or insert dowels once it . When the walls (up to about 2 inches) were complete and dried, we moved on to the upper portion. Working this way ensured we didn’t collapse the walls as they bent or draped under the weight of gravity. We assembled the masjid by making four trapezoid shaped walls and lifting them into position. Once with they were positioned. We added the dowels and let it dry before working on the courtyard details and the door.


Working with Shea Butter
Making lip balm is more simple than I thought. With a few basic materials, you can make dozens of lip balms in just the right consistency and flavor. Plus, you can mind your ingredients so you’re using the best ones available. For this project, we are using shea butter, coconut oil, beeswax and cocoa butter. We chose to make lip balm using shea butter because we learned that shea butter was a natural resource in West Africa. For our West Africa main lesson block, we ran short on ideas for projects and and hands-on activities. While this project may be a stretch, I do think that shea butter was likely used as a moisturizer in ancient times. And seeing as is was readily available in the dry regions, it seems perfectly logically that it would have been used in this way and likely other ways as well. For this project we also used a lip balm tray and lip balm containers. If you wanted, you could put your lip balm in a tin or plastic container and use your finger to apply the lip balm. We also used essential oils to scent our lip balm. Since we’ve made lip balm and bar lotion before, we didn’t follow a recipe, and estimated measurements and proportions. In the end, our lip balm is smooth, all natural and smells good!


Mansa Musa’s Pilgrimage to Makkah
While working through our West Africa main lesson block, we learned about Mansa Musa and his great pilgrimage to Makkah to perform Hajj. He is reportedly the wealthiest man in recorded history and carried so much gold to give as charity that he crashed the markets in Egypt with in the influx of gold. This was in the 14th century at a time when Europe was still experiencing its Dark Ages. To see the rest of the world prosper, gain wealth and knowledge and make great discoveries in science and medicine was a stark difference from what was transpiring in Europe. I’m disappointed that the Middle Ages is focused on Europe as if the rest of the world didn’t exist. In fact, because of the Silk Road, travel and trade, there was much exchange of goods, ideas and resources. While studying the rest of the world during the Middle Ages, we came up the empires of Ghana, Mali and Songhai. While learning about these, we discovered the wealthiest man, Mansa Musa, and his massive caravan to Makkah. For our main lesson block on West Africa and the empire of Mali and the leader Mansa Musa, we collected a number of resources to use. What we couldn’t find, we hands-on kits and projects for with to supplement our unit. As a result, I repurposed a Medieval castle building kit to make our replica model of the Kaaba. While I’m pleased with our ingenuity and creativity, I’m not super pleased with the end result. Our Kaaba doesn’t look like the Kaaba. It’s quite plain in our attempt to recreate a historically accurate depiction of what the Kaaba might have looked like in the 1300s. We did cut a piece of black T-shirt material to drape over the top, but that looked worse. I also wanted to put the Black Stone on the southeast side of the Kaaba, but didn’t find a way of recreating the encasement. We chose a limestone color for our bricks, but they may have been more grey. We used a brick mold from our castle kit and undyed plaster of Paris. We stained popsicle sticks for the roof and made our door with them as well. In the end, I’m glad we made it, but I wish there was a pre-made kit available with more historically accurate supplies.


West African Food
Ghana Mushroom Soup
Whenever we do our history main lesson blocks for homeschooling, we always do our best to include some historical or regional recipes to enhance our lessons. While I attempted to look for historical Malian food, we ended up buying two modern cookbooks, one on Ghanaian food called The Ghana Cookbook and one on Senegalese cooking called Senegal by Pierre Thiam. My goal is to try a minimum of two recipes from each cookbook I get for our unit studies and for the Ghana cookbook, we cooked Mushroom Stew about 10 times! We love this recipe so much, and granted I’ve made some alterations to the recipe and maybe some shortcuts as well, but overall, I feel we’ve stayed pretty true to the recipe and in the process tried something new. Preferably, I wanted recipes that included ingredients we didn’t readily use in our own cooking so we could get a feel for the region. While this recipe doesn’t do that, I think bringing in some staples from a region allows you to truly try something new. All places will usually have a meat, grain and vegetable that is heavily relied upon as well as spices that are common. What we learned through our Silk Road unit study is that spices traveled the Silk Road, later known as the Spice Route by sea, so some spices that are quintessential in West Africa may have originated in China or India! Since making this recipe, my West African friends have told me that you can serve this over rice or another grain. We typically ate it like a stew and it was just right for chilly falls and springs.


Kale, Avocado and Grapefruit Salad
One of the things we like the best about our history units, is the new recipes we get to explore and discover as we learn about a culture or region. For our West Africa unit, I bought two cookbooks. One called Ghana Cookbook and this one called Modern Senegalese Recipes from the Source to the Bowl by Pierre Thiam. While I didn’t look extensively, I was actually looking to get a cookbook on Malian food and preferably a historic cookbook before the influence of colonialism. While I didn’t find what I was looking for, I did find this gem. Senegal by Pierre Thiam is full of artsy photographs of people, places, cultural festivities and food. You learn a lot about the region through the narrative of food and culture, even the changes in food as a result of colonialism. I admit I was surprised at this recipe. Being a California resident, foods like grapefruit, avocados and kale grow abundantly here. In fact, the county I grew up in was known and filled with citrus groves, with other orchards like avocado, almonds and walnuts mixed in in the surrounding areas. So when a Senegalese recipe called for easily accessible ingredients and furthermore looked like it would appear in a posh little beach cafe, I had to try it. I didn’t have high hopes for this combination. I couldn’t see how grapefruit, avocado, garlic and mustard could possible be paired together let alone taste good. Goodness was I wrong. Not only was it good, it was amazingly delicious. The sweet tart grapefruit balanced the greens and mustard, the cashews added crunch and texture and the avocado added a smooth creamy deliciousness that took this salad from appetizer to meal. If you wanted to make it a complete meal, you could add some grilled, but cooled, chicken breast seasoned with salt and smothered in a cashew sauce. Add some fresh baked bread on the side and you will feel so satisfied, you won’t feel like dessert! Truly! I encourage you to try this recipe.


Nigerian Fried Rice
Few family recipes are all around crowd pleasers. There’s usually at least one person who doesn’t like something I cook. Usually that person is me. And yes, I’m not a fan of this dish…well at first that is. I’m not a rice fan (except for Zeresh and Adas Polo and a new pomegranate rice), so biryani and kibsas don’t interest me. This dish is similar to a biryani or kibsa in the sense that it’s a one pot meal in which the rice will cook with the rest of the vegetables and meat. It’s so easy to make, but it does take over an hour to cook. It takes about 15 minutes to brown the onions and add the tomatoes, spices and other ingredients (that also includes prep time as I chop and prep while the onions are cooking), then 30 minutes to cook the chicken, and another 30 minutes to cook the rice with the chicken. But once it’s done (and if you cook it in a pot big enough), you’ve got food for a dozen servings! This recipe was adapted from the book called Nigeria by Patricia Levy. While we did take some liberties with this recipe, I do believe in capturing the essence and spirit of a historic or regional meal. As these are part of our homeschool lessons, the experience is the primary goal, accuracy is secondary and trying new ingredients is somewhere in there! Actually, I love the idea of trying new foods, but sometimes the pain of finding them often means we are using alternatives which are part of our daily diet and that seems to defeat the purpose. For this meal, I used 6 drumsticks and 4 leg quarters. I seasoned with cumin, curry powder, salt, and onion and garlic powder. I used about 7 cups of water and 4 cups of rice. I added 3 large tomatoes (but I would have preferred more), plus two jalapenos which were medium spicy. I think it would have been tastier if I used chicken or vegetable broth, but I didn’t have any. I also used parboiled basmati rice which I find holds up really well to these kinds of dishes where the rice is soaking with the meat or vegetables. I also used my cast iron large oval pot from Le Creuset which helps ensure even temperatures.


Banana Coconut Fritters
This delicious dessert is sure to impress you. It’s simple with ingredients that are readily available. We got this recipe from the book Senegal by Pierre Thiam. We are using this book as part of our West Africa unit for homeschool. We love to include regional, cultural and when possible, historical foods. This book offers all of that. It’s a breathtaking journey through Senegal, the people, the food and the culture. You learn about culturally religious foods and celebrations, and in the process you learn what is important to the Senegalese people. This cookbook is more than a cookbook, it’s an experience. We’ve made a couple recipes from this book and we aim to do more. We weren’t sure how we were going to like this dessert, so I halved the recipe. That was a mistake! It was so delicious, I made it again the following day. We made a few alterations to the recipe, as a Muslim family, we did not add rum to the batter. We also didn’t let it sit for an hour as directed. We were too impatient! I used avocado oil and a sauce pan for frying. Even without the right equipment, you can achieve success with this recipe. I also didn’t have the right kind of shredded coconut, so we took our slivered coconut and pulsed them in the NutriBullet until they were flour consistency. That mixed well with the flour, which was white wheat flour and not millet flour as I didn’t have that on hand. Since the coconut was sweetened, I put less sugar in the batter. That too was a mistake as the batter could have used more sugar. After gently frying the banana fritters a few at a time, I placed them on a paper towel and dusted them with powdered sugar. I paired them with some vanilla ice cream, but I think coconut ice cream would have been even better!


West African Inspired Peg Dolls
For our West Africa main lesson block spanning the years 900-1400 and the empires of Mali, Ghana and Songhai, we did several projects, cooked regional recipes and read books. We are including our peg dolls in this series, though this is the first time we are making peg dolls to represent a specific people, location and time period. These are not accurate replicas, these are based on two resources: Bringing Water to Kapiti Plain and Children Just Like Me. These peg dolls, like the meals we cook for our unit studies, carry the essence and spirit of the project or meal, not the historical accuracy. When making these for our West Africa unit, I used sources that depicted clothing from different regions of Africa and most were modern or traditional. For this project, I used materials from A Child’s Dream. The peg dolls, paints, yarn and fabric can all be found in their shop. The accessories like beads and twigs, I got from my own supplies. I also tried out different art mediums for skin tones. Here are a few tips I learned from others and some I learned along the way: Sand peg dolls before staining (this isn’t necessary if you are painting with acrylic paint or opaque watercolor paints, though it will make your surface smoother). Use beeswax sealant to protect the finished peg doll (I usually leave my peg dolls unstained, so I’ve only started doing this more recently when I used opaque watercolors for my peg dolls for outfits). Use a weight to submerge the peg dolls when staining them in a bath. I found that some parts that were left exposed and when the water evaporated, it left stain rings on the peg doll. At first (and in the video I say) I prefer the walnut ink (which I used as a stain), but upon reflection, I think the peg dolls that were soaked in the bath had a more even tone. One important suggestion that was offered by my friend Kristy (at Ethnic Green Living), said to make skin tone varied, even within a family. You will see that in one peg doll family. While I’m only sharing two peg doll families here, we have others in our homeschool that we have added to these history units.


West Africa Review
At the end of each of our main lesson blocks and unit studies, I like to share what we did, what books we read, what things we liked and what things we didn’t like and didn’t get to. When putting together a unit, I often don’t know how our resources are going to work out. Sometimes these books and projects are brand new to me. It’s important to me that I share with you how we liked our materials and which ones I recommend and more importantly which ones I don’t recommend. As we usually use our educational funding to buy many of the materials you see in our tutorials and lessons, it’s easy for me to try these things out without worrying about our personal budget. Since most who homeschool don’t have access to this kind of funding, it’s personally important that I share with you the insides of the books I’m using and how we liked them. Often the grade level is hard to determine from looking at a resource online and many times, it’s hard to see sample pages and gauge the books from the limited information available online. Granted you could get many of these books from local libraries and some of my older selections from thrift bookstores or library bookshops, but overall, I’d like to simplify the process for you as it is my skill and passion to put together main lesson blocks and unit studies that are book rich. When looking for books, I like engaging living books when possible. That’s not always possible and it can be disheartening to get a book that looked promising only to have fall flat for you and your students. Also, I tend to get an assortment of books at varying levels to meet the needs of multiple students. Even if you only teach one or two children, adding variety in the form of picture books, chapter books and other resources enriches the learning experience. In my review video, I also share the projects we did. Usually they are finished projects, but occasionally, you’ll see an unfinished project or a project we haven’t started yet! There is overlap in our unit studies and it’s not uncommon for us to have a week of overlap of finishing up one unit study as we begin another one.


