North Africa and the Journey of Ibn Battuta
The 1200-1400s were a vibrant time for explorers. Starting with Marco Polo in the 1200s to Ibn Battuta in the 1300s and finally Zheng He in the 1400s, the European, African and Asian continents were be explored and journeyed upon. While Marco Polo and Ibn Battuta primarily journeyed by land (occasionally by sea), Zheng He was the admiral of a fleet of Chinese ships that traveled from China to Africa. There were other sea explorers from Mansa Musa’s court with some traveling to South America. While most of Europe was still in their Dark Ages, the rest of the world was thriving. On the northern tip of west Africa is where our journey begins with Ibn Battuta. He was a Moroccan Muslim of Berber descent who set out on a journey to perform Hajj (one of the five pillars of Islam). The journey from north Africa to Makkah in the Arabian peninsula (modern day Saudi Arabia) began in 1324 and didn’t end for over 20 years! Once Ibn Battuta left his home as a young man, we never saw his parents again. It took him about 1-2 years before performing Hajj which he was able to do multiple times in his life.
This unit study is on Ibn Battuta’s life. It’s a smaller unit study than what we normally do and accompanies our larger Silk Road unit study which has grown over the years to included several smaller units on the time period of about 600s to 1500 and spanning the areas from North and West Africa, to Arabia and Asia. When we do our history units, we love to include biographies, projects and recipes. Each region has much to offer in the way of exploring the food that’s either historical or regional.

Lesson Plans
When we initially did our Ibn Battuta unit study, we focused only on Ibn Battuta and left the study of the destinations of his travels to our other unit studies of the Silk Road, Ancient China, Mongolia, West Africa and the Golden Age of Islam.
When putting together these lesson plans, I decided to approach it differently than the way we did this unit. Now you can learn about the places and history of those places Ibn Battuta traveled to and where he lived during his multi-decade travels across the Muslim world.
While these lesson plans say 3-6 weeks, this is a tight schedule. It isn’t realistic to expect to achieve all that is suggested in the lesson plans in that time, nor may you wish to achieve all of it. Often our lessons trail into our next unit and rarely (or rather never), were we able to stick to a schedule the way I’ve presented them here in these lesson plans.


The primary goal of setting up lesson plans this way is to accommodate all the resources we have used and present them in a way that may be more achievable in a traditional setting. As we homeschool with our personal approach, as most homeschoolers do, we may devote a whole day to cooking a week’s worth of recipes, another day to reading chapter upon chapter of our books and yet another day in which we lose ourselves in our handwork and projects.
I encourage you to use the lesson plans as a resource rather than a guide. Use the books you can find or have on hand.
Chalk Drawing
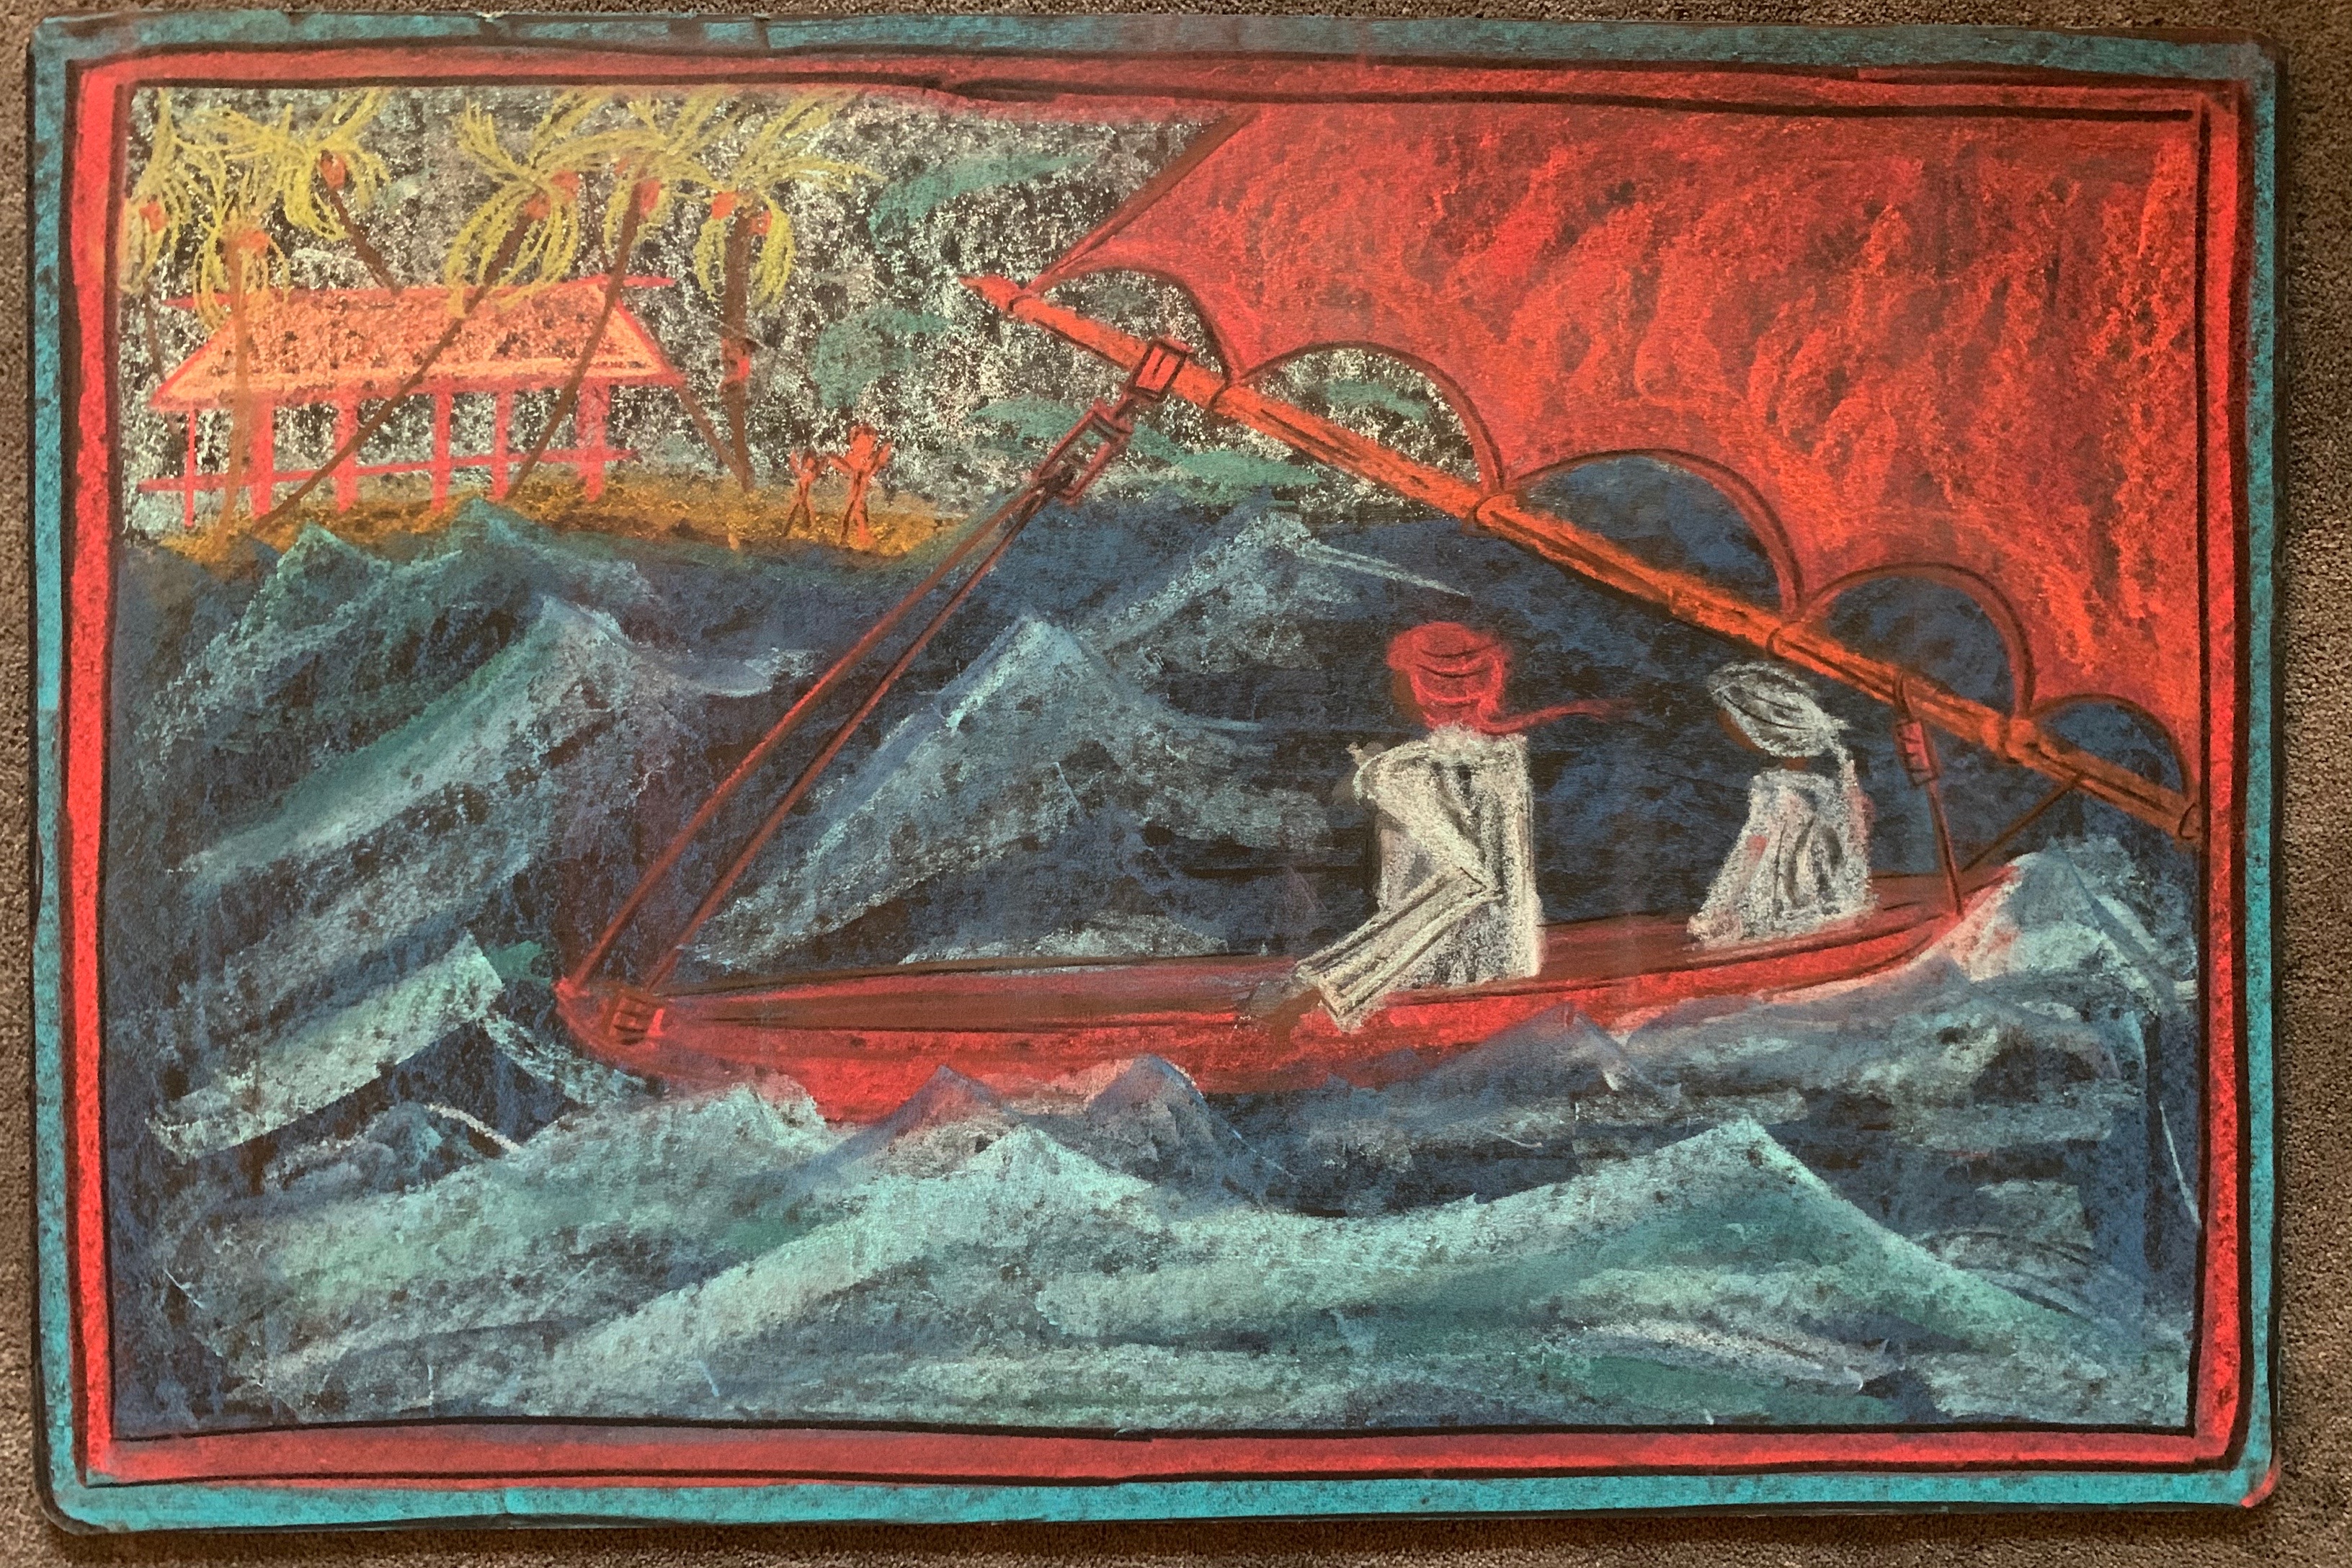
We love to start our units with a chalk drawing. In this case, I was originally thinking of doing a map of north Africa and Arabia and part of Asia, but then as I was flipping through the pages of the book The Traveling Man by James Rumford, I came upon a stunning illustration of a boat with a red sail upon a pristine blue sea. I immediately decided to change the chalk drawing and I’m so happy I did because I love the way it turned out. I’m using Sargent Art Chalk Pastels from Blick Art Supplies and a 2’x3′ chalkboard from Paper, Scissors Stone.


Projects & Hands on Activities
Leather Travelers Journal
There are two travelers/explorers who we studied during our history units which focus on the Silk Road and the time period of about 1200-1400, and we imagine both of them carried a journal of sorts to record their travels, what they saw and how they felt. We decided to make an authentic leather journal filled with real parchment or vellum. Did you know genuine parchment is goat skin and genuine vellum is sheep skin? And did you know that it’s probably about as expensive to buy it today as it was 700 years ago?! One small 5″x7″ sheet of parchment cost me about $5. Maybe there are better deals out there, but I have to admit that looking for actual goatskin parchment wasn’t easy! So we opted to buy a few sheets for the children to feel and use, but made our journals out of handmade paper (9″x12″) I found on Amazon. I also found a piece of genuine leather (12″x24″) for the cover and used my own scrapbooking tools and embellishments for the details. We used this notebook for our written and illustrated lesson work for our Ibn Battuta and North Africa main lesson block. My 14-year-old son loved the journal so much! And one perk from the way I made it, allows you to add or remove paper. It does flip up and over rather than from side to side and we also didn’t stitch the paper into the spine the way that journals were likely made at the time. I do have a tutorial on how to make notebooks with a stitched spine if you choose to make your journals that way.


We also altered store bought traveler’s journals which ended up being super affordable and easy. I bought our journals from a local craft store and embellished them with a sandala from The Rustik Home. A simple, yet beautiful addition to a store bought journal was a quick and easy way to do this project. The only downside to the store bought journal was the size. It isn’t really big enough for us to use as a main lesson book for our daily lesson work. It is just right to use as a mock itinerary or timeline.


DIY Historic Kaaba
Our DIY mini Ka’aba is a project that worked for several main lessons blocks from the Islamic Empire, to North and West Africa and through to the Silk Road. We love our hands on projects and I love to use as many kits or crafts books when doing our units. For this unit of North Africa and Ibn Battuta, we couldn’t find many hands-on kits and projects for with to supplement our unit. After the unit started, I did find a build kit by Aedes Ars for the Lighthouse of Alexandria. As a result, I repurposed a Medieval castle building kit to make our replica model of the Kaaba. While I’m pleased with our ingenuity and creativity, I’m not super pleased with the end result. Our Kaaba doesn’t look like the Kaaba. It’s quite plain in our attempt to recreate a historically accurate depiction of what the Kaaba might have looked like in the 1300s. We did cut a piece of black T-shirt material to drape over the top, but that looked worse. I also wanted to put the Black Stone on the southeast side of the Kaaba, but didn’t find a way of recreating the encasement. We chose a limestone color for our bricks, but they may have been more grey. We used a brick mold from our castle kit and undyed plaster of Paris. We stained popsicle sticks for the roof and made our door with them as well. In the end, I’m glad we made it, but I wish there was a pre-made kit available with more historically accurate supplies.
Find me on YouTube, Twitter, Instagram and Facebook
North African Inspired Cuisine
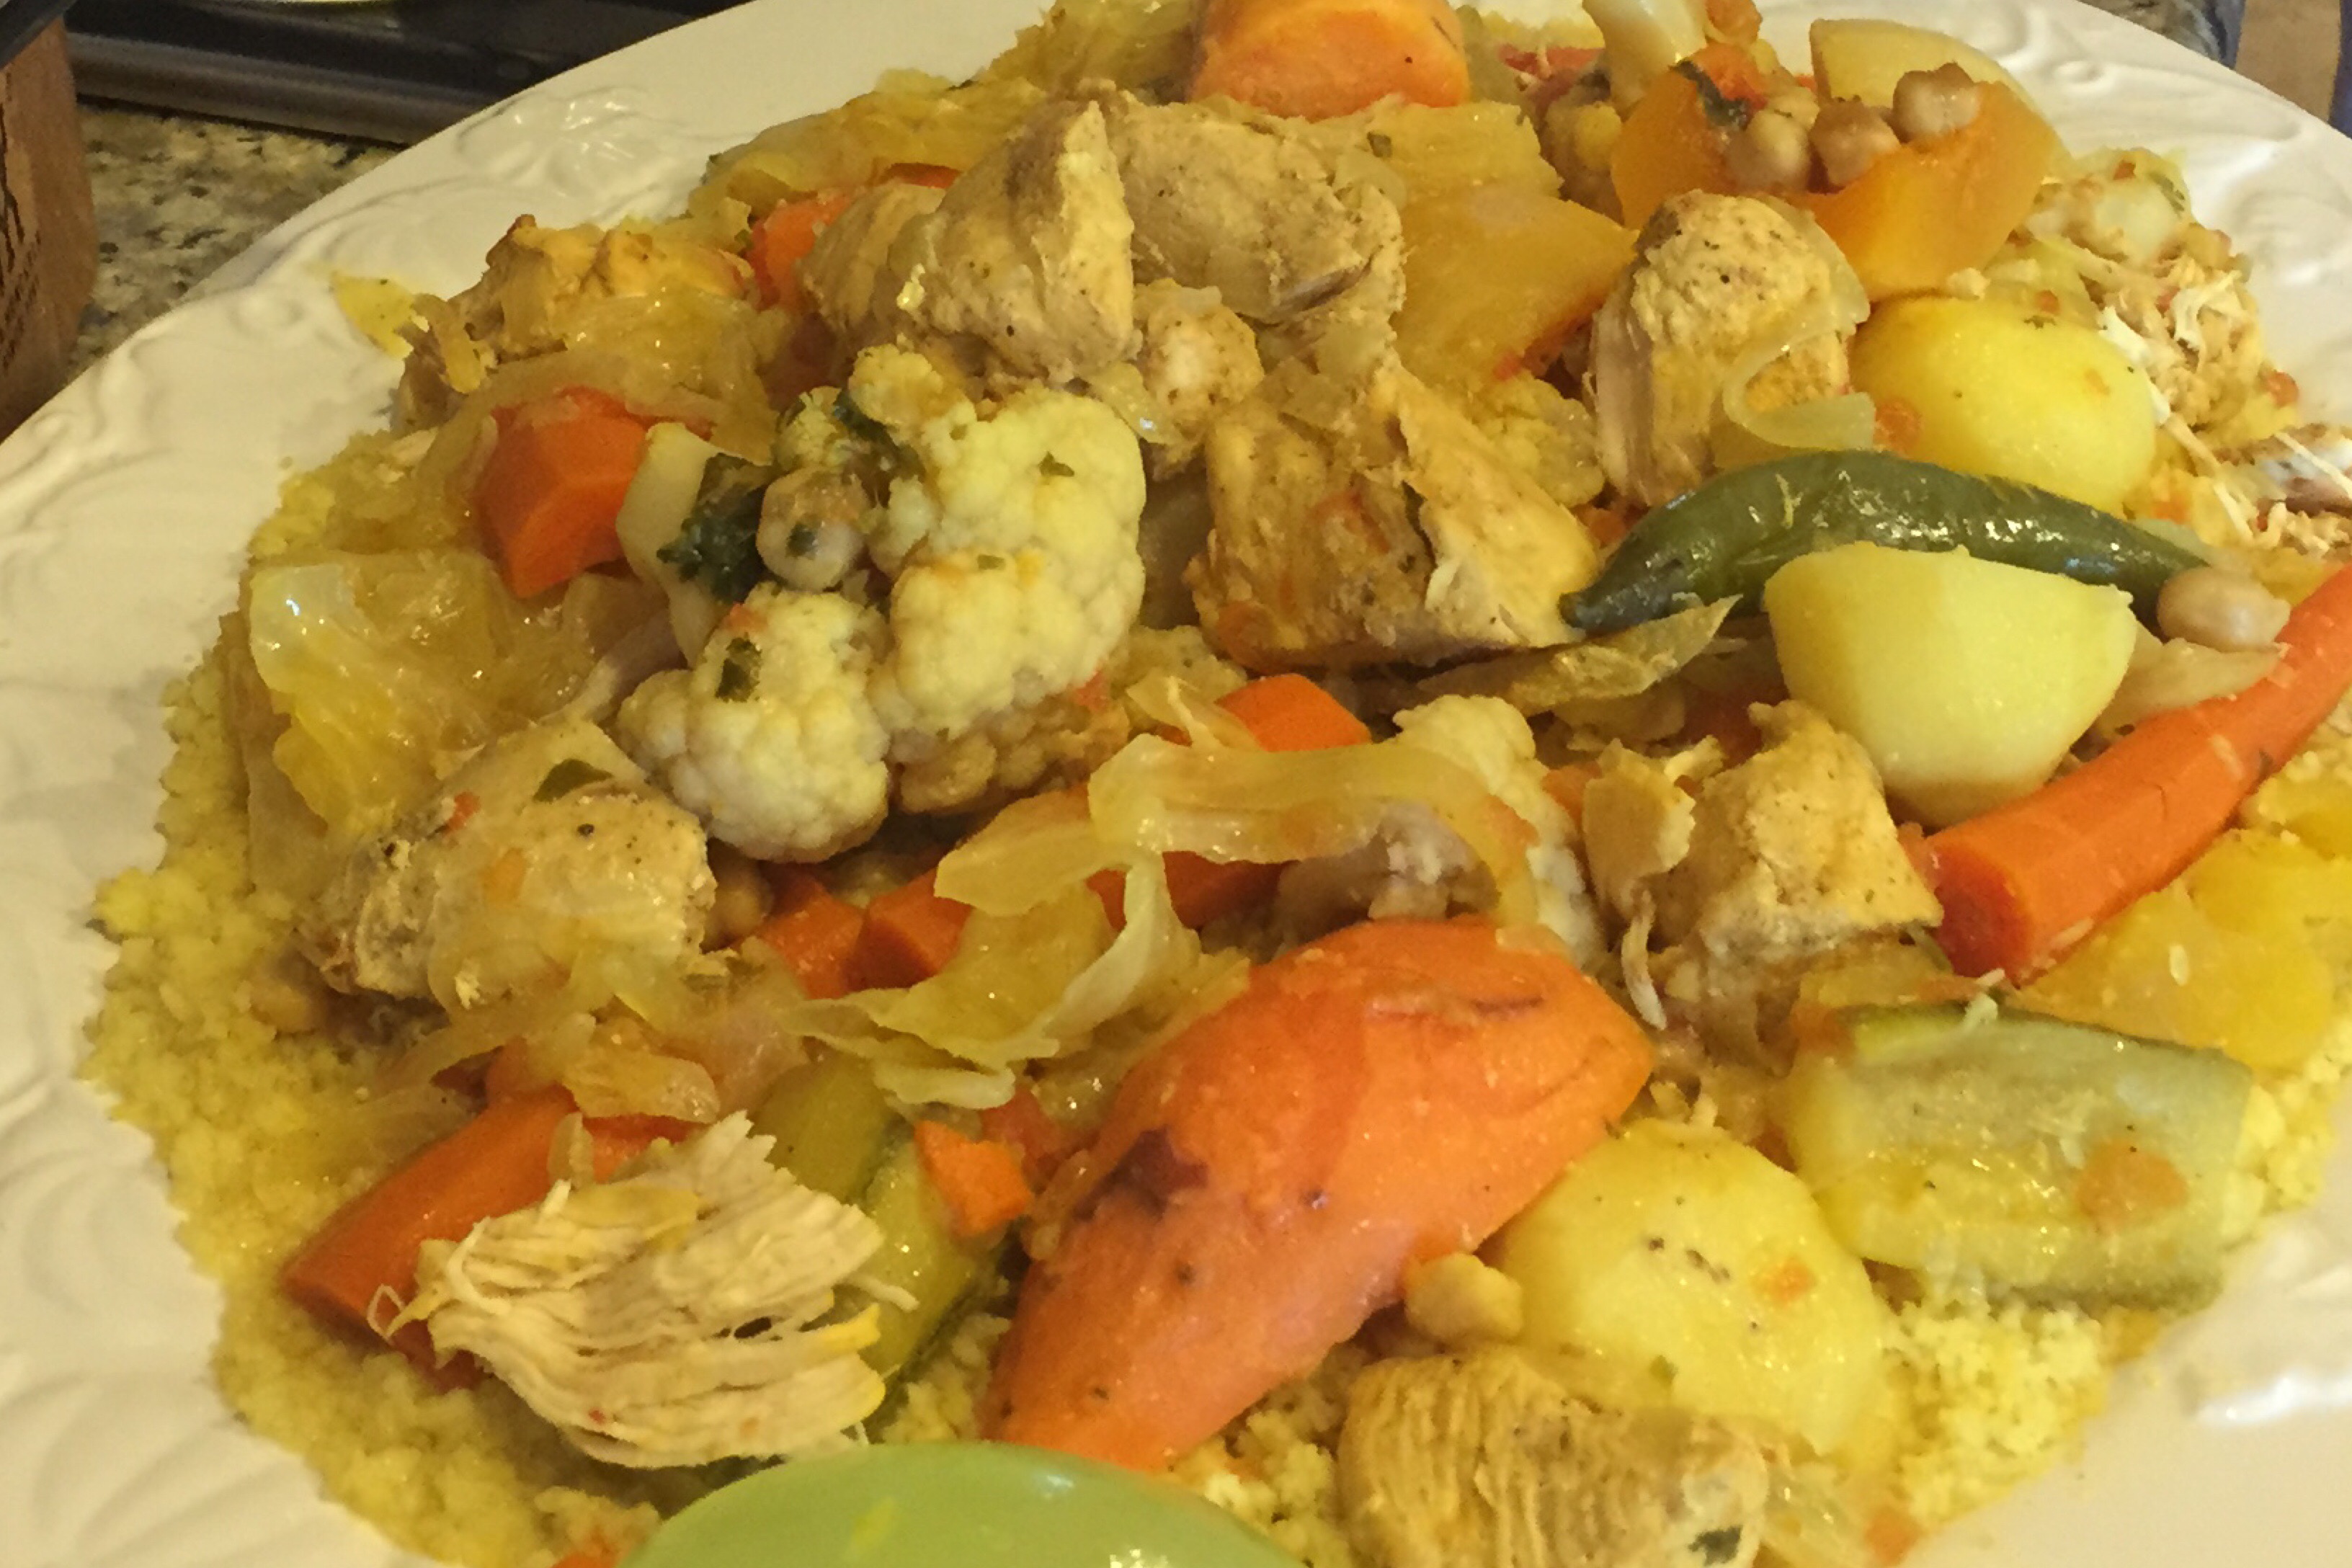
Couscous
This is my favorite fall recipe of all time! It’s so warming, nourishing and healthy; it’s perfect for cool autumn days or for a cozy dinner with friends. I have my dear friend Laura and her husband to thank for sharing this recipe for me. Though the following recipe is altered from the traditional way Noureddine made his, it still turns out pretty good, but nothing compared to the original! I’d like to point out a couple differences between my version and his: firstly, I repeatedly forget to add cilantro to my recipe, but that is in the original one. Secondly, and more importantly, I make mine more like a soup or stew, whereas the original recipe calls for very little to no water. The vegetables steams as the meat and onions cook, and while releasing their own water, the vegetables then add to the liquid and then in turn add to the steam to finish cooking the rest of the vegetables.
This recipe is naturally dairy free and to make it vegan, simply omit the meat from this recipe. It’s so flavorful as it is, you won’t even miss the meat! To bulk up the protein, I’d recommend adding more garbanzo beans.
The complete is as follows and does differ from the one in the video. Please keep in mind that this is a very forgiving recipe and anything goes! To make the couscous base of this meal, simply follow the directions on the box of couscous. It’s super simple to make.
I love my peeler! Though I accidentally mentioned it was by Martha Stewart, it’s actually by Chef’n and can be found at Bloomingdale’s.
Moroccan Couscous-Chicken
Special thank you to Laura and Noureddine for this recipe 🙂
Ingredients:
1 chicken (whole with skin on or cut into 10 pieces-no skin)
2 onions-sliced
2 jalapenos
1 head of garlic-minced
Ginger (equal to garlic) – minced
1 small can of tomato sauce (8 oz.)
1 butternut squash-peeled and quartered
1 bag of carrots (about 6-8)-peeled
3-4 potatoes-peeled and cut in half long ways
2-3 sweet potatoes or yams-peeled and cut in half
1 acorn squash- peeled and cut in half long ways
1 head of cauliflower-washed and quartered
½ head of green cabbage-washed and quartered into wedges
1 can of garbanzo beans
1-2 boxes of couscous, follow directions of package
Spices: salt, pepper, cumin, turmeric, cayenne pepper
Optional: add other fall vegetables that are in season like squashes and root vegetables
Directions:
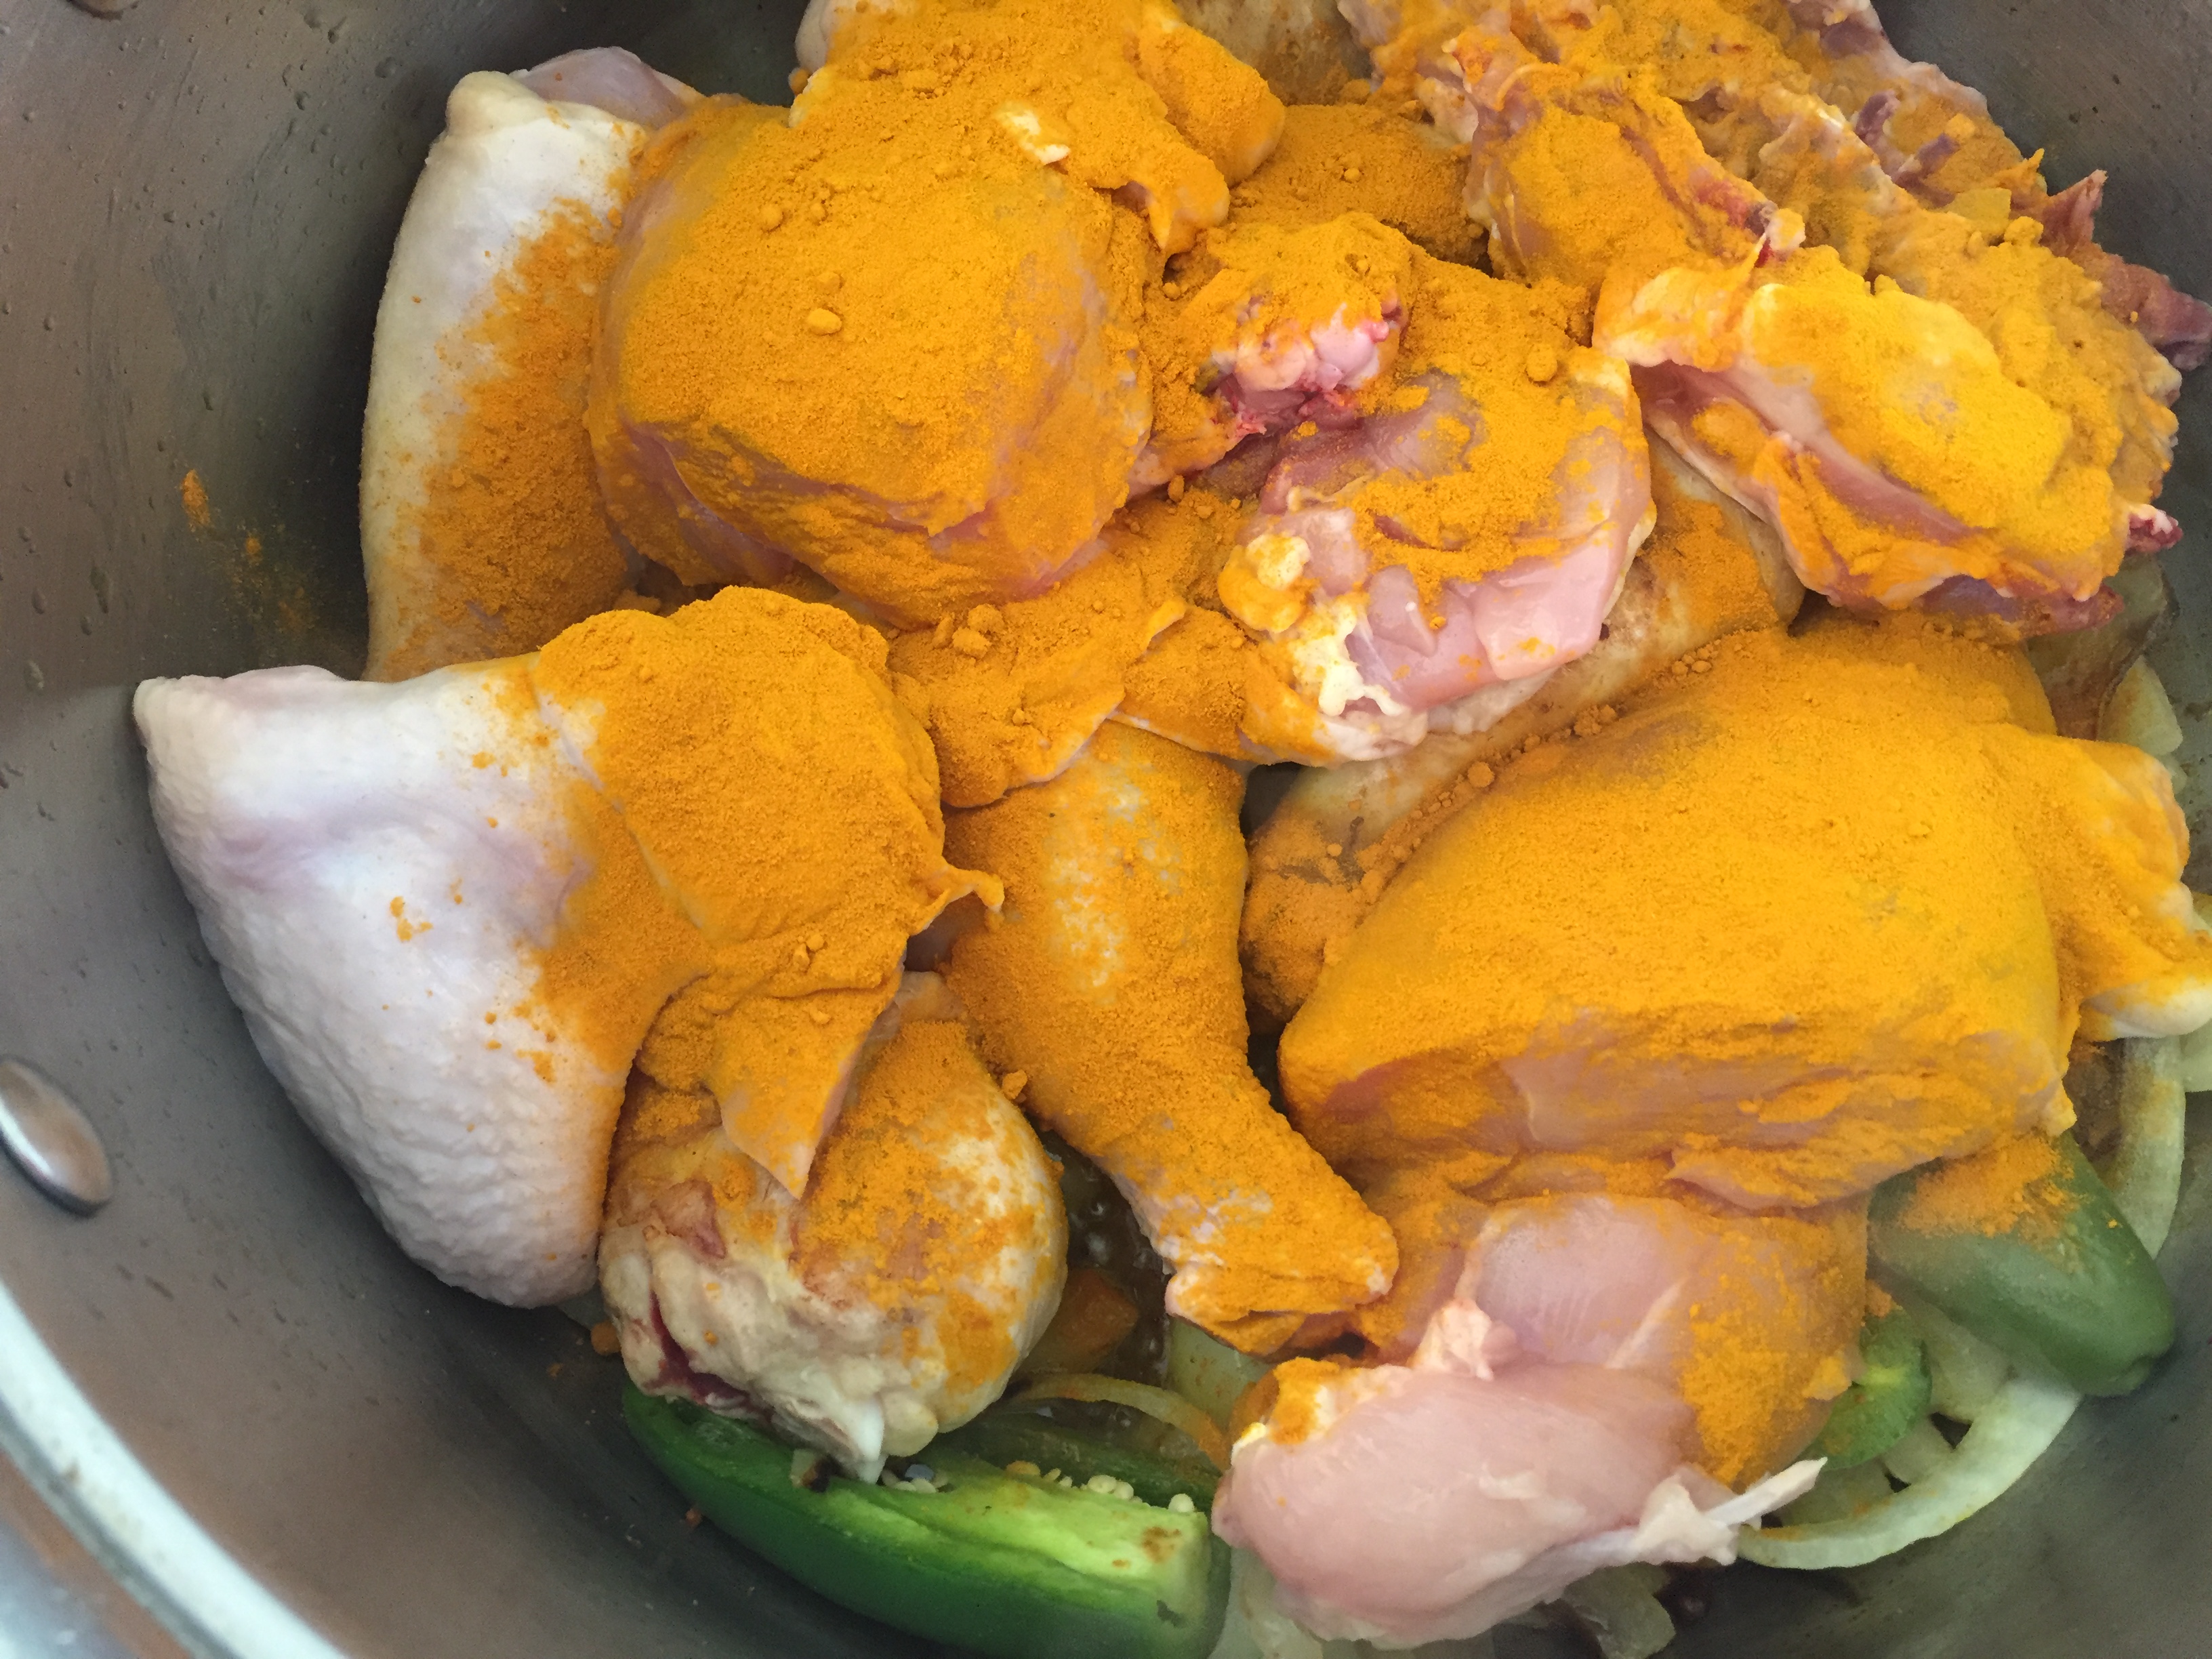
If cooking a whole chicken, wash and place it on a baking pan, season lightly with black pepper and salt and bake on 450-500 degrees for 10-15 minutes uncovered until the skin is dark golden brown and crackling. Reduced to 400 degrees, poke the skin of the chicken where the thigh and breast meet to let the juices run, and cover the chicken. Cook for another 45-60 minutes until the chicken is done, but not over cooked.
If cooking chicken pieces begin by browning an onion over medium heat, add the jalapeno at this time, trimming off the top if you want it spicier. As the chicken will cook quickly, just brown the chicken pieces before covering with water and bringing the water to a hot simmer. You may choose to heat water earlier in a separate pan, and add it to the chicken hot.
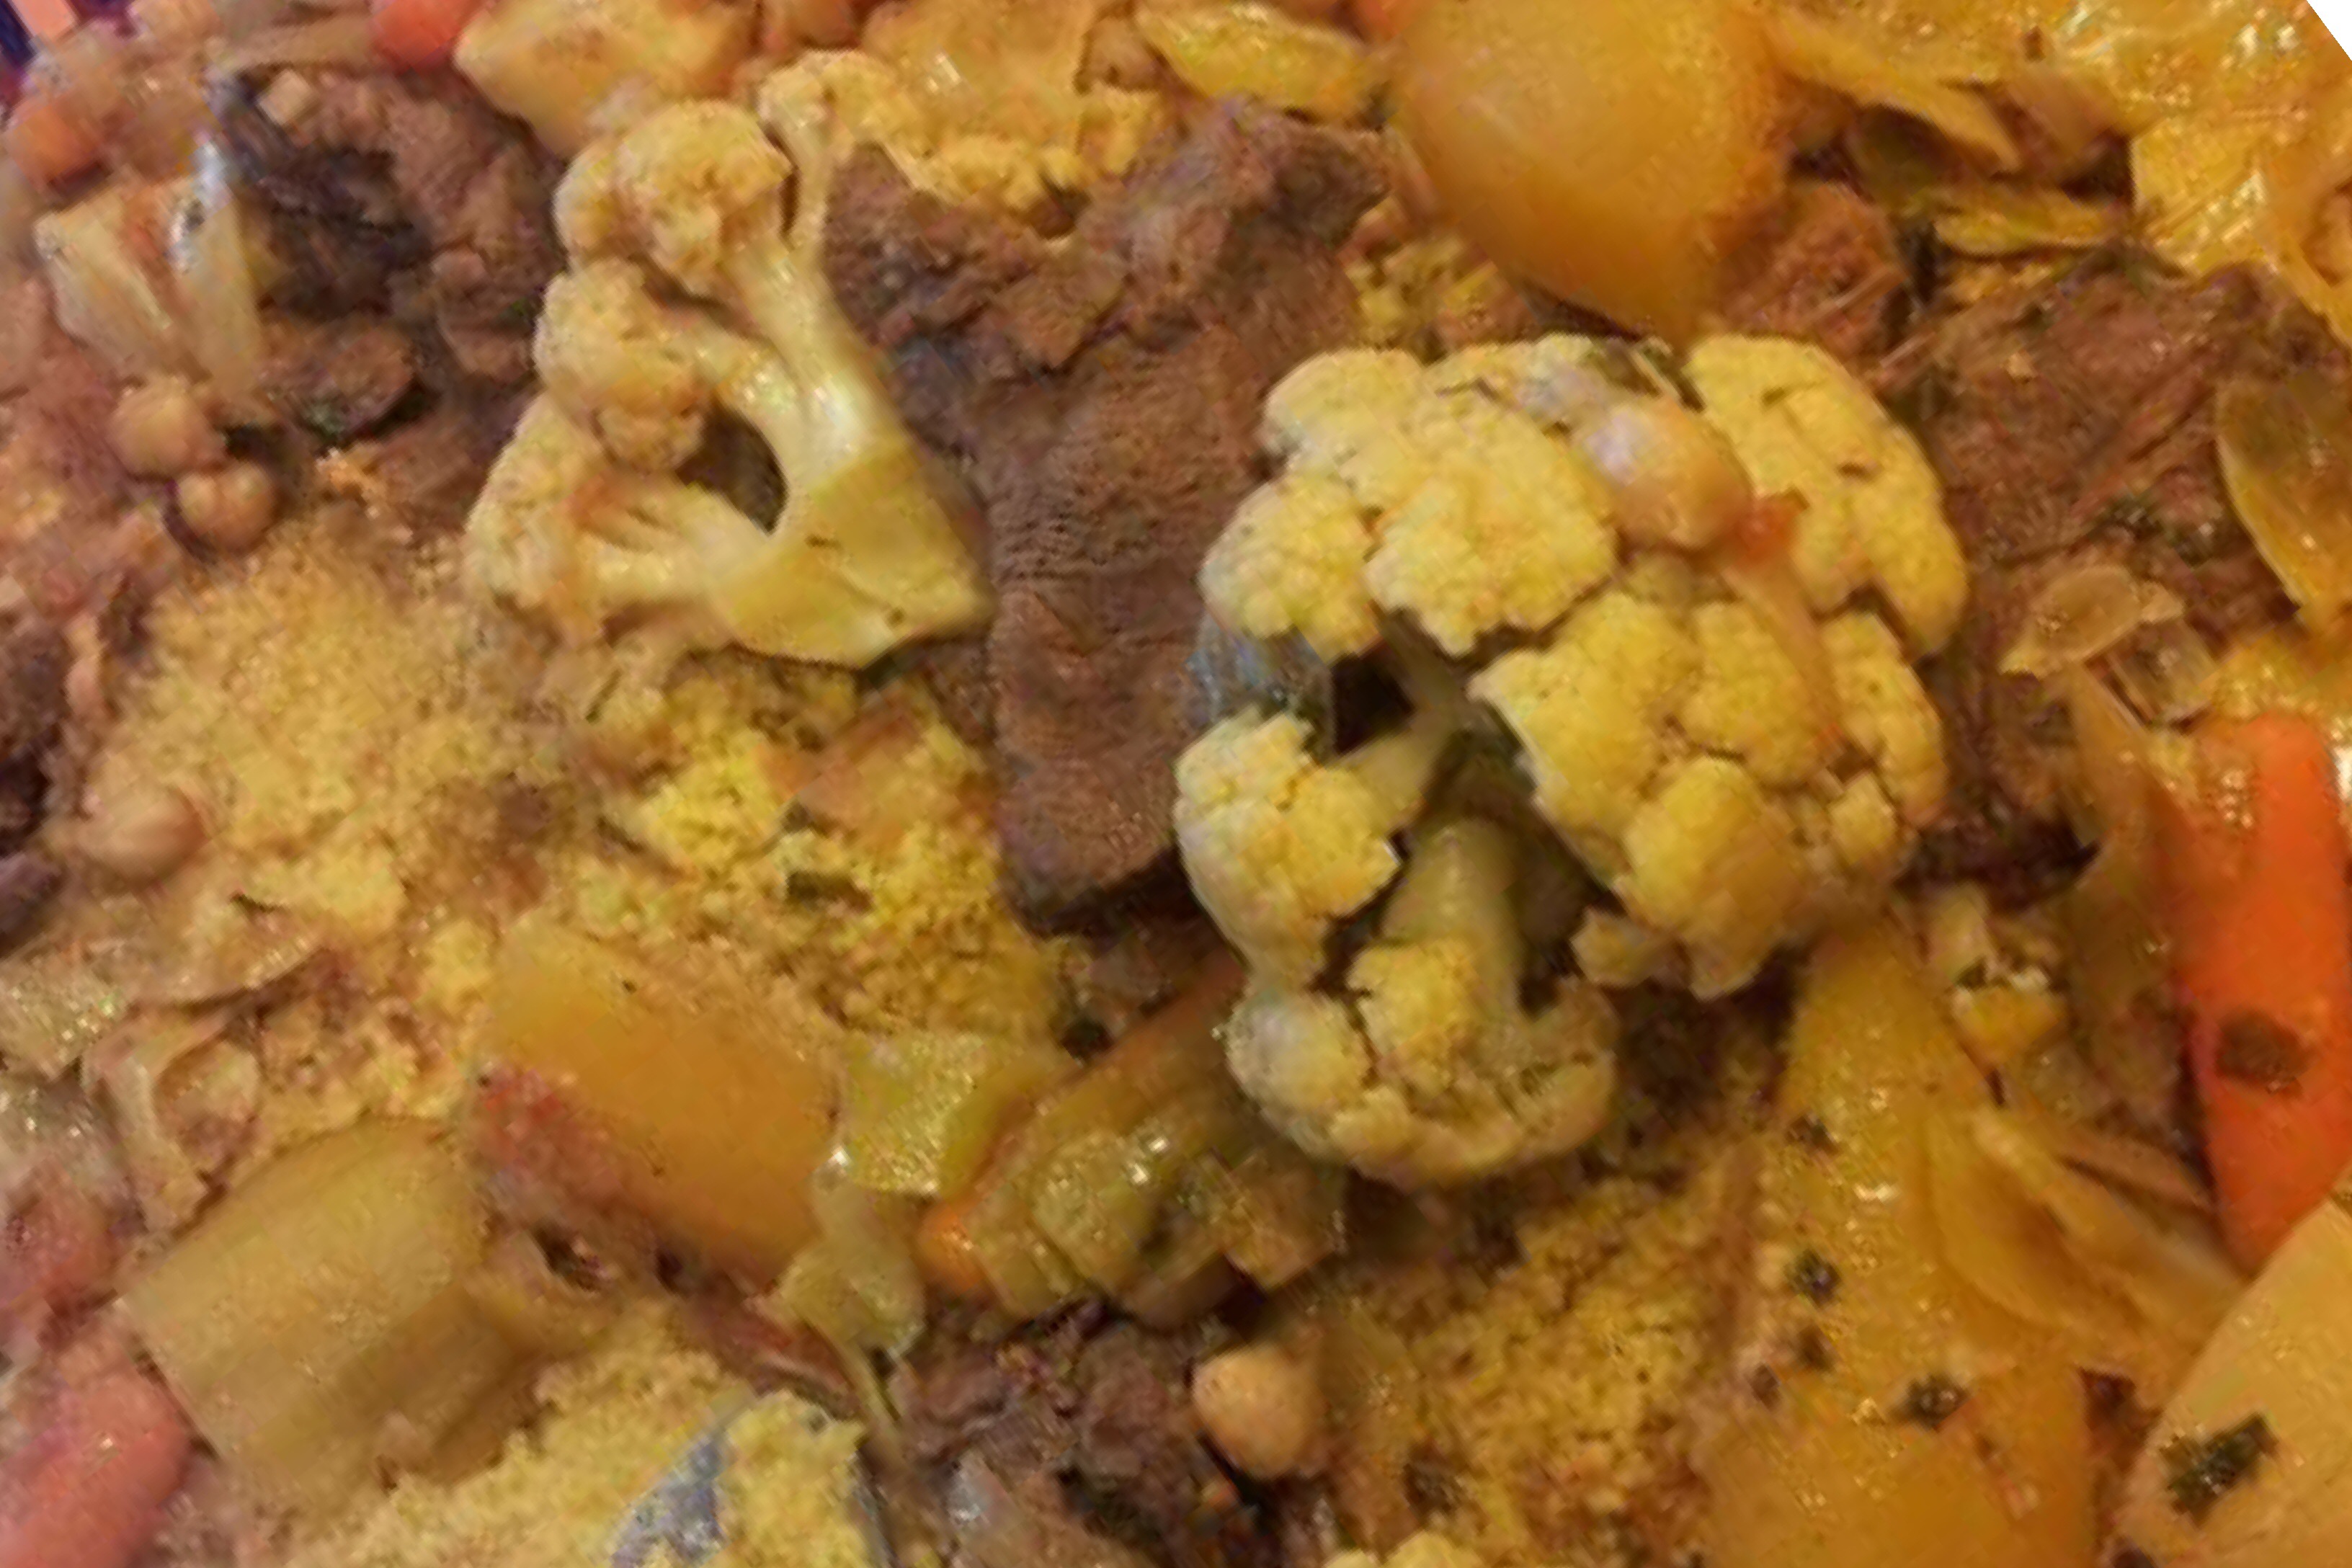
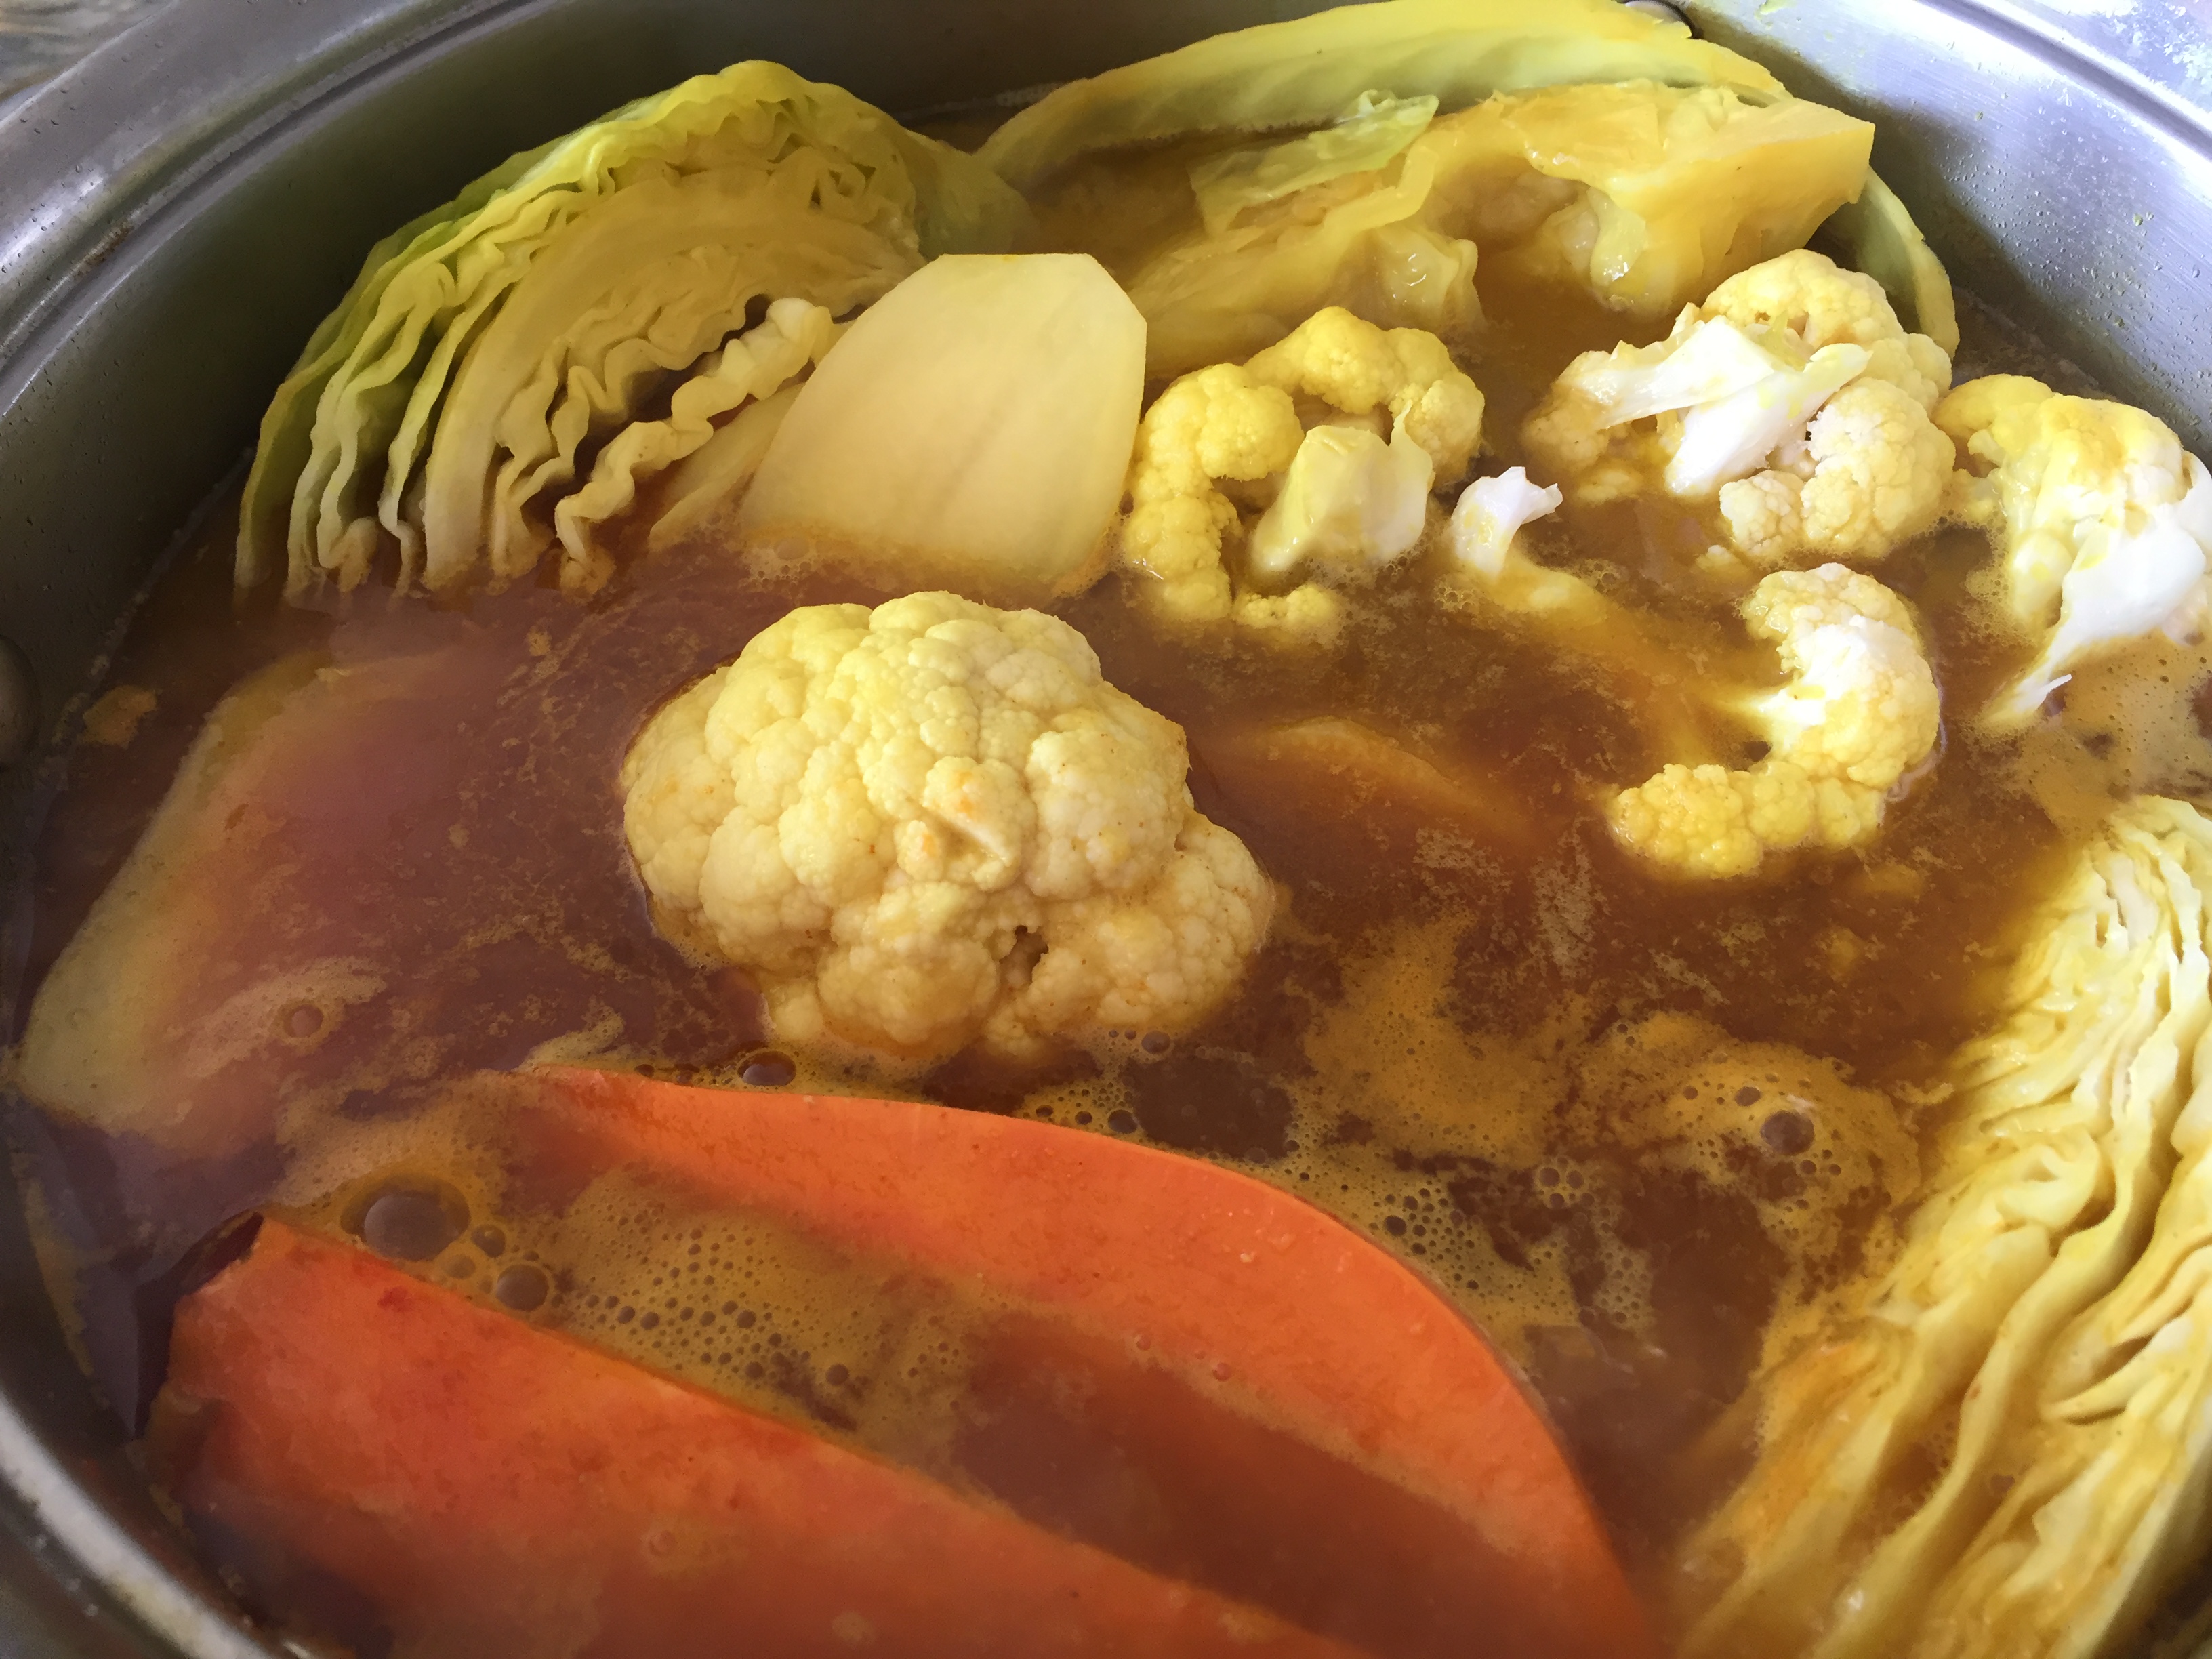
Add garlic, ginger, salt, pepper, a pinch of cayenne pepper, turmeric and cumin, and tomato sauce. Layer in the vegetables starting with the ones that take the longest to cook. I start with the dense squashes and carrots, then add to root vegetables and finish with cabbage and cauliflower on top. Lastly, add the garbanzo beans. Avoid mixing as this breaks up the vegetables, only lightly mix if necessary. I like my couscous soupy so I tend to add quite a bit of water, enough to nearly cover the vegetables. Though this is not traditional, it has become a family tradition and allows extra liquid for making the couscous.
When the vegetables are all tender, turn off the heat and prepare the couscous. Follow the direction of the package.
Presenting the dish is as important as cooking it. In a large shallow serving dish, add a thick layer of couscous, evenly spread the couscous around. Next add the vegetables and chicken pieces, or lay the whole chicken on the bed of couscous and then assort the vegetables around the chicken. Using a strainer, add soup to a bowl to add separately to each plate.
Hana’s Tip: Instead of using water to make the couscous, substitute couscous broth for water for a richer, tastier couscous.


Moroccan Couscous-beef
Ingredients:
2-3 lbs. beef stew cut into bit size chunks
2 onions-sliced
2 jalapenos
1 head of garlic-minced
Ginger (equal to garlic) – minced
1 small can of tomato sauce (8 oz.)
1 butternut squash-peeled and quartered
1 bag of carrots (about 6-8)-peeled
3-4 potatoes-peeled and cut in half long ways
2-3 sweet potatoes or yams-peeled and cut in half
1 acorn squash- peeled and cut in half long ways
1 head of cauliflower-washed and quartered
½ head of green cabbage-washed and quartered into wedges
1 can of garbanzo beans
1-2 boxes of couscous, follow directions of package
Optional: add other fall vegetables that are in season like squashes and root vegetables
Directions:
Over medium heat, brown an onion, take care not to burn the onion add the jalapeno at this time, trimming off the top if you want it spicier. Toss in meat and brown lightly. Cover with water and let simmer on medium heat until meat is nearly tender, this may take 2-3 hours, bear in mind there will still be 45 minutes of cooking to follow, don’t over cook the meat or it will be stringy.
Add garlic, ginger, salt, pepper, a pinch of cayenne pepper, turmeric and cumin, and tomato sauce. Layer in the vegetables starting with the ones that take the longest to cook. I start with the dense squashes and carrots, then add to root vegetables and finish with cabbage and cauliflower on top. Lastly, add the garbanzo beans. Avoid mixing as this breaks up the vegetables, only lightly mix if necessary. I like my couscous soupy so I tend to add quite a bit of water, enough to nearly cover the vegetables. Though this is not traditional, it has become a family tradition and allows extra liquid for making the couscous.
When the vegetables are all tender, turn off the heat and prepare the couscous. Follow the direction of the package.
Presenting the dish is as important as cooking it. In a large shallow serving dish, add a thick layer of couscous, evenly spread the couscous around. Next add the vegetables and meat. Using a strainer, add soup to a bowl to add separately to each plate.
Hana’s Tip: Instead of using water to make the couscous, substitute couscous broth for water for a richer, tastier couscous.

How To Make Moroccan Harira Soup
This Moroccan soup became an instant favorite for my family and friends. I highly recommend you give it a try. It’s an easy recipe that’s harty, filling, nutritious, and delicious. You can serve it as an appetizer or as the main meal; we’ve done both. While it does take some time to prep and cook, you can easily make a big pot of this for company, or have plenty for leftovers to eat for a few days.
My friend, Laura, who is married to a Moroccan, shared this recipe on Facebook at the start of Ramadan 2019, and I immediately added all the ingredients to our shopping list for that week and made it straightaway! I’m thrilled I did because it became the “Soup of Ramadan” for this year. The “Soup of Ramadan 2018” was a tomato soup that my friend, Megan, made. Yes, my friends are awesome 😉
I’m happy to keep this recipe going throughout the year with our Ibn Battuta unit study. While I’ve made some changes to the recipe, it’s also possible that Harira soup is a modern day recipe inspired by some dishes that were common during the 1200s in North Africa.
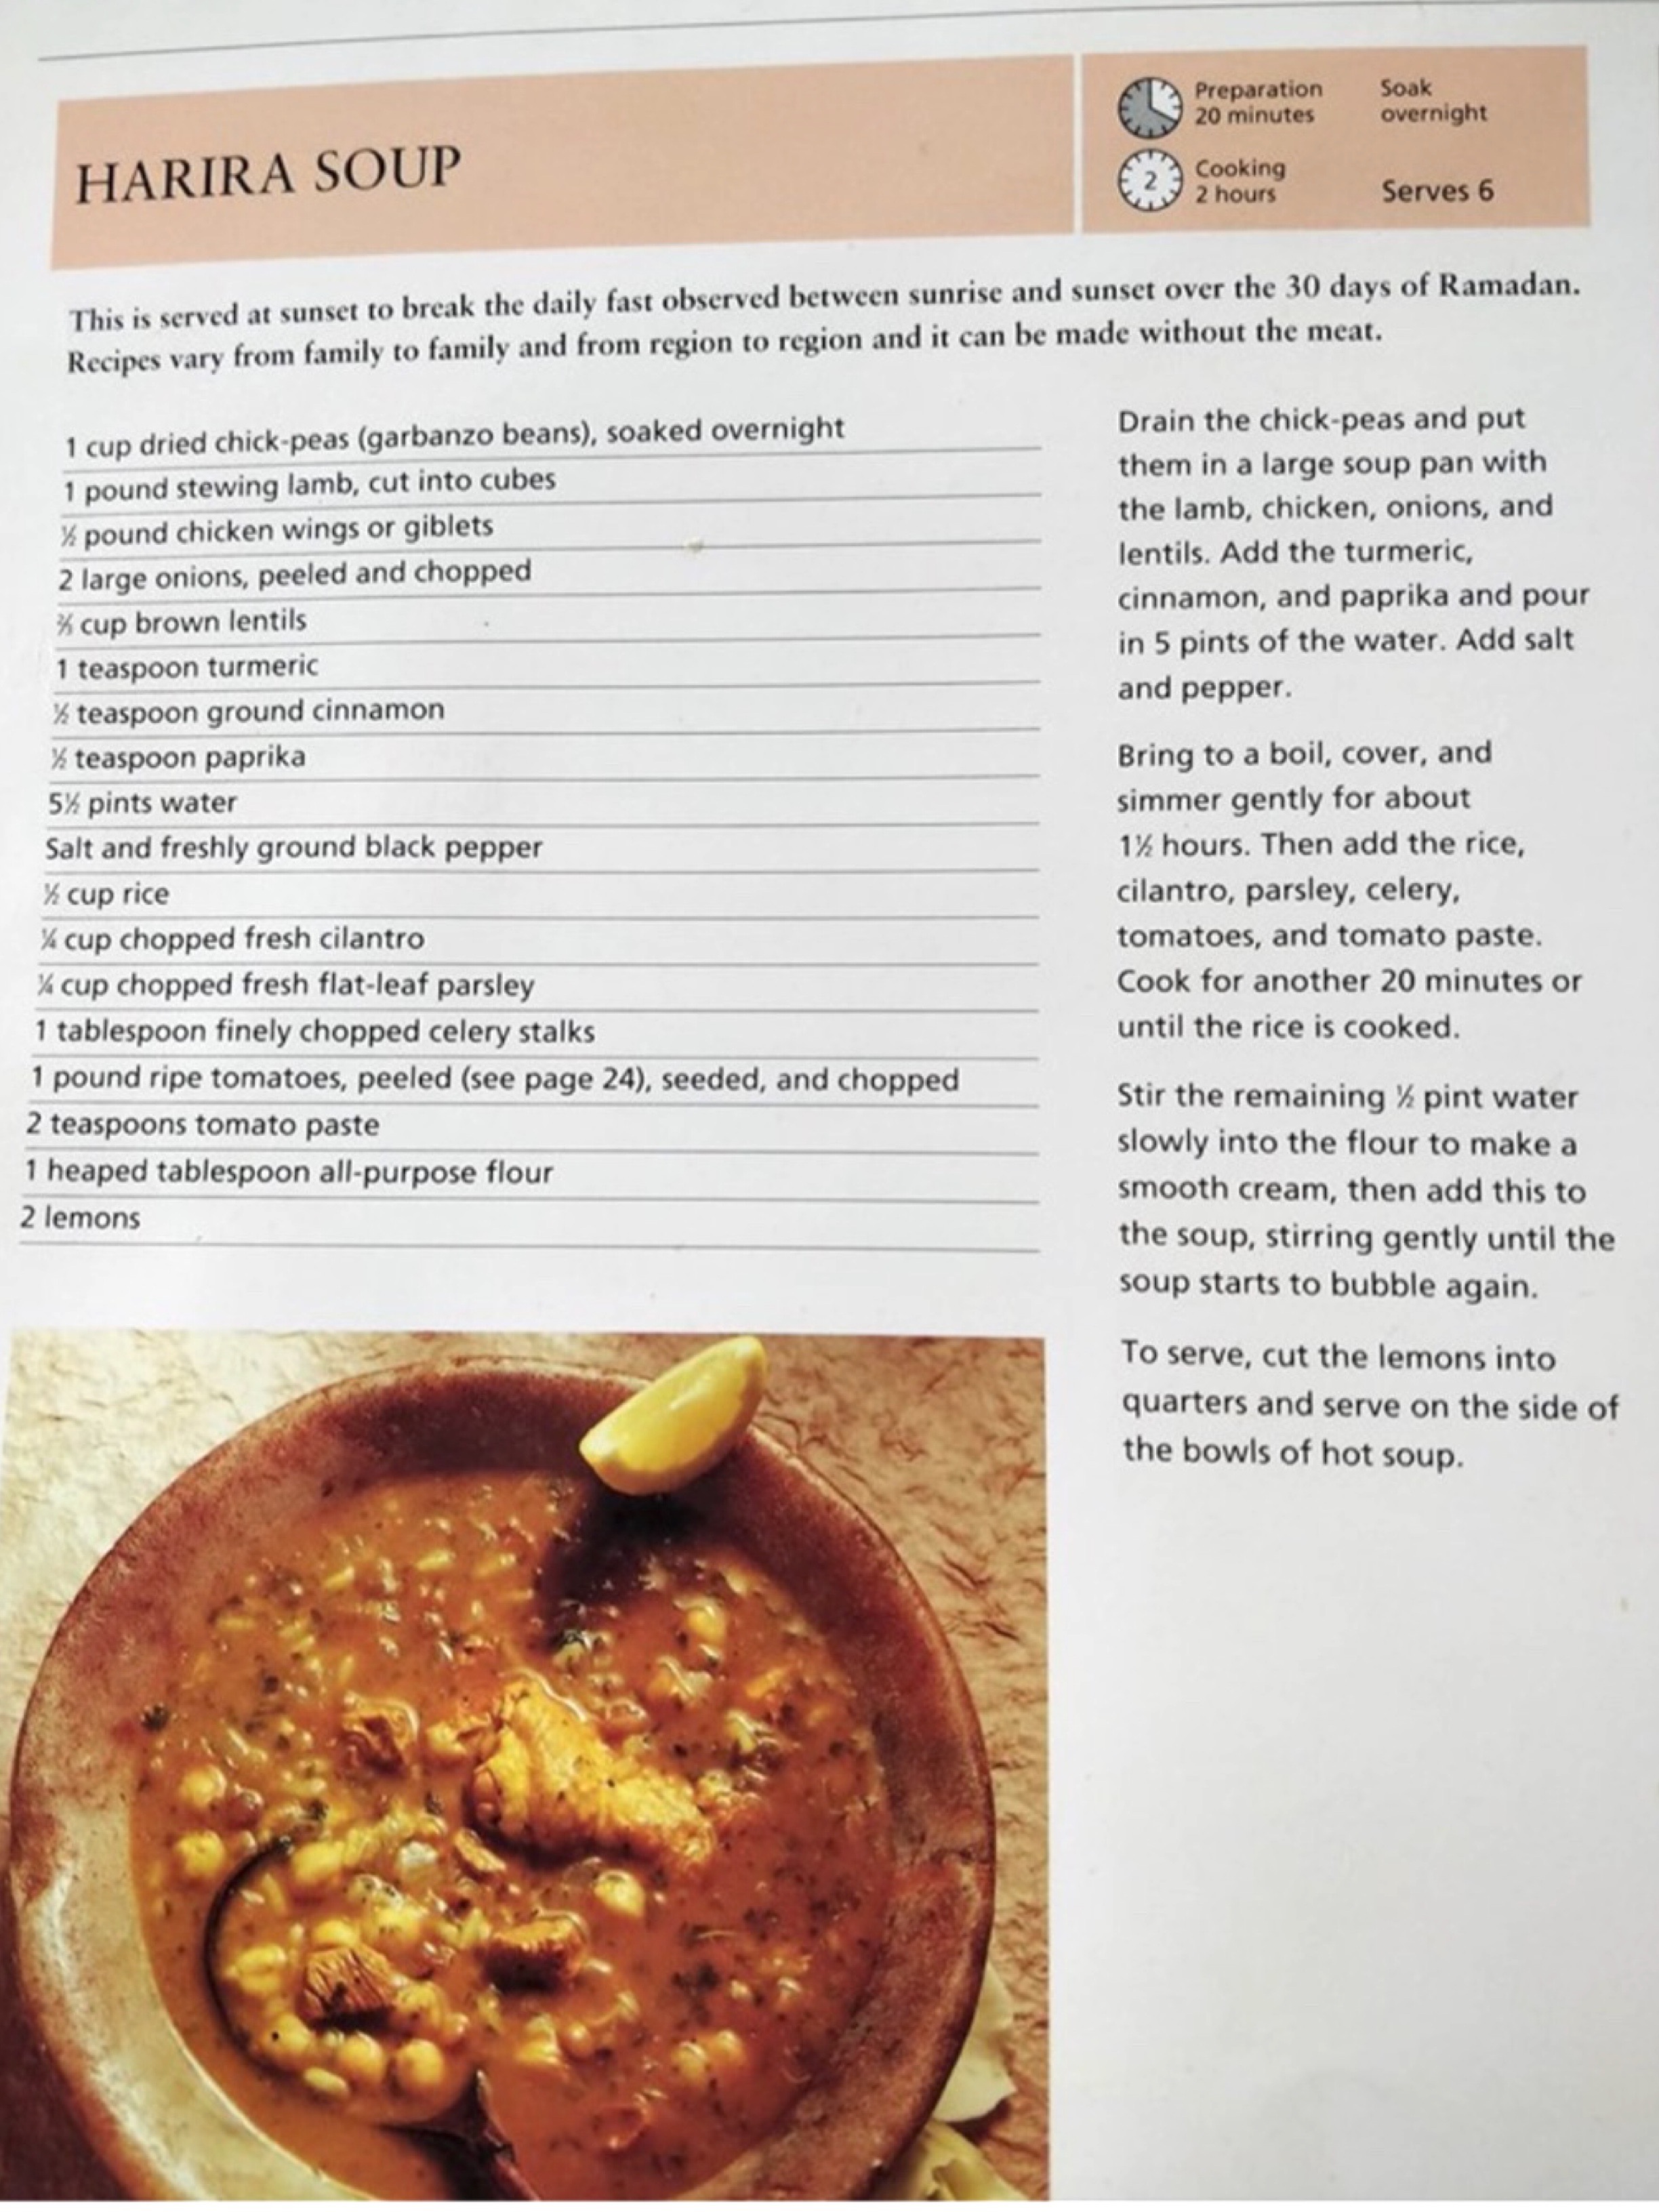
The original recipe can be found in the book Recipes from Morocco by Sufo
Here’s my version of the recipe which probably tastes just as good. And the thing is, you can add or remove ingredients depending on what you have and I think you’ll still end up with a rich tasting recipe.
Ingredients (serves 10 for a main meal 20 as an appetizer):
- 1-2 pounds of lamb stew or 5 pounds lamb shoulder
- 4-6 chicken wings
- 2-4 diced onions
- 2-4 diced tomatoes
- 1-2 cups of green lentils
- 3-4 cups of garbanzo beans (1-2 cups if they are dry)
- handful of flat leaf parsley
- handful of cilantro
- optional: serrano pepper
- up to 1 can of tomato paste (6oz)
- 4 cloves of crushed garlic
- 10-14 cups of water
- salt and pepper to taste
- 2 teaspoons paprika
- 2 teaspoons turmeric
- 1 teaspoon cinnamon
- 1 teaspoon cayenne (optional)
- 1 teaspoon onion powder (optional)
- 1 teaspoon garlic powder (optional)
- 1 teaspoon cumin (optional)
- 2 cups egg noodle (very fine or tiny pieces)
- olive oil
Heat 4 cups of water in a small pan. Brown lamb in olive oil with chicken wings and 2 onions in a large soup pot. Once browned, add spices, tomato paste (or can be added at the end), 2 tomatoes and spices. Add more water if the meat isn’t covered. Bring to a boil then reduce to a simmer and cook for 1-2 hours until the meat is soft but not quite done. Once the meat is soft, but not falling apart, remove chicken wings (they cook faster). Add 2 tomatoes, 2 onions, cilantro and flat leaf parsley, and lentils. Cook for 10 minutes. Add egg noodles and cook a remaining 10 minutes. Add serrano pepper at any part of the cooking process depending on how spicy you like it. Meanwhile, remove the chicken from the wings and return to the pot. Serve hot! It’s soooo good!!
Instant Pot variation: Brown lamb shoulder in the Instant Pot (or on the stove in a larger pot, my meat couldn’t brown well in the Instant Pot) with chicken wings and 2 onions. Add 4 cups of water, spices, tomato paste, 2 onions, 2 tomatoes and soaked garbanzo beans. Cook for 30 minutes on high pressure. Remove meat and chicken when done and remove all the meat from the chicken and lamb. Keep the liquid in the pot and add lentils, egg noodles, 2 more onions, 2 more tomatoes, cilantro and flat leaf parsley. Cook again for 5 minutes. Add meat back into the instant pot and serve hot. Optional: add lemon before serving.
Find me on YouTube, Twitter, Instagram and Facebook
How to Make Buried Vermicelli
This recipe, Buried Vermicelli, is from the book Arabesque A Taste of Morocco, Turkey and Lebanon by Claudia Roden. I loved this recipe!! It’s than the Moroccan food I typically make so I was excited to explore pairing orange water with cinnamon and sugar for a slightly sweet take on a pasta and chicken dish. We love adding regional recipes to homeschool unit studies and often, we end up with new family favorites. What distinguishes this recipe from others are the cinnamon and orange water, the sweetness of this otherwise savory dish and the chicken broth and onions that are boiled down for a rich sauce. Overall this recipe is amazing, however, a sweet & savory dish isn’t for everyone. You may need to balance this recipe with a salty savory appetizer or skip dessert!


How To Make Moroccan Fish Soup
We almost always cut our recipes in half when we are trying something new. That way we can explore new cuisine without worrying if we are going to waste anything if we don’t like it. For this recipe, that was a mistake!! As soon as I was done making it, and we started sampling it, it was nearly gone before I had completed the rest of the meal. I hustled to defrost more Alaska cod, and my 14-year-old son helped chop the ingredients we needed for this simple, yet wholesome, warming and delicious soup. Well, here’s what happened. I had run out of brown onions, so we substituted with a red onion. That was a mistake! While red onions may taste similar, their color is not. And for many recipes the color may not matter, but for this one it did! The whole soup turned a brown which stained the white cod and left the broth kind of murky. While it tasted the same, it wasn’t appetizing. I also substituted homemade chicken bone broth for water and that added a depth of flavor as well. One ingredient I don’t typically use is nutmeg and this recipe calls for about 1/4 teaspoon. That added flavor along with our chicken broth and the simplicity of the fish and carrots has turned this recipe into a family favorite. I hope you’ll try it too!


Spicy Moroccan Carrot Dip
We often head to the kitchen when doing our homeschool unit studies as this adds flavor to our lessons. Sometimes we simply cook a single recipe, other times, like today, we cook up a whole feast! But this was mini feast and included dishes you might not immediate think of as Moroccan. When I think of Moroccan food, I think of tagine, couscous and harira. Those our recipes we have been making for years, so I decided to add some new things that are not so different to some of the recipes we already use. However, this carrot dip was a first for us. While I usually only make half the recipe to start out with, this time, I needed to add more carrots because the spices were a bit strong for us. In the end, only my 14-year-old son really liked it. The rest of us weren’t so keen on it. If I made it again, I would reduce my spices, especially garlic and ginger as they are extra potent when they are raw.


Moroccan Tomato and Red Onion salad
I love a good salad, and while I prefer more in my salad than just tomatoes and red onions, this Moroccan salad makes the ideal side dish to a main entree. I paired it with BBQ chicken and spicy green beans. This side dish was part of a mini Moroccan feast we made for our lessons on Ibn Battuta and North Africa. While putting this unit together, we focused much of the cuisine on Moroccan food, but Ibn Battuta was a world traveler, and didn’t return to his home county for decades. This recipe is simple and I recommend using the tastiest tomatoes you can find and slicing them from the bottom up rather than from side to side.


Moroccan Spicy Green Beans
I’ve seen green beans in tomatoes in many different cuisines so I don’t immediately think of these are being Moroccan, but I have to admit, while I enjoy eating this one, I have never made it before or any variation of it! We don’t eat a lot of green beans and when we do, it’s simply grilled with olive oil and seasoned with salt and pepper. After making this, I’ll definitely be adding this as a side to some of our other meals and since we cook a lot of Indian food, I can see myself adding more Indian spices as well. Here are my tips for this recipe. Don’t overcook the beans. I made that mistake and they were too soft by the time I plated them. Also, mind how much liquid you add. I substituted homemade chicken bone broth for water and I love the additional flavor that gave this dish. But, I added too much! Go easy on the liquid as the tomatoes give off a lot of liquid, especially if you leave the seeds in.


BBQ Moroccan Chicken in the Oven
I’m still kicking myself for overcooking this recipe. Just five minutes less and it would have been just right. So my first tip is mind the grill or oven when you are making this. I opted to broil the chicken in the oven rather than grill them or barbeque them. I was a little rushed so I also decided not to skewer them. I actually like that a lot better because it allows all the yummy marinade to get baked with the chicken. It also saves time since you don’t have to skewer them, and it also produces less waste. While we do have metal skewers, I often use bamboo skewers. I always end up with a splinter or two. Also, since we have children (though now they are nearly all grown), I find skipping the skewers means that children will just take what they need rather than a whole skewer. I also had run out of brown onions so I used a red onion which was a delicious substitution. I hope you try this recipe along with some of the sides we made for our mini Moroccan feast.


Orange and Date Salad
What a great way to end (or start) a meal than with sweet seasonal oranges garnished with dates and blanched almonds with a drizzle of lemon. The key to the success of this recipe is sweet seasonal oranges! We live in Southern California and our oranges are delicious! So imagine my surprise when we got a tasteless bitter bunch of oranges when buying the ingredients for this mini Moroccan feast for our homeschool main lesson block on Ibn Battuta and North Africa. No amount of garnish or sugar or lemon could enhance this recipe enough. So my tip is make sure you are using the best oranges you can get for the best success for this recipe. Enjoy!


Find me on YouTube, Twitter, Instagram and Facebook
Geology of North Africa
We recently got several excavation kits from Excavating Adventures. While they don’t exactly fit with this unit, I’m adding the kits here as North Africa and other parts of the world that Ibn Battuta traveled through were rich in fossils, seashells, gems and rocks.
Dinosaur Excavation kit
The Dinosaur Excavation kit from Excavating Adventures is one of the most creative kits we used. Each month (if you are doing the monthly subscription kit), you get a different kit to excavate and explore. What’s unique is that each excavation kit is in a different material. The kits we’ve used and loved in the past (primarily from Dig, Discover and Display among others) have been set in plaster. While plaster may seem more appropriate of a material to excavate through to give a more authentic feel to being a paleontologist, having each kit in a unique material adds to the excitement and experience of the kit. The dinosaur kit comes in a gooey slimy material which is interesting tactile. While I did like the kinetic sand of the seashell kit (super creative!), I didn’t like the texture of the slime. My 14-year-old excavated this kit and he didn’t mind the slime and used the tools (as well as our own) provided. This kit will accompany our Geology and Mineralogy main lesson block as well.
Gemstone Excavation Kit
We recently got four excavation kits from Excavating Adventures and I have to say, I’m blown away at how awesome these kits are. Aside from the huge amount of speciums you get in each kit, you also get to excavate in unique materials for each kit. For the gemstone kit, you are excavating through a plaster/clay material. What I especially liked about it was that it was small making it easy for young children to excavate within 30 minutes or less. We typically do the excavating kits that require several hours to do so this is just right for young students and equally thrilling for older students as well. My 9-year-old daughter did this gemstone kit and the seashell kit while my 14-year-old son did the dinosaur and geology kits. This kit will accompany our Geology and Mineralogy main lesson block as well.
Geology Excavating Kit
We love our hands on projects and this time we are trying out a new company and their innovative kits. Recently, Excavating Adventures reached out to me to see if I would like to try their products. These are just the kinds of kits we normally buy and love so I said yes because we had run out of educational funding for that semester. I’m glad we took them up on their offer because we love these kits and are adding them to our wishlist for next semester. What’s especially wonderful about these kits is that you get a lot of high quality specimens per kit, plus get trading cards, a display case and a special added bonus item in every kit. Another quality that I love about these kits is that you can get the monthly subscription, so each month, you can have another hands on excavating adventure. This kit will accompany our Geology and Mineralogy main lesson block as well.
Discovering Seashells
I am totally surprised that so many seashells were packed into that tiny little tin! More too, I’m so impressed with the excavating material. Rather than excavating through plaster, children can discover the hidden shells in kinetic sand! Then they can play with it too! Once they’ve discovered all their specimens, they can identify them with the included card and arrange them in the display case that comes with the kit. Everything has been considered for this kit. The identification card fits just right into the display case. Once it’s shut, the treasures stay in place and don’t shift around or get lost. The trading cards provide additional information and a card sleeve is even included making it easy to add to a binder. The kits are designed to encourage you to complete the sets and with a monthly subscription offer, it’s super easy to add hands on activities for your children. This kit would work well with an ocean main lesson block, you can check out the complete Ocean Main Lesson Block video playlist.
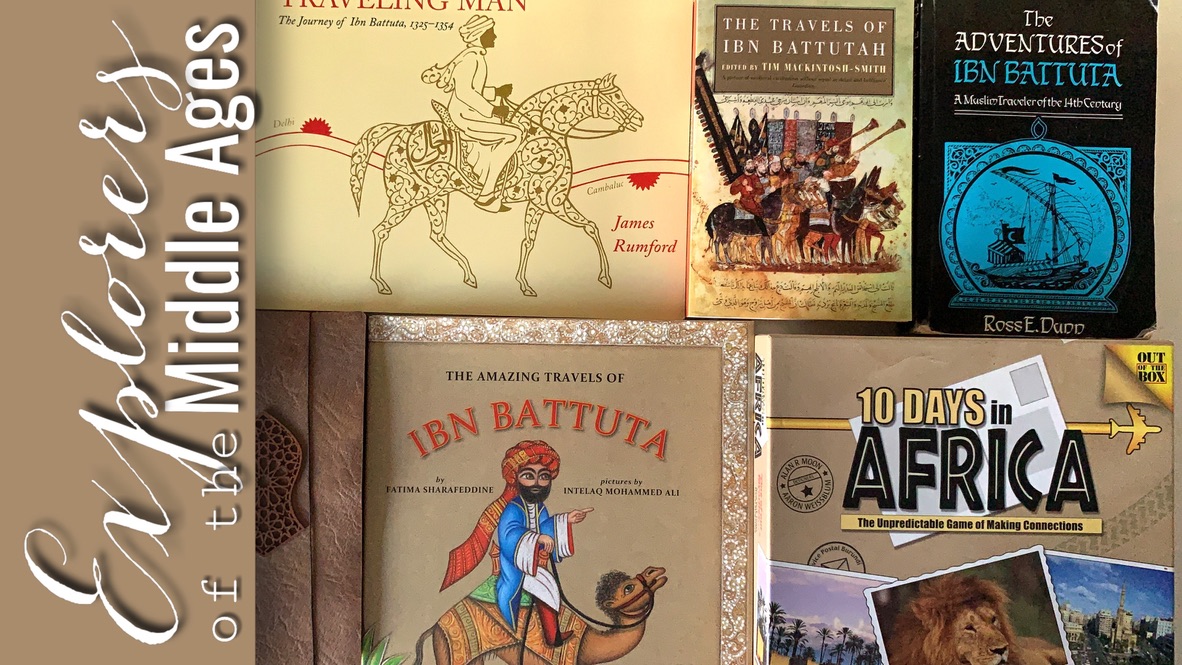
Review of Ibn Battuta Unit
At the close of my Unit Studies and Main Lesson Blocks, I like to review the books we used, the ones we didn’t get to and most importantly, the ones we didn’t like. We rarely don’t get through all the books in a unit as I typically choose far too many books than we have time for. In this case, we didn’t even open Moorish Architecture or The Mosque of Cordoba. We also didn’t finish reading a book I was really excited about: The Travels of Ibn Battuta. It is a translation of his Rihla and I had high hopes for it. We did re-read Ross Dunn’s book The Adventures of Ibn Battuta and liked it much better this time around, especially since we read it after The Travels of Ibn Battuta which ended up being a dry, slow and laborious read. Seeing as we didn’t finish the book, it’s entirely possible that the book redeems itself and is actually an intriguing read. We made our travel journals especially for this unit but included the sandstone mosque of Mali and the Ka’aba as projects for this unit. We did spend a lot of time in the kitchen making new and old favorite Moroccan recipes. While we have already done a number couscous and Tagine recipes, we opted to try new recipes and found the Fish Soup from Recipes from Morocco to be the stand out favorite.